DIGITIZING FILM AT THE KITCHEN TABLE
This article is an update to my digitizing process. I talk about what has changed for me in gear and technique. If you have not already looked at Part 1 and Part 2, you might want to read them as they will showcase my evolution with this process. Everyone does things a little differently. If you are like me, you enjoy reading how other photographers develop their techniques, what gear they like or dislike, etc. I hope you gain something to try or think about here.
AT A GLANCE
- WHY THE KITCHEN TABLE
- NEW & UPGRADED GEAR
- COPY STAND & CAMERA LEVELING
- FEEDING UNCUT FILM INTO THE FILM HOLDER
- FILM STORAGE & FILING SYSTEM
- HOW I TITLE LIGHTROOM FOLDERS
- IMAGE NUMBERING SYSTEM
- PREFERRED CAMERA & TECHNIQUE FOR DIGITIZING
- MY MEDIUM FORMAT DIGITIZING SETUP EVOLVES
- SPEAKING OF CAMERAS
- CLOSING COMMENTS
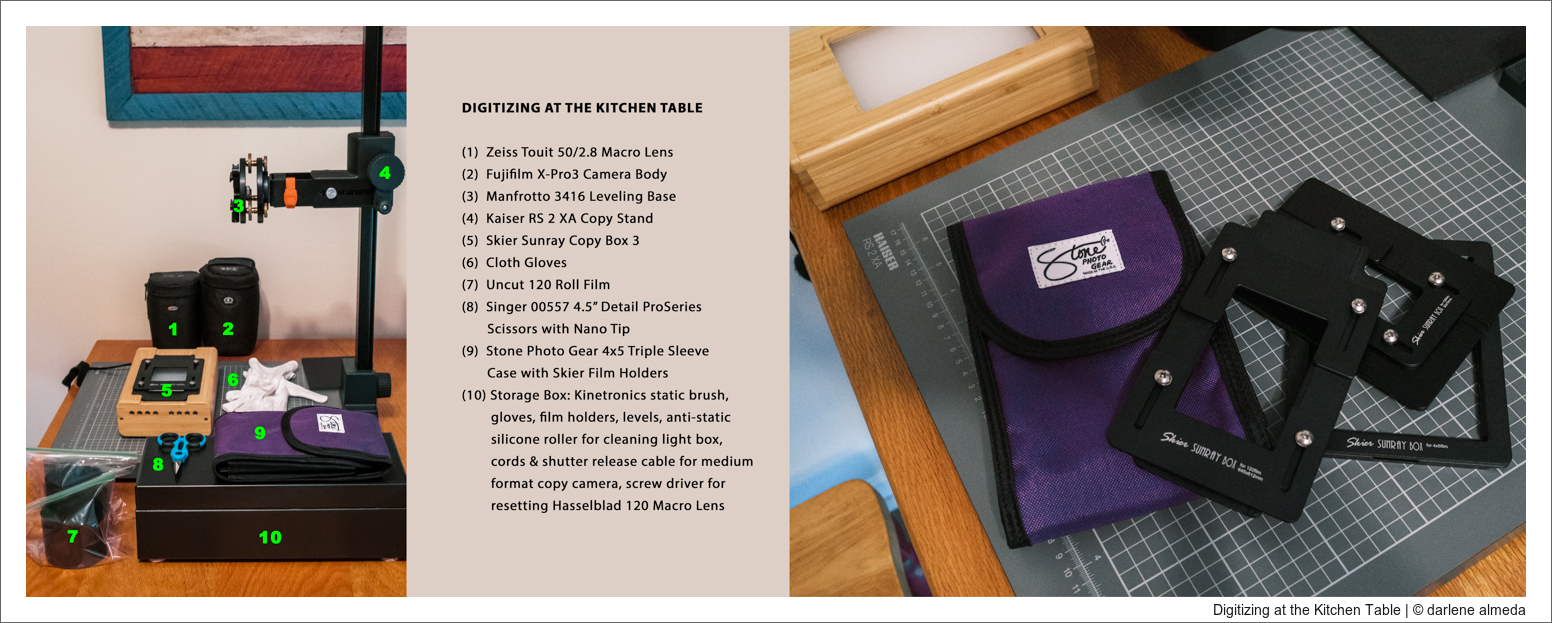
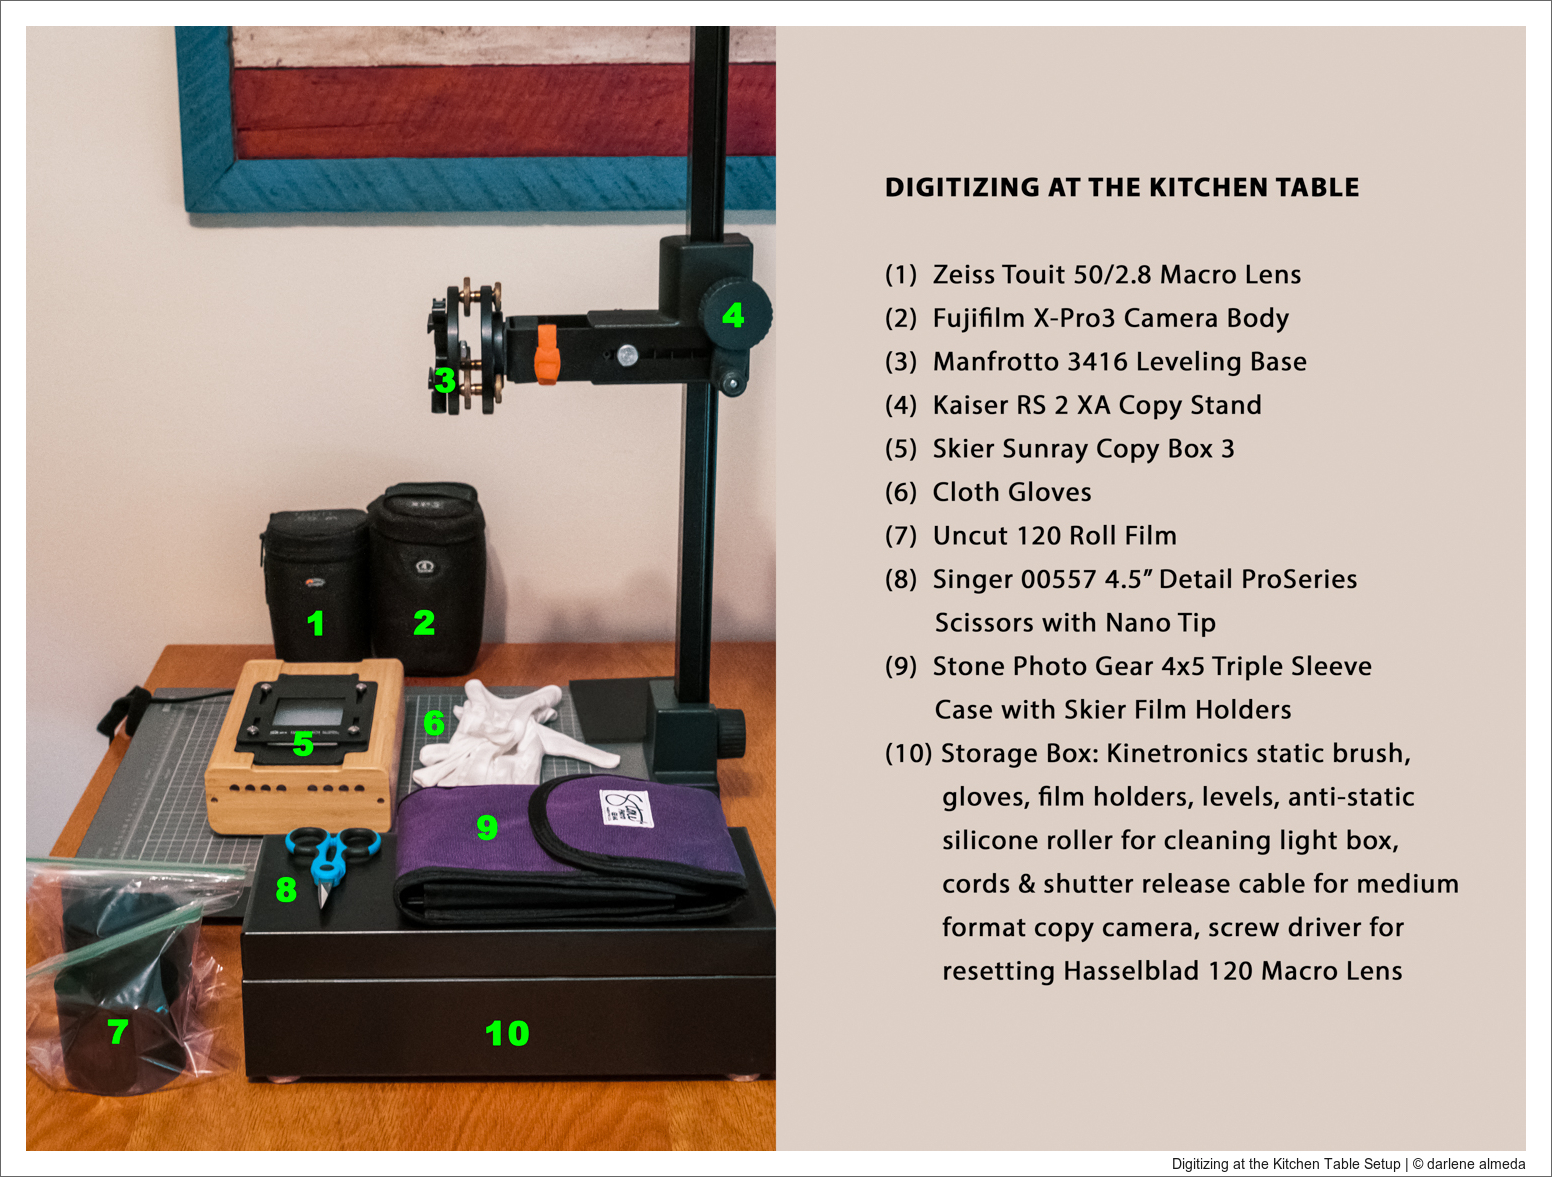
Kitchen Table Gear Setup
WHY THE KITCHEN TABLE
I had a studio addition built on my home years ago that serves as my work area. It has a nice digitizing station with a heavy-duty Beseler CS Copy Stand, so why am I at the kitchen table with my portable copy stand?
A few months ago (writing this July 2022), a vast water oak fell on our home during a turbulent 24 hours of tornado warnings and non-stop torrential rain. It fell through portions of the studio roof, causing an immediate evacuation of all equipment. Flooding proceeded, and more than 25% of the roof was destroyed, along with damaged roof trusses, facia, gutters, doors, and interior walls. It has been a journey, especially having to deal with an almost absent insurance company, but no one got hurt, and for that, I am very grateful.
The show must go on, so I have been digitizing my film at the kitchen table with my very capable Kaiser RS 2 XA Copy Stand, Fujifilm X-Pro3, and Skier Sunray Copy Box. I have learned a few things from doing this and felt it was time for an update. I will be referring to the contents of the above image throughout this article. The black box holds all the smaller items I use for digitizing, including the film holders in their case. This box has also been used as a platform for the Skier Sunray Copy Box when a small amount of height had to be eliminated between the film and lens for correct focus on the film plane while using my medium format setup and a particular set of extension tubes.
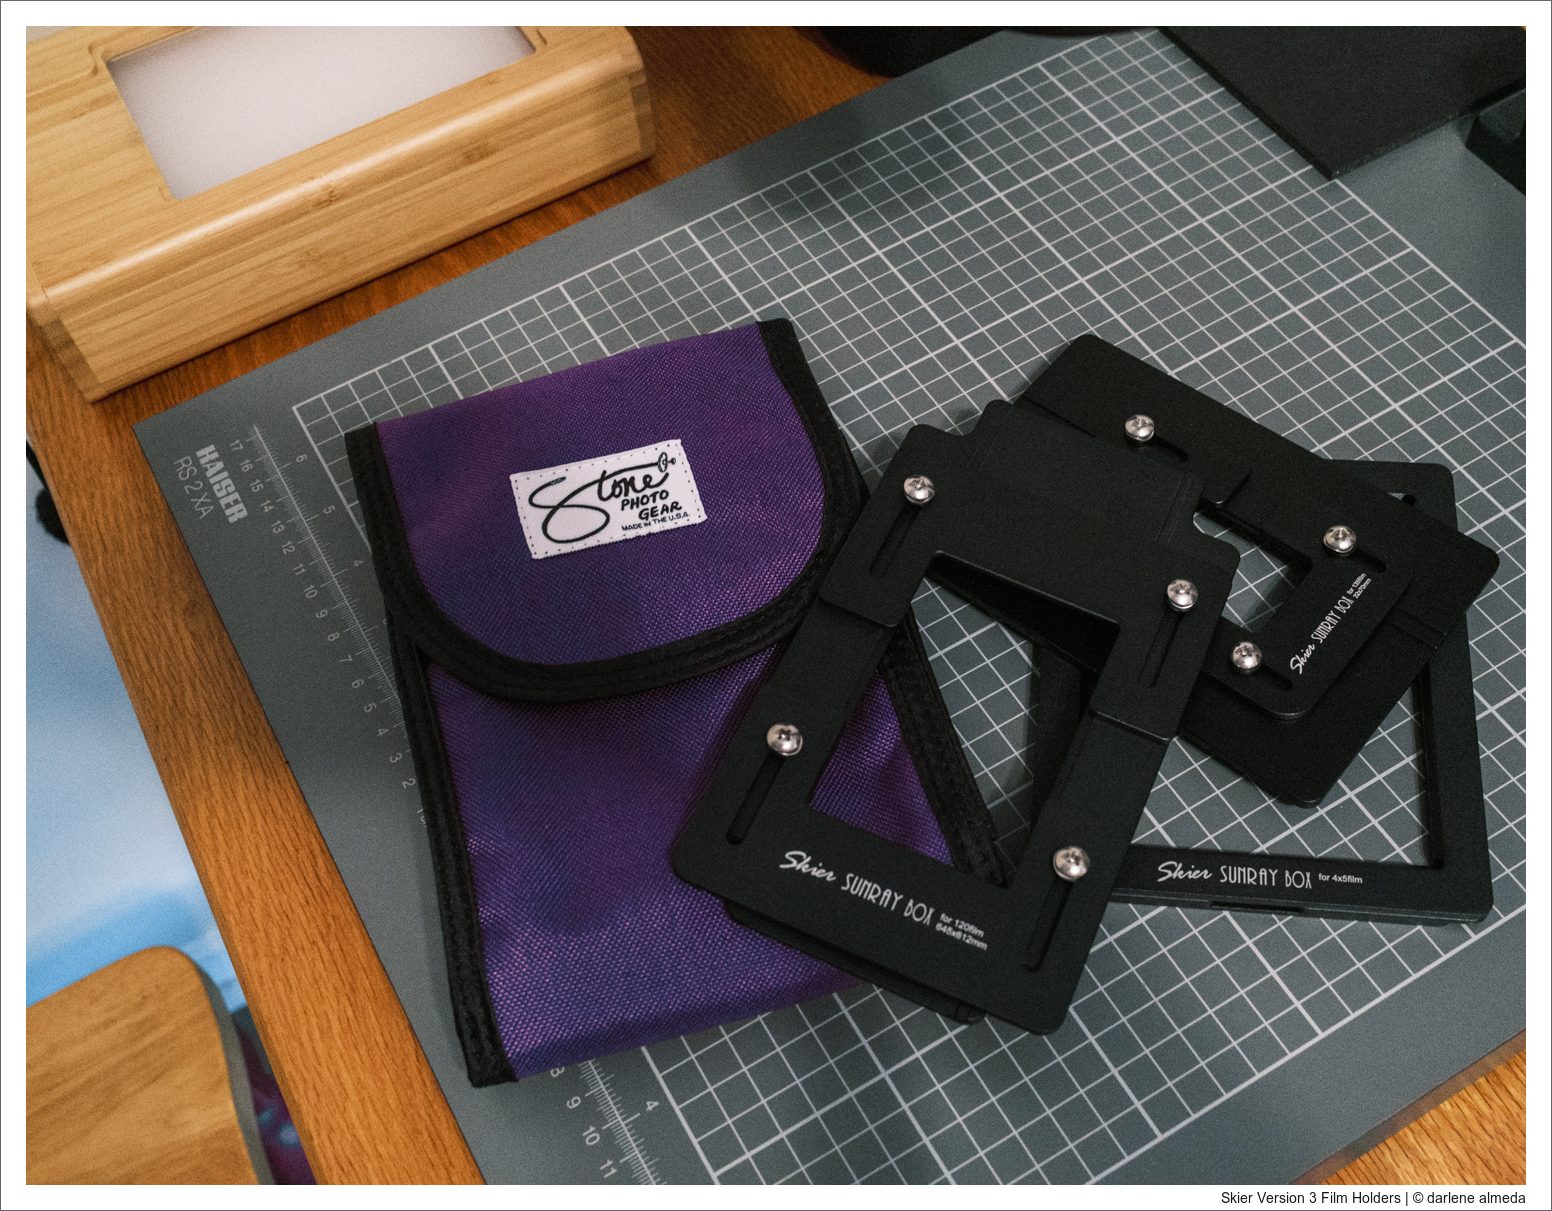
Skier Film Holders & Stone Photo Gear Case
NEW & UPGRADED GEAR
Early in my digitizing process, I bought a Skier Sunray Copy Box with 120 and 135 film holders. I have been happy with this system but was hoping eventually; they would add 4×5 and 6×12 film holders. Glad to say, the Skier Sunray Copy Box 3 Kit includes 4×5 and 6×12 film holders! Before having these film holders, I used a Kaiser lightbox with a Microtek 120 film holder (I will still use it for 6×17 if I ever get there) and an Omega enlarger 4×5 film holder. Also new to version 3 is a three-way power toggle switch that I do not use. I choose full power and switch the light off after each 120-roll or 4×5 sheet. It still gets darn hot as there is no internal fan to help cool it down, but I still enjoy using it. The price is right for what I need.
I store the Skier Film Holders in the Stone Photo Gear (SPG) 4×5 Triple Sleeve Case. I use SPG cases for my 4×5 film holders, exposed 120-roll film, 4×5 camera, and lens storage. SPG produces high-quality products for my traveling needs. Their products are custom-made so that I can pick the color and size. I always toss the inserts out of my backpacks and fill them with gear stored in custom cases made by SPG, Lowepro, and Tamrac. I find it easier to stay organized this way (see Camera Bag Versatility & Lens Case Recycling), and I quickly fill my backpacks with the gear I need. In the gear setup photo above, you can see my X-Pro 3 and Zeiss Touit 50/2.8 Macro Lens are stowed in Lowepro and Tamrac cases.
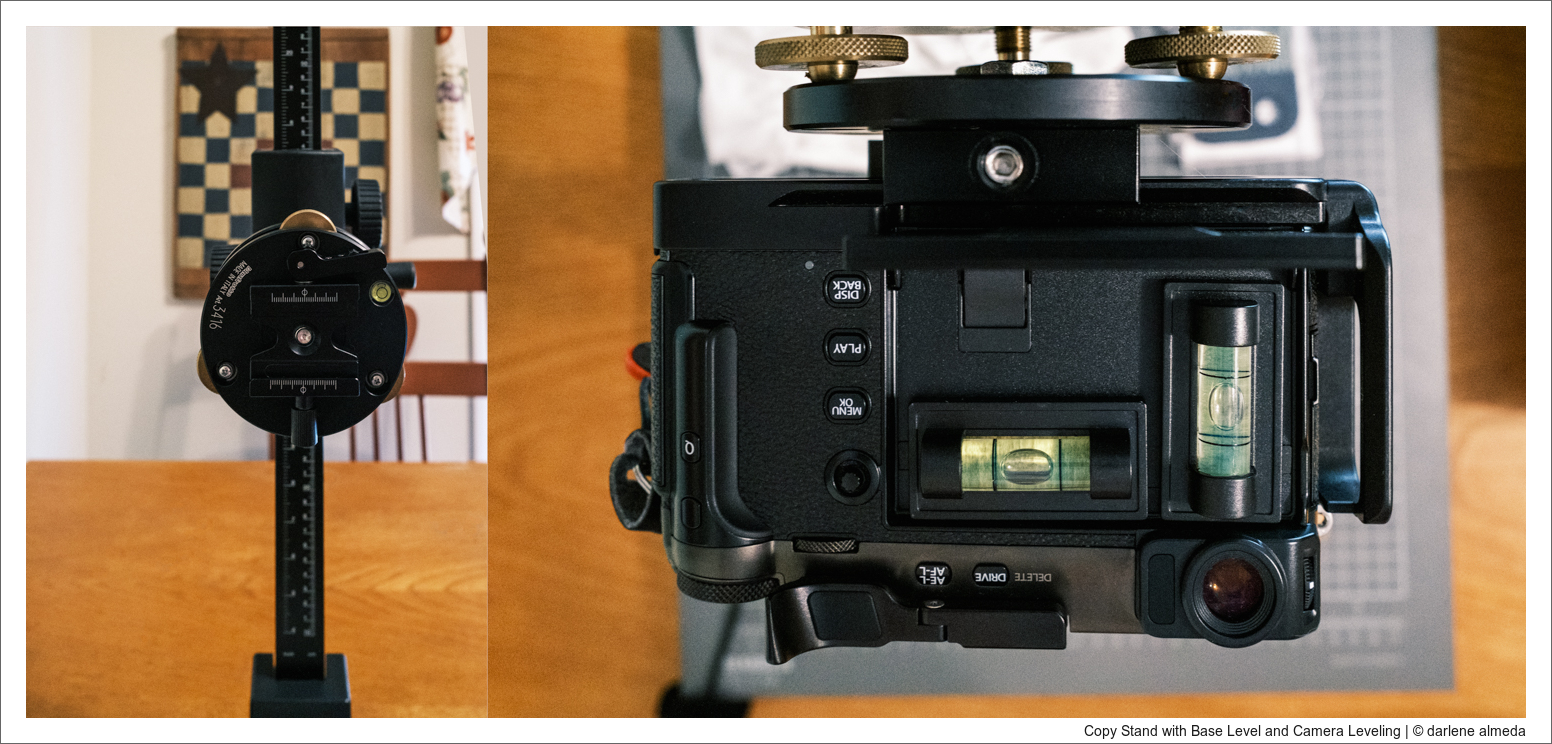
Copy Stand with Manfrotto 3416 Leveling Base & X-Pro3 Leveled
COPY STAND AND CAMERA LEVELING
One thing that never changes is having to level the camera. I found the camera was never level attached to the copy stand-alone and had a small ball head for help with leveling. Eventually, the ball head was removed for use on a tabletop tripod. After considering what I would prefer, I decided a simple leveling base would be best. I have two tripods for working outside the studio that have excellent leveling bases, and I did not want to remove or repurchase them. So I started a search for an affordable, used leveling base. I came across a Manfrotto 3416 for under $50 shipped. It is not the most straightforward leveling base I have used, but once I got it leveled, it stays level. I move the copy stand from the kitchen table to store it, which seems to stay level between trips. At first, I thought this particular leveling base would be overkill for this size copy stand, but overall it was money well spent.
Some photographers prefer to use a mirror when leveling their camera; I do not. I have used inexpensive bubble levels since the beginning of my digitizing journey. The Fuji X-Pro3’s screen is up in the photo above, and the bubble levels are across the camera’s back. I use the same bubble levels and technique with my medium format digitizing setup, but on the Beseler CS copy stand. My files come out just fine between the leveling base and bubble levels. Whatever works for you is what is essential. I do not think anything is ever genuinely level, even though my inexpensive and expensive levels say so. Lightroom’s transform tool is where I do it when I need to make minor level corrections.
Plastic Bags Work Well For Storing Film Before & During Digitizing
FEEDING UNCUT FILM INTO THE FILM HOLDER
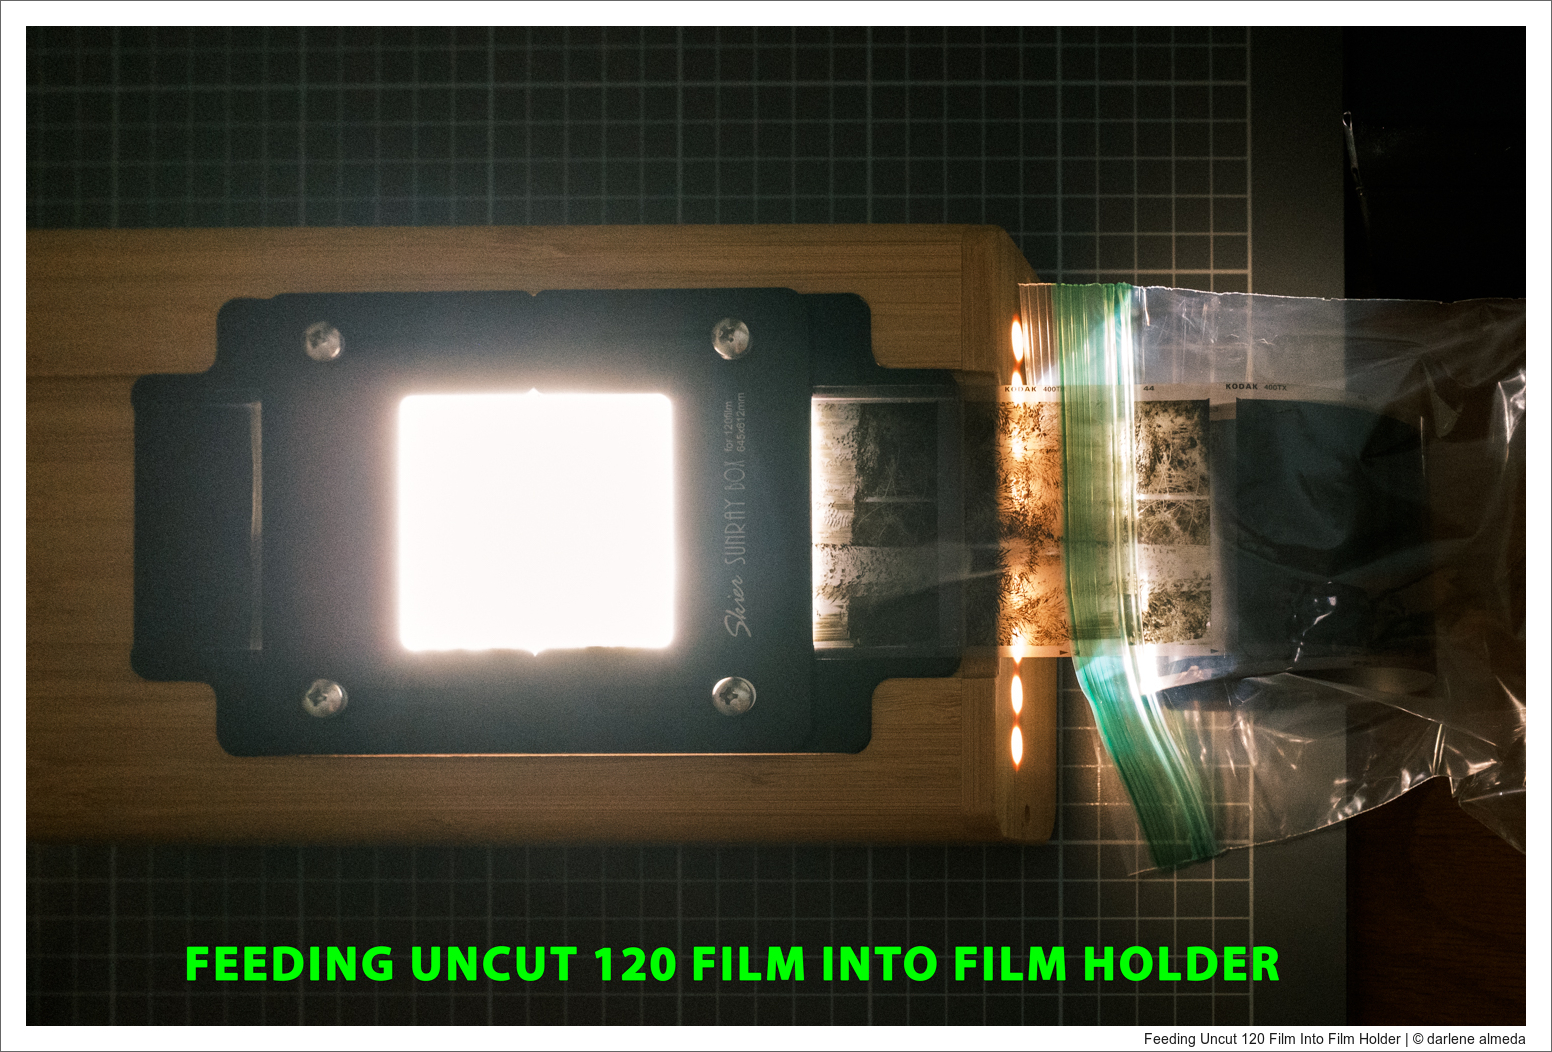
I needed a way to hold my uncut 120 films as it was fed through the film holder without touching anything and rolled up. In the photo above, you see my film is in a plastic sandwich bag fed into the film holder for digitizing. What is not pictured is the bag I will have in place on the other side of the film holder to catch the film after it exits the holder. After about two frames make it into the exit bag, I roll it up, and it will roll into the bag by itself, although sometimes I may need to roll it again. This works for me, as I did not want to buy more stuff. Below are the steps I use, from the (1) finished dried film to (2) cleaning it in preparation for (3) digitizing to (4) bagging it.
After my film has dried overnight, it is removed from the wall-mounted retractable clothesline above my tub. I always wear cotton or anti-static cloth gloves when handling film. For each 120 roll: I hold the film with my left hand, and using a 2.5-inch Kinetronics StaticWisk with my right hand, I make two long downward strokes across the film to clean it (never going backward). Two on the right side, turn the film over; two on the right side, flip the film and repeat. The film is loosely rolled up with frame #1 on top, then placed and sealed in a plastic sandwich bag until I can digitize it. I find my film is clean and dust free doing this procedure.
When I process my film, I use either a Pyro developer or Rodinal and always use a tiny bit of Kodak Photo-Flo in the final rinse. I do not squeegee my film; I pull it out of the film tank and hang it to dry. If your bathroom is a dust magnet, run the shower for a few minutes before hanging your film. The weight of the moisture in the air will help pull any dust down.
Now that my film has been digitized let’s see how I organize and store it.
Film Storage and Filing: (1) 120 Film Pages + (2) 120 BW Holding Binder
FILM STORAGE & FILING SYSTEM
Organizing digital files and film can quickly become daunting if we do not have a well-thought-out system. I am an organized person. I had to be to get where I had gone. For my photography to be best organized, my digital asset management (DAM) software has to handle all my needs. I do not want to use one program as my primary post-processor and another for file organization if there is one program that can do it all; Adobe Lightroom does it for me.
In 2006 when Adobe Lightroom first appeared as a beta, I was invited to be a tester. At the time, I was using Image AXS by Digital Arts & Sciences and SilverFast’s Archive Suite. I found Lightroom’s user interface (UI) to be better than what I was using and thought it would have a future since Adobe was producing it. I was already a committed user of Adobe Photoshop and Illustrator (and other Adobe programs), so I was hooked. There is nothing wrong with using multiple programs if that is how you do it, but Lightroom is my Grand Central Station and Archive Department.
I use Photoshop and NIK software for specific tasks, but 90% of all my post-processing is completed in Lightroom. I taught Lightroom in the college classroom and privately for over a decade; I have had access to other popular software programs, but nothing has been able to tear me away from Lightroom since I first started using it. Even a free copy of Capture One that came with my Phase One digital back could not win me over, so you know where this is going.
AFTER THE DIGITIZING, WHAT’S NEXT?
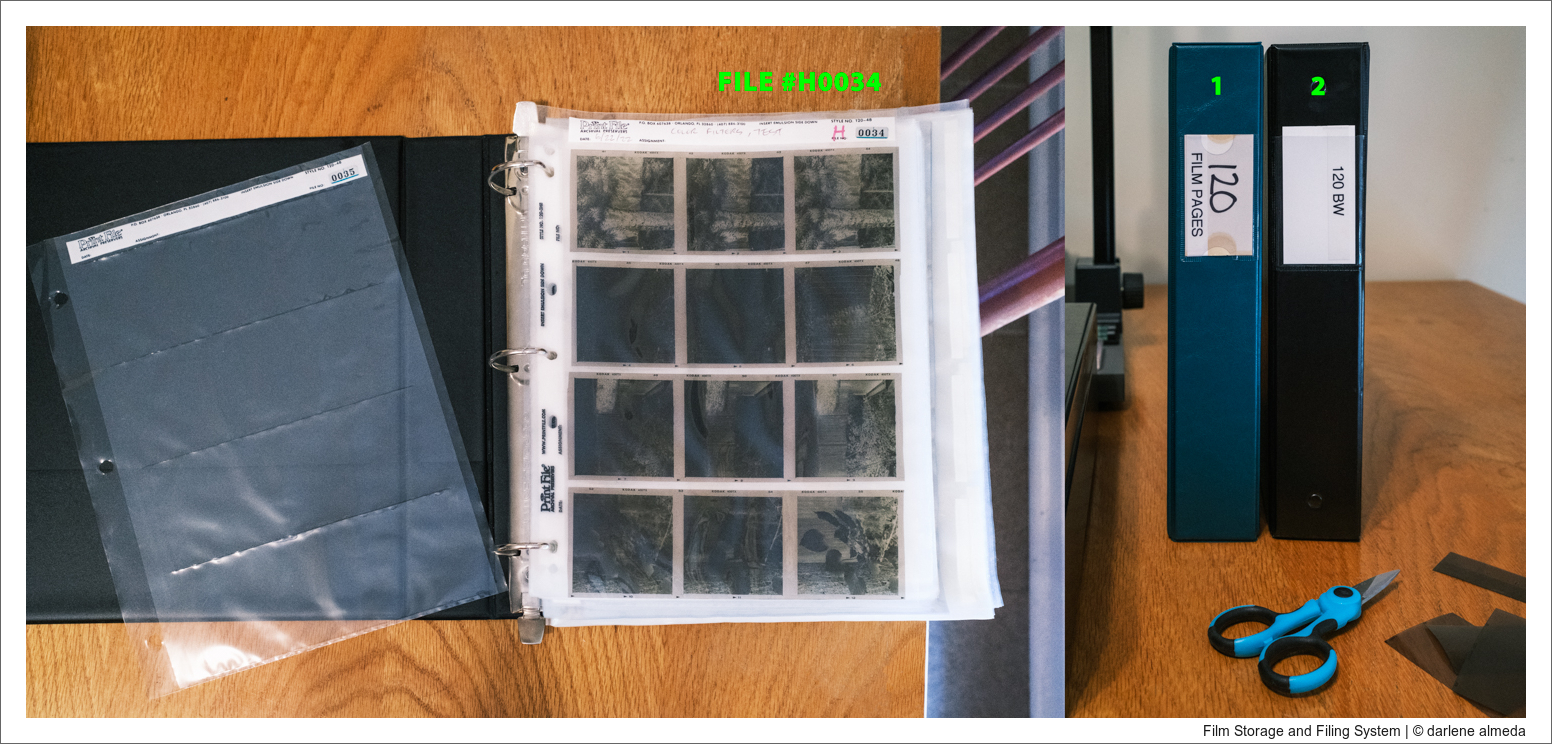
After my 120 film is digitized, it is cut using small precise scissors and placed in Print File pages for archival storage. I have used different types of scissors over the years and find the Singer 00557 4.5 Inch ProSeries Detail Scissors with Nano Tip an excellent choice for cutting roll film. I keep a stash of Print File sheets in green binders (#1 in the above photo, #2 below on the shelf) labeled by film size. When a binder becomes low on Print File pages, I order more in 100-page quantities. All my film and Print File binders are organized by year and film type on shelves in my home office.
Before I place the film inside the page sleeves, I write pertinent information like date, location, and shooting/equipment/processing notes, if necessary, in the small text area. For 4×5 film, if necessary, I write on an index card and place it in a sleeve next to the film for reference. I assign each sheet a descriptive file code of my design. The above image on the left is a sheet of 120 film assigned the file code H0034. The “H” stands for Hasselblad, and the “0034” is a random number from a roll of twin check stickers. When I have the time, I apply twin check stickers to empty file sheets to be ready for use. Because the stickers have two of each number, I apply half on 120 sheets and the rest on 4×5 and pano film sheets to ensure no file code repeats. The first letter represents the camera that shot the film; as in the above example, it is Hasselblad. This unique file code is entered into Lightroom’s keyword area at the time of file ingestion. My cameras codes are:

Once the film is properly filed in a Print File sheet, it is placed into a black holding binder (#2 in the second image from above, #1 in the image below on the shelf). Once the holding binder is full, it is given a proper name on its spine, for example: “2021-2022 BW 120” If necessary, a tab divider would be inserted between where 2022 begins and 2021 ends. A new black binder is then pulled from my binder stash and labeled “120 BW” until it fills up, and the process begins again.
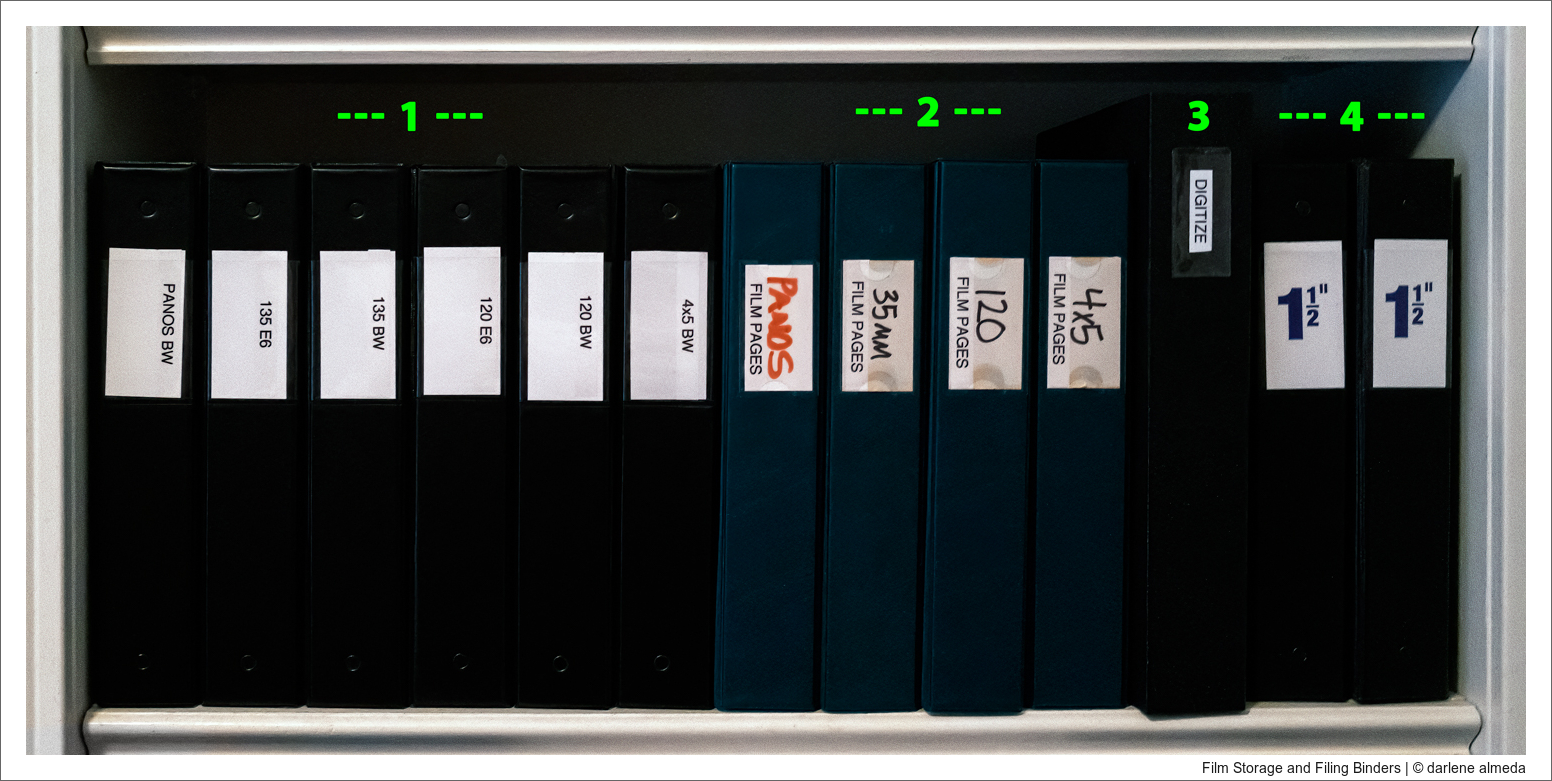
My Working Shelf
#1 Holding Binders
#2 Film Page Supply
#3 Pulled for Digitizing
#4 Empty
Above is an image of ‘my working shelf’ in my home office. You will notice no color film labels other than 135 & 120 E6. That is because I shoot color images with digital cameras. Occasionally I will shoot color chromes, but it takes years to fill a binder of color film images. The funny thing, my career started with shooting 4×5″ chromes for advertising and 120 color negatives for portrait work. Time has changed things for me, but the one constant has been my love for 4×5″ and 120 black and white film. A beautiful black and white image with a fine-tuned tonal range and pleasing contrast is a work of art for my eyes.
Binder #3 is where I place older films I want to digitize for my blog, teaching jobs, or publication. I will also deposit film in there that I feel might look better digitized, which was difficult to print years ago; I want to give it a second look. When I have the time, I will add a few images from the binder to my current digitizing workload. #4 Binders are empty and available when a holding binder changes to an archive binder. When I pull an empty binder, I remove its 1½” label, flip it, and then label it to what I need it to say. We have had a Brother Label Maker in our home forever, which continues to help me stay organized.
HOW I TITLE LIGHTROOM FOLDERS
After the digitized files are uploaded into Lightroom, a folder with a unique title is created for each roll of film or 4×5 shoot.
For archiving purposes, my Lightroom folders are named:
[yearmonthday]-[job/shoot/location]-[file code]
The 120 film in this article has the Lightroom filename:
20220622–color filter tests–H0034
Just as important as the title, the file code H0034 is entered for all negatives in the keyword area. This makes locating the files on the computer and film in the binders easy to locate.
IMAGE NUMBERING SYSTEM
Here is an excellent way to number each image captured, whether film or digital, for your recordkeeping. I read about this method in the book Way Beyond Monochrome, and recommend the book highly:
YYYYMMDDcXXXX-vv
YYYY = year
MM = month
DD = day
c = analog (a) or digital (d)
XXXX = (film roll number or format (ex: 45 for4x5)
XXXX = frame or film holder number
vv = version
An example of a film negative from my Hasselblad above:
20220622a0109-01
20220622 = June 6, 2022 (shoot date)
a = analog
0109 = roll #1, frame #9
-01 = version #1
An example of a digital capture could be:
20220622d2501-02
20220622 = June 6, 2022 (shoot date)
d = digital
2501 = image number from camera
-02 = version #2, after edits
PREFERRED CAMERA & TECHNIQUE FOR DIGITIZING
I like having camera automation when I digitize film. Since the critical finishing work is completed in post-processing, I want the ability to shoot correctly bracketed shots and precisely focused slices that can be stitched later in post if the film size or output requires stitching. Unfortunately, my medium format digital setup cannot do automation, not even autofocusing, but it can make incredibly huge stitched digital files when needed. However, for most of my digitizing work, my APS-C camera, the Fuji X-Pro3, does precisely what I need to do, fast and easy. You may wonder why I choose an APS-C sensor over a medium format sensor. Suppose my medium format camera (a technical camera with a digital back) had autofocusing and auto-bracketing. In that case, I might feel different, but I do not need all the extra pixels for personal stuff and the extra work and time required. Paying me to make a huge digitized file is a different reason to use the medium format setup. Still, I never print larger than 13×19″ for personal stuff, and the X-Pro3 can quickly produce a digital file that can print larger than what I need in one shot. I find no advantage in digitizing film with medium format other than creating larger files.
MY MEDIUM FORMAT DIGITIZING SETUP EVOLVES
If you read Part 1 and Part 2 of my digitizing journey, you may know I am an ALPA-Hasselblad medium format photographer. I have shot Hasselblad since the start of my career and have a great appreciation for the system. When digital medium format showed up, I turned to ALPA after Arca Swiss, the studio and field cameras I used for many years, disappointed me with their ML 2 camera. The great thing about ALPA if you are a Hasselblad user is how easily Hasselblad gear adapts to ALPA cameras. For me, it was a marriage made in heaven. So naturally, I stay with Hasselblad in the digital age and complement the system with ALPA components and cameras. My current medium format digitizing system is an ALPA TC with a Hasselblad variable extension tube, Hasselblad CFi 120/4 macro lens, and Hasselblad CFVII 50c digital back. This setup has evolved as the most straightforward setup for digitizing film from the gear I own and use. I had to add a Hasselblad lens adapter to the ALPA TC to make it work, and eBay seller litz-studio made mine. The lens adapter operates like the lens mechanism on the Hasselblad FlexBody but is easier to use on a copy stand with the lightweight TC. It also allows all my Hasselblad lenses to be used on my ALPA cameras which is a bonus. This setup works well but, again, has zero automation. If I could have only one automated feature, it would be autofocusing when digitizing. I find the Fuji medium format camera offerings interesting, but I do not think it would work because I like tech cameras for larger film and sensors. It’s just me; I like playing with cameras.
SPEAKING OF CAMERAS
Give credit where credit is due is what I say. The photos in this article were made while hand-holding a Fuji X100V on auto. The ASA was 12,800 every time I looked at it. There is noticeable grain, and I do not have a software program specifically designed to help gloss over grain. You are seeing it all except whatever Lightroom may automatically smooth out. I did not have the resources of time and space to take better images as my home is currently in repair mode, and there are lots of boxes in all the rooms. Thankfully I keep the kitchen cleared out because where else could I process film and digitize it? I am in awe of what this little camera can do when I need it to step up to the plate and be the big girl camera. Thanks, Fuji. Just wondering if it could be my digitizing dream machine if it had a macro lens because it has the same sensor and automation settings as the X-Pro3. 🙂
CLOSING COMMENTS
It has been a journey, learning and relearning what I need and what I prefer when digitizing my film. One thing I know for sure, I like an auto-focusing camera while digitizing. If you come across a problem with your lens not focusing correctly, try directing your focus point on the film rebate. That always works for me. I find difficult negatives get a second chance through bracketing and then taking them into Photoshop for selective layering. If I had more time, I would resurrect many images from my archive that I loved but could not get a print that I liked. In retirement, I will have lots of fun! If I have a choice, it is my X-Pro3 for digitizing. The nice thing about the X-Pro3 I have learned from my current situation is it feels so good sitting at the kitchen table with a kitty close by and my favorite music playing in the background. There we are spending pleasant time together while I am digitizing with little effort. It has been nice to have the right equipment that helped guide my technique. I hope you have gained something from reading this article. Unfortunately, commenting is closed because of spam, as I do not have the time to deal with it, but you can send a message if you like. Take care and be safe, my friend.

