THE TALE OF TWO HASSELBLADS
My Hasselblad cameras are more than tools—they’re extensions of my artistic voice. When I know I’ll want both film and digital at hand, I often choose to carry two 500 series bodies rather than pairing my 907x with a film camera. Working with two slightly different 500 series models creates a rhythm all its own, allowing me to move seamlessly between classic film and contemporary digital. This dialogue between the two forms is more than a method—it tells the story of why I shoot, as much as how.
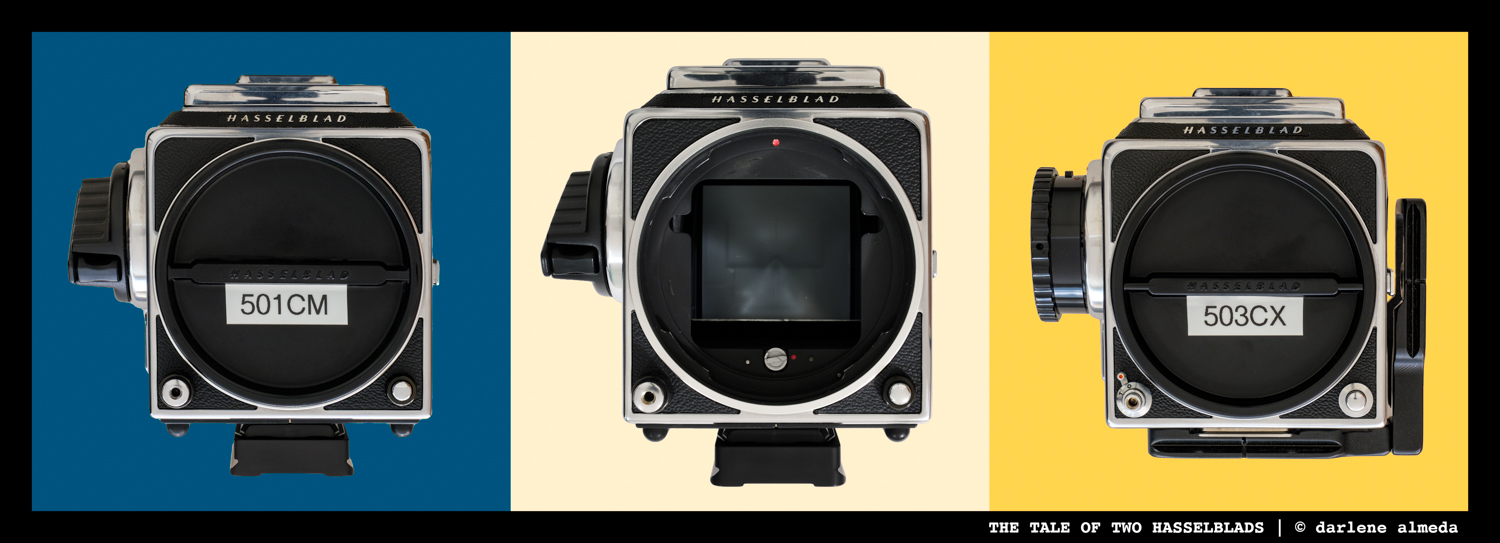
HASSELBLAD 501CM: FOCUSING SCREEN & SHUTTER BUTTON
Why I Chose Hasselblad
I have more experience shooting medium format film than any other film format. I do shoot 4×5 and enjoy it, but I have racked up the most shooting time with 120/220 film, and 95% of that film has been shot through Hasselblad cameras.
The Hasselblad 500 series (V system) of cameras is a sturdy mechanical box and, despite its age, has proven its timeless worth. If you take care of your Hasselblad equipment, it will endure as a trusty companion. My journey with Hasselblad cameras began in the early 1980s, when I started working as a commercial photographer. I have a deep connection to the V system, characterized by its fully manual cameras and leaf-shuttered lenses, boasting flash synchronization capabilities across all shutter speeds. V system lenses possess visual characteristics that are unique to them. Many of these lenses perform equally well with both digital sensors and film.
The V system’s modularity is akin to having an extensive camera toolbox that extends its versatility beyond my Hasselblads, making components adaptable for use with my ALPA system as well. In light of all these factors, the V system can be regarded as a straightforward and dependable system that operates with its own distinct mark of perfection.
When choosing a camera for film photography that I could rely on for decades ahead, the Hasselblad 501 CM (1997-2005) was the obvious choice. Its appeal stemmed from its bright, acutematte screen and the inclusion of the gliding mirror system (GMS), which effectively prevents vignetting when using focal lengths exceeding 100mm. While the 501 CM marked the most recent addition to the 500 series with GMS, it didn’t include the TTL OTF flash system. My decision prioritized functionality over unnecessary features, making the choice straightforward. Nevertheless, I made sure to acquire the newest body in the best possible condition.
HASSELBLAD 503CX: “T” CATCH & CFV 50C II MASK
A Tale of Two Hasselblads
In 2014, Hasselblad announced the release of their first CMOS digital back, the CFV 50c. I was thrilled to learn that this digital back came equipped with Live View, a revolutionary feature at the time. I was shooting medium format digital with a Phase One P45 on ALPA cameras. The P45 did not have Live View, and I knew I was headed for the CFV 50c. The CFV 50c was designed to work without cables with the 500 series, a huge advantage for V system users looking to attach a digital back to their cameras. I acquired the CFV 50c, which exceeded all my expectations and delivered stunning results, plus Live View.
The CFV 50c included an acute-matte screen with dotted lines superimposed on the crop area. To mitigate distracting extraneous light from the outer regions, I resorted to covering them with blue masking tape. While this approach provided some relief, it could have been better. I still noticed faint light beneath the blue tape when I looked through the viewfinder. Moreover, frequently swapping focusing screens, one for film and one for digital, was not a desirable solution, given the concerns about potential dirt, fingerprints, or accidental drops.
In order to engage Live View on the digital back, the lens must stay open in bulb mode (‘B’) to work. It’s not difficult to do this per se if you have a locking cable release that you can count on or a Hasselblad 500 series body with the time exposure catch (‘T’). The ‘T’ catch is located behind the shutter button if your Hasselblad model has it; unfortunately, the 501 CM does not. This small catch has two settings, ‘T’ (engaged) and ‘O’ (disengaged), and will keep the lens in ‘B’ mode until you switch it back to the ‘O’ position. For shooting digital on a 500 body, I wanted the ‘T’ latch option.
I used the CFV 50c with the 501 CM from 2014 to 2021, and the images and performance of the digital back were everything I wanted and more. However, I encountered three persistent issues that I was determined to resolve: (1) I did not want to see crop lines on the focusing screen, (2) I did not want to have to change focusing screens between film and digital, and (3) I wanted the option of having the time exposure catch.
When I shoot film with a Hasselblad, I want to see the entire screen, whereas, with a digital back, I only want to see the relevant framing. I obtained another 500 series camera body with the sole purpose of adapting it for digital photography. This decision ultimately led me to select the 503 CX (1988-1994). My choice was driven by the need to address the focusing screen concerns and acquire a camera equipped with the coveted ‘T’ catch feature. The 503 CX stands as the last model within the 500 series that includes this ‘T’ catch, and it came with an acute-matte screen that I could easily configure for digital framing.
In the summer of 2020, Hasselblad introduced the 907X 50c, a camera body featuring a detachable digital back, the CFV 50c II. Not long after the 907X 50c became available, my CFV 50c’s sensor glass was damaged, necessitating a replacement. When my CFV 50c was undergoing repairs, I encountered difficulties with my studio work while using my backup digital back, the P45, which required Firewire connections and an older Macbook Pro. Given the estimated repair time for the CFV 50c was between 8 to 16 weeks, I urgently needed a digital back with Live View functionality. This prompted me to invest in the 907X 50c, primarily for the CFV 50c II.
Upgrading to the CFV 50c II showed me how much I disliked the focusing screen included with the CFV 50c. This became apparent when I placed the black cardboard mask that came with the CFV 50c II onto the focusing screen of the 503 CX. I found this mask significantly superior to the previous screen I tried to make better with blue masking tape. The mask does a superior job of blocking extraneous light from below, has no visible crop lines, and precisely matches the view from the digital back’s LCD screen. It’s remarkable how something so simple as a precisely cut black cardboard mask can make a world of difference for my eyes.
Once I fine-tuned the view through both cameras to my satisfaction, it was time to refine my shooting checklist and update my traveling tripod needs.
ACRATECH LEVELING BASE + CFV 50C & FILM + FOTOPRO E-6H
Shooting Film & Digital
I hope it’s clear why I use two slightly different camera bodies now. I use the same lenses, compendium hood, viewfinders, and some filters interchangeably with both.
My preferred viewfinder has been the PME51 for many years because of its built-in meter and 45° viewing angle. As someone particular about the view through the lens, this viewfinder is a delight to use, considering the horizontally-flipped view and lack of metering of the waist-level finder accompanying 500 series bodies. To be clear, there’s nothing wrong with waist-level finders, as I keep them on hand, but the PME51 aligns better with my preferences and requirements.
How I attach the bodies to my traveling tripod (which includes an RRS series 1 tripod, an Acratech leveling base, and a Fotopro Eagle E-6H gimbal-type head) varies depending on the camera.
For the 501 CM, which I use for square negatives exclusively, you don’t need to change the camera’s orientation from its default tripod position. I use a Kirk Arca Swiss-style quick-release plate, which is more like a heavy-duty block than a traditional plate. This block is attached to the underside of the camera body and provides a secure connection to the leveling base’s quick-release system. I prefer shooting the 501 CM from a tripod with a leveling base only. This choice arose from my growing dissatisfaction with ball heads over the years.
When I use the 503 CX, there are times when I want the flexibility to create panoramic stitches, depending on the composition and environmental conditions. To enable this, I have a specially crafted “L” bracket (made by the late John Milich, a dear photography friend) permanently attached to the 503 CX; it never comes off. This “L” bracket seamlessly slides into the Fotopro Eagle E-6H gimbal rail, which has been installed into the leveling base.
This configuration allows me to effortlessly switch between shooting horizontally and vertically. Since the digital back is naturally oriented horizontally when attached to the camera, having the “L” bracket and the gimbal in place ensures a swift and secure transition for shooting or creating panoramic stitches in a vertical format. However, when not stitching, I often opt for a square compositional frame for the digital back and do not require using the E-6H gimbal.
FILM & DIGITAL ON THE ROAD KITS
On the Road with the Hasselblads
When I take to the road with my Hasselblads, I am going out to shoot film and digital. I shoot black and white film and leave color work to digital, but sometimes I do convert an image made with the digital back to black & white.
The 501 CM is packed in a backpack with three lenses from a section of five (60, 80, 100, 120 & 180), a compendium hood (6093T), filters, and film. The backpack is the Think Tank Retrospective; it fits the gear and accessories pouch well and is comfortable to wear when walking.
The 503 CX, CFV 50c II + three extra batteries, a Hoodman Loupe, and an accessories pouch travel in a Porteen Gear camera bag. The camera has its waist-level finder and “L” bracket installed and fits nicely inside a lightweight yet durable box designed for large-format lenses. To create a case for the digital back (originally created for the CFV 50c), I repurposed a Tamrac lens case made for wide lenses and a deep ALPA rear cover (go here for DIY instructions).
I love to explore small towns, historic architecture, and beautiful landscapes. Sometimes, I know what I want to photograph beforehand, but other times, I like to drive around or hike and discover new places that catch my eye. I don’t carry a camera during these explorations except for my iPhone. Instead, I use a handheld Linhof multi-focus viewfinder to pre-visualize possible compositions. I have customized a 6×9 model with a 6×6 mask and an additional 56×72 mask for the digital sensor crop. This helps me decide which lens to use for the shot, so I don’t have to carry all my equipment into the field.
After returning to my camper van to prepare for shooting, I set up the tripod first. My choice of camera body depends on whether I want to shoot black and white or color first. If I want to capture an image with both film and digital, I usually grab the 501 CM first because its framing feels more natural to my eye, and then I’ll switch to the 503 CX because I may need to step back (44×33 mm vs 60×60 mm) a bit if shooting the same composition as the 501 CM.
The 501 CM installs on top of the leveling base via the quick-release connection. Suppose it will be the 503 CX; then the Eagle E-6H gimbal gets installed first on the leveling base via its quick-release connection. My tripod setup is as simple as I could refine it over the years, swapping out gear as I saw necessary for weight, functionality, and speed.
Preparing to Shoot Film with the 501 CM
When I’m shooting film, my setup workflow involves several steps. I start by replacing the waist-level finder on the 501 CM (used when storing the camera) with the PME51 viewfinder. Then, I load the film magazine and mount the camera onto the leveling base. Next, I attach the lens, compendium hood, and shutter release cable.
I regularly use yellow, #8, and #15 contrast filters for black and white film photography, and occasionally an orange #21 filter. Although I carry a red #25 and a green #11 filter in my bag, I seldom find a need to use them. Over time, I’ve experimented with these filters in various situations but have yet to develop a strong preference for their effects.
In addition to these filters, I also carry a Hasselblad Soft Filter kit and a LEE 10 Stop ND filter, which I use for creating long exposure shots. These filters are 4×4 inches (100 mm) in size and conveniently fit into the filter tray of the compendium hood.
Preparing to Shoot Digital with the 503 CX
When shooting my digital Hasselblad, here’s my step-by-step setup process: First, I remove the waist-level finder from the 503 CX (used when storing the body) and replace it with the PME51 viewfinder. Next, I mount the CFV 50c II onto the body and attach the camera using the “L” bracket onto the Eagle E-6H, which is already secured onto the leveling base. Then, I attach the lens, compendium hood, and shutter release cable.
If I encounter intense light conditions, I might utilize a B60 Hasselblad polarizing filter or opt for the LEE neutral-density polyester filters (0.3, 0.6, & 0.9) in 4×4-inch frames to manage the brightness. These filters conveniently fit within the filter tray of the compendium hood, allowing for easy installation and removal of the B60 polarizer without needing to detach the hood. What a convenience it is when all your Hasselblad lenses have B60 filter threads.
Lastly, I rely on a Hoodman Loupe to view the LCD screen clearly, especially in bright light conditions.
I hope you found this article both informative and enjoyable, and that it has addressed any questions you may have had about my use of two Hasselblads. I believe I’ve demonstrated that it’s not only technically feasible but also incredibly enjoyable to explore both realms of photography—film and digital—with these iconic Hasselblads. If I didn’t have a genuine passion for shooting black and white film or a strong desire for the unique aesthetic achieved with the specific V lenses I prefer, I might as well spend my time using the 907X or an X2D with digital lenses. However, until that changes, my heart remains with the 501 CM and 503 CX.

