[ DEVELOPING TANKS + POPULAR FILM SIZES + FILM REELS ]
FILM + PROCESS: WHAT I HAVE USED
Below are listed most of the film, chemistry, and processing equipment I have experience with, but not all that I have used.
KODAK B&W FILM:
Tri-X, Technical Pan, T-MAX, Panatomic-X, High-Speed Infrared (HIE)
KODAK COLOR FILM:
Kodachrome, Ektachrome, Vericolor II/III, Portra, Kodak Gold, E100VS
FUJIFILM B&W FILM:
ACROS Quickload 4×5, ACROS I/II 120/135 (datasheet)
FUJIFILM COLOR FILM:
Velvia, Provia, Instax
ILFORD FILM:
Delta 100, FP4+, HP5+, Kentmere Pan 100z
Ilford Film Developing Chart
POLAROID FILM:
55 P/N, 559, 804, 809, SX-70, 600
OTHER FILM:
AGFA, FOMA, Scotch Chrome 1000, FOMAPAN 100 Reciprocity Chart
NOTE: Graphic designer, Akil Alparslan, spent four years drawing over 1,000 photo film boxes to reproduce the lost 35mm containers of history. See it here.
FILM DEVELOPERS:
510 Pyro, CineStill DF96 Monobath, Famous Format No. 1 Monobath, Kodak D-23 & D-76, HC-110, Ilford DD-X, Pyro HD, Rodinal, Tetenal E-6 Kits
FILM FIXERS:
B&S Rapid Fixer, Ilford Rapid Fixer, Photographers’ Formulary TF-4 & TF-5
OTHER CHEMISTRY:
Heico Perma Wash, Kodak Photo-Flo
FILM PROCESSING EQUIPMENT:
AGO Film Processor, Jobo ATL 1000, Jobo Expert Drum 3010, Patersons Tanks
FILM REELS:
Jobo DUO, Paterson Auto Load, MOD 54 4×5 Sheet Film Reels
FILM ENLARGERS:
Beseler 45V-XL, Beseler Dichro 67S, Polaroid Daylab
DARKROOM TIMER:
GraLab 300
COPY STANDS:
Beseler CS, Kaiser RS1 XA
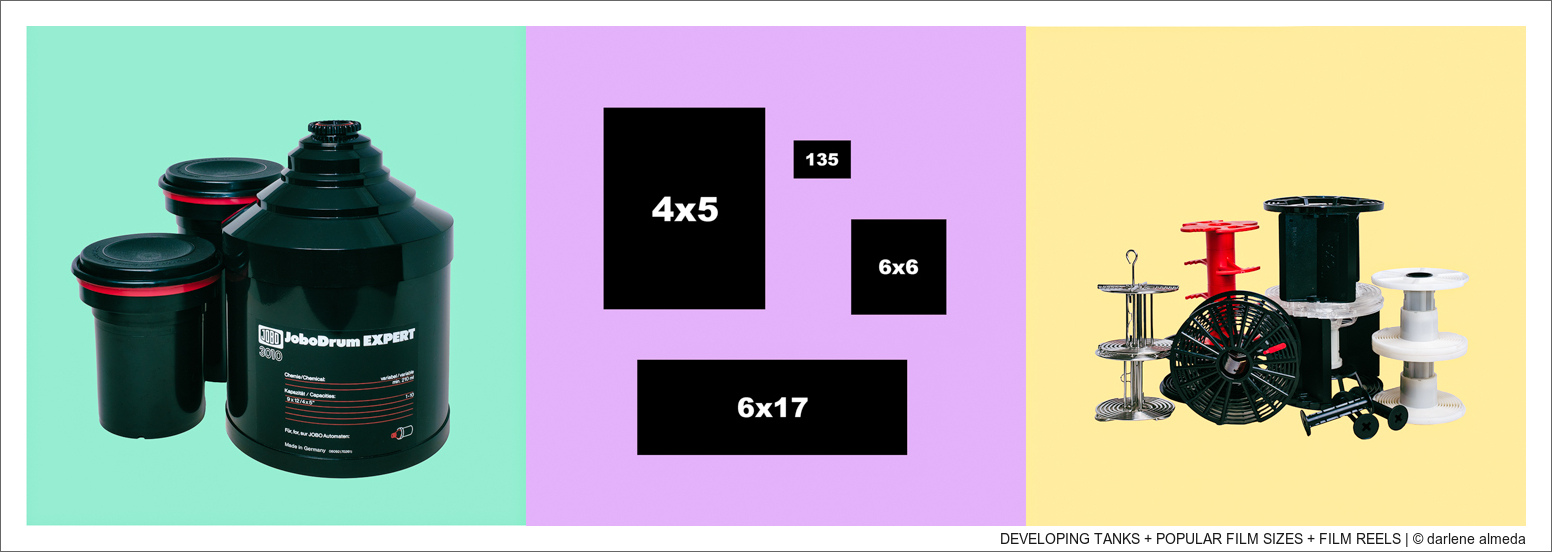
The graphic at the top of this page shows a comparison view of popular film sizes. They are, in order of size: 135, 6×6, 6×17 (a strip of 120 film equal to the length of three 6×6 frames or half of a 5×7″ sheet of film), and 4×5″. I made the graphic so the different film sizes scale to one another, but I reduced it because the 4×5″ and 6×17 cm sizes would not make for a good website banner. Just the same, I want to start this page with a graphic that shows the difference in film formats to give reasons as to why cameras, lenses, and other gear like tripods, for example, and also the chemical processing for each format can be a more costly endeavor or an inconvenience in other ways. As each format gets larger, everything it needs to make an image grows exponentially and can be more difficult to work with. Chasing after the better resolution a larger format may offer is not the only thing to consider when switching formats.
For on-location jobs, I had assistants not for picture taking but for breaking down, setting up, and carrying gear. After a few jobs, I could tell if the assistant had what I was looking for and found stay-at-home moms raising small children were the best for my portrait and special event business and photography students for in-studio product work. My film was the only item all my assistants knew never to touch unless asked to retrieve it.
Film was the norm when I started my professional career, and I have shot many different films over the years, including all formats listed in the above graphic, plus 5×7″ and 6×12 cm. In the commercial film-shooting days, we required different film types developed for various Kelvin lighting conditions or tastes and different size formats for assorted reasons.
I have evolved through the business from film to digital, shooting medium format digital for most of my commercial work today. Still, I have never lost my love for black and white (B&W) film, as B&W digital images do not satisfy me as beautiful B&W prints shot on film can. I hardly ever shoot color film today, but when I do, it has been Kodak Ektachrome 100 in 120 and 135 and Kodak Portra 160 or 400 in 120. Portra has evolved from the color negative film that was the standard portrait film for decades, Kodak Vericolor II and Vericolor III. It looks about the same to my eyes as it always has. Some things change, but a classic changing its name still looks the same.
***
MY BACKGROUND IN FILM
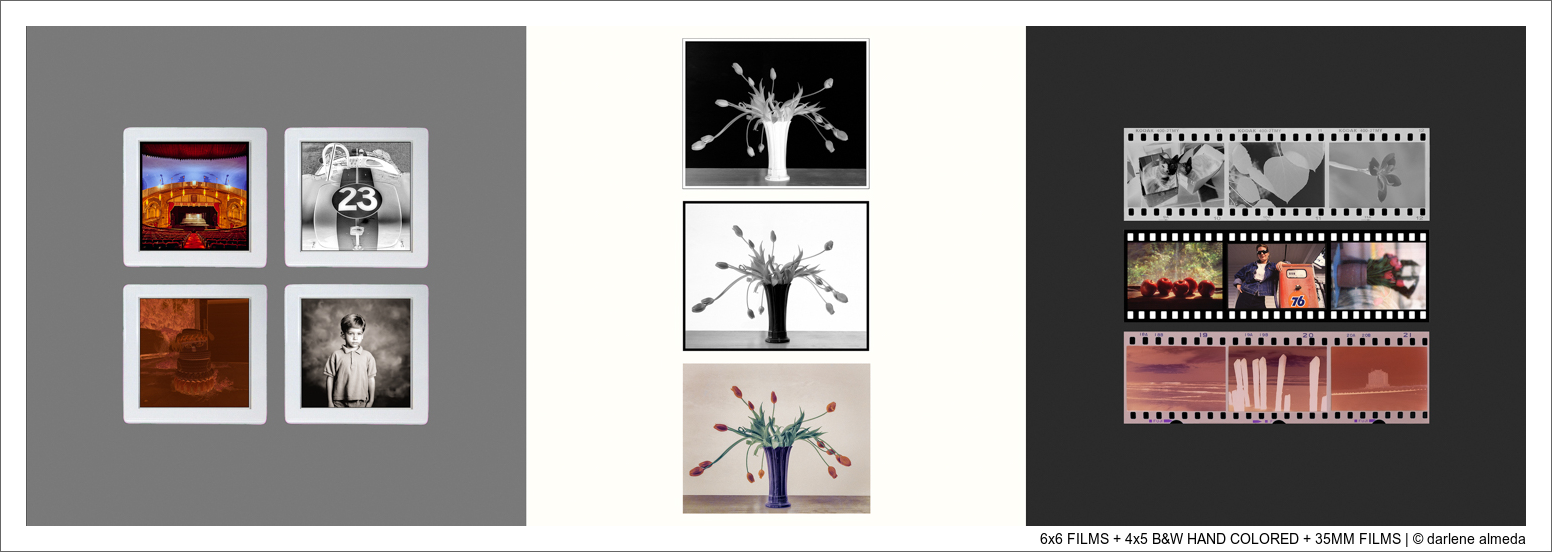
[ 6×6 FILMS + 4×5 B&W HAND COLORED + 35MM FILMS ]
The graphic above shows examples of film sizes and film types from my files. Most of my commercial work has been done with Hasselblad cameras, and the 6×6 films are shown in the first box of the graphic. I will not show clients’ work online as per disclosure agreements, but the top left image of an empty theatre was from a brochure job, but the frame shown was not selected and kept in a file. My son’s bottom right image was from when he was a ‘young bud.’ As a little guy, he ran around the studio and helped assist me with children’s portraiture by using puppets and toys to entertain the children as I stood behind the camera waiting for the right moment. He was about four years old in the image, and I would try to photograph him now and then before we started each shoot.
The second box shows what I enjoy doing with some of my 4×5 B&W work; hand coloring using Photoshop. The finished image is titled: Twelve Plue Two; to see it larger, click here. I call it hand coloring even though I no longer apply Dr. Martin inks with a paintbrush on a print as I had before Photoshop showed up. Today I use a Wacom digital tablet and stylus and select the colors for the image before I begin the process. It takes a lot of time to reach the finish line, but once I have a look in my mind for the finished image, I work it till it gets there. I prefer 4×5 B&W negatives that I digitally scan to a large file allowing enlargement into delicate areas of an image. I have always been artistic, drawing as a young child and then moving into colored pencils and watercolor painting. Part of my commercial art training was in illustration for the advertising profession. Even though I walked away from an advertising artist career for commercial photography, I still like to play in art, and hand coloring 4×5 B&W images is something I have always enjoyed doing. I shot about 20% of my commercial work with 4×5 transparency film and left 4×5 B&W for my art stuff.
And finally, the last box shows early work from my Canon AE-1 and Nikon F3 cameras when photography was fresh in my life. I have a lot of film in binders and all types, including B&W, transparencies, and color negatives. The old stuff never gets looked at, as scanning or digitizing is not something I want to do unless it is for a new film fresh out of the developer. What I want to do is shoot new stuff, but it is also nice to look at the old stuff too. Save all your film, even the stuff you may not like! For the first decade or so, I saved everything and would go back and look at it again and again. I learned a lot from doing that; I learned things that books and the classroom could not teach me. Next, I will talk about my journey with film from a few years into my career until the digital era, and I still enjoy shooting films today.
***
When I attended Portfolio Center, Atlanta (now called the Miami Ad School – Atlanta) for commercial photography, I had a growing studio business in commercial art and portrait work. I arrived in the area three years prior and wanted to go after more advertising work. After my time at the School of Visual Arts for commercial art, I knew I wanted a pro from the field to instruct me on the business sense and operation of the 4×5 camera, not a teacher with book knowledge only. Not only did I learn how to shoot the 4×5 camera and spend time with pros in the field, but I also built on-location sets, designed lighting for products, created props, and learned to use different types of film for creativity.
During that time, I began shooting Scotch Chrome 1000, pushing it a couple of stops and manipulating it with filters. Cokin creative filters were my favorite during those years due to their diffusion and graduated color selections. It was a fun and enlightening period for me as a photographer. From that time, I began shooting 4×5 chromes, mainly Ektachrome, for product work. Still, a significant part of my studio work continued with Hasselblads loaded with 120 & 220 Vericolor films (and 70mm), which today would be Portra.
All my commercial film processing was primarily E6 and C-41, which was left for pro-labs to complete as I had no time for that. I spent most of my time meeting clients, looking at freshly developed films, and shooting behind the camera. Of all the thousands of sheets and rolls developed, a tiny percentage returned damaged; usually, 220 films got caught up in a machine or something. The ‘dip and dunk’ method was my first choice if I had one. I had pro-labs display my work in their publications and on their walls more than a few times, sometimes without my permission. Before digital was upon us, almost nobody made a big fuss about it, as it was seen as a compliment.
In 2000 I closed my Atlanta studio business for a planned move to Florida, where I would start an online advertising art business (23 years strong), realign my graphic designing and product photography for web development clientele, and spend more time teaching in the classroom. I also acquired a Jobo ATL 1000 for E-6 development during that time. I ran E6 in the ATL 1000 for about a decade, and when my first digital DSLR showed up, the Nikon D200, I began looking forward to the day digital would mature enough to handle all my color work. In 2011 when I acquired my first medium format digital back for commercial work, my need for E6 in-house processing stopped, and I sold the ATL 1000 without regret.
However, my love for shooting and developing B&W films continues. I have worked with a few different hand processing systems over the years and stayed with Paterson reels and tanks for 120 and 135 film and a Jobo Expert Drum 3010 for 4×5 film. I keep a MOD 54 in my processing kit when I have less than five 4×5 sheets, as the 3010 can process up to ten sheets simultaneously. Pyro and Rodinal developers have become what I routinely use. I find satisfaction in developing my film, but I gave up the idea of optical darkroom printing long ago. Early on, I realized I had the time for commercial art or the time for darkroom printing, but not both. Commercial art won out for various reasons; the biggest reason was I had an established career in it, I never cared for all the darkroom odors, and I always preferred a lab to print my work.
Today I digitized my film and will send the files for printing to a pro lab. However, I print my favorite images 8½x11 inches with an Epson printer and place them in archival boxes to look at from time to time, and when needed, I send a master print to the lab to match a client’s print order.
If you have never developed your film, I highly encourage you to try it. It has gotten easier with the advent of newer chemical formulas and films. Just remember, like photography, it is an art, and it will take time to master your technique. But that is what I love about film and photography; it is an ongoing process that has never bored me.
***
MY FAVORITE FILM FORMAT
[ HASSELBLAD FILMS: POSITIVE, NEGATIVE & CONTACT SHEET EXAMPLES ]
One day, while waiting at an Atlanta photo lab counter, a photographer I did not know started a conversation with me. My son, about eight years old, was by my side as I had previously collected him from school. During our brief discussion, the photographer asked me what my favorite camera format was while waiting for my film to be finished processing in the back. Before I could answer, my son said, “medium format.” To say I was surprised my son knew that so well was an understatement, and he was and still is correct.
Above is a negative I made with a Hasselblad 501cm camera and black & white film in my backyard of a fairy lily. Every Spring, the lovely fairy lily plants bloom, and I still get excited to see their beautiful tiny flowers. You can always tell if a Hasselblad made the exposure by the two small triangles (they are little “V”s for Victor Hasselblad) recorded onto the film via the film gate. Why did I choose to shoot the lilies with my Hasselblad when I could use my Fujifilm X-Pro3 or my Nikon with a zoom lens? Read on to see why the square film format is my favorite.
For me, medium format is the sweet spot, and square medium format is what I prefer. Even though I was introduced to photography by a Canon AE1 and learned the basics on a Nikon F3, and then academic training with the 4×5 format, medium format is the middle ground I find fits me best. I never received training for medium format; I just knew what to do, like a fish-to-water scenario. The Hasselblad cameras are not as heavy as 4×5, and the film is much larger than 135. The genre of photography I began shooting for a living fit the square medium format very well.
I began as a portrait and special event photographer when Hasselblad was the golden child of cameras for that type of work. Unless you have the experience of shooting the bride and groom coming down the aisle for the first time as Mr. and Mrs., you probably have never thought about where the speedlight or flash will hit their faces. And what about that lovely white dress? (Do not blow out that dress, or you will never be considered exceptional or worthy of high pay in the wedding photography business!) And from my experience, the walking down the aisle shot will probably be a vertical composition because the subjects are taller than they are wide. So if I was shooting a typical rectangle format camera, say a Nikon or Mamiya 645 with a flash on the side or high above the lens, when I flip the camera to make a vertical shot, where is my flash’s direction of illumination going? With a square format camera, you never have to flip.
For designing purposes, if you start with a square, you can crop it to anything, even a circle, without much effort. Part of my special event business was carriage trade weddings. My wedding clients received “Wedding Storybooks” bound in expensive, handmade leather albums. I created a “Wedding Storybook Designer” (WSD) for my clients to fill in with what photos they wanted to be placed on what page. 99.9% of the time, they asked me to design it for them. After I created the unfolding of the storybook wedding, the photos were printed with one 10×10/8×10 per page, two 5×7/5×5 per page, and up to four 4×5 per page or a mix—the more photos they chose, the more income I made. Once the lab printed the images, they were shipped along with the WSD to Leather Craftsmen of Farmingdale, NY. From there, the photos would be dry-mounted to the pages in the order as per the WSD and all bound together between a custom-made leather cover with custom gold or silver embossing. I sold hundreds of albums in my career. Every time a bride showed her Wedding Storybook, it was the best advertising I could receive. I never had to buy advertising as my name was tastefully embossed on the bottom inside cover of each album.
Today Hasselblad cameras live on as legendary, and with good reason. The Hasselblad cameras I shot with throughout my career made me a lot of money, and they were dependable, versatile, and consistently produced beautiful image quality. I retired from portrait and special event photography work after fifteen years. From my experience, I will call it a stable income earner for the young photographer. I left it for product and web design work, but I continue to shoot Hasselblad cameras and accessories well into the digital era. The Hasselblad digital backs I have owned, the CFV 50c and CFV II 50c, are beautiful digital tools that integrate with Hasselblad 500 series film cameras and the technical cameras I use today; what is not to like about Hasselblad except maybe the cost of entry. So long ago, when my young son gleefully stated: “medium format,” he knew his mama, the photographer, very well. 😉
***
MY FAVORITE TESTING FILM
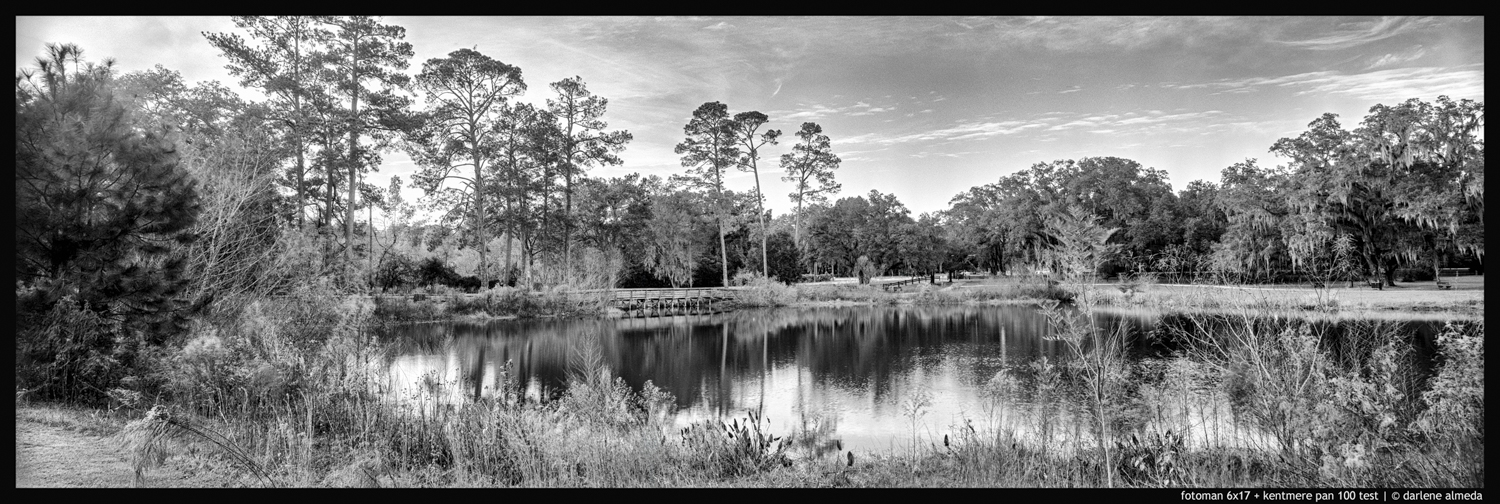
[ FAVORITE B&W TESTING FILM: KENTMERE PAN 100 ]
In late 2023, I sought a cost-effective alternative to the 100 ASA panchromatic film I had been using from Foma for my testing purposes. While I occasionally use Fomapan Classic 100 in 4×5 format, I’ve discontinued its use in the 120 format. I grew disheartened by the performance of Foma films in the 120 format, having experimented with their 100, 200, and 400-speed variants. My preferred developer is 510 Pyro, and the combination of Foma 120 film and 510 Pyro may be the cause, as I frequently encountered issues with excessive contrast and blown-out highlights with 120 Foma films. When such problems occur with one type of film and not others, it’s reasonable to attribute it to the specific film or the interaction between the film and the developer. Despite these challenges, I am reluctant to alter my shooting technique, as I honed it to perfection decades ago and have not encountered the consistent contrast issues that persist when using Foma films in the 120 format.
To see what is available in lower-priced 120 panchromatic films, I visited B&H Photo’s black & white film section and used their sorting feature to arrange all their 120 black & white films by price, starting from the lowest. Among the top four selections, I came across Ilford’s Kentmere Pan 100 and 400, so I decided to give Pan 100 a try. The image displayed above was captured using the first roll of Pan 100, which I quite like. Throughout the test shoot, I didn’t make any adjustments to my technique; I shot with a new-to-me 20+ year-old camera (Fotoman 6×17) and a 30+ year-old lens (Fujinon SW 90/8) that I had to test within the trial period for returning if necessary (also purchased from B&H Photo). I took the shots at my local library, where I frequently visit to test various photographic equipment and films. I then developed the film using my typical 510 Pyro semi-stand process. I’m pleased to say that Kentmere Pan 100 has now become my go-to 120 panchromatic film for testing purposes, and if the need arises for more than just testing, it will meet my requirements. Give it a try if you are looking for a new panchromatic film, such as I was.
***
DARKROOM TOOLS
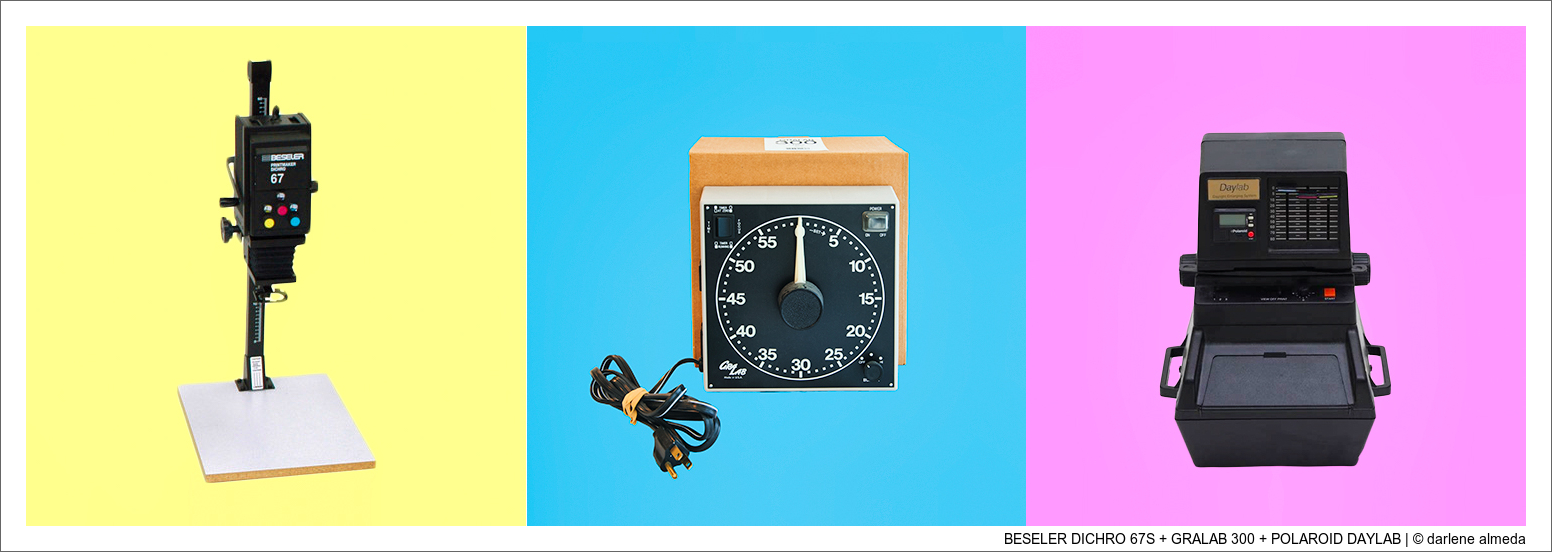
[ BESELER DICHRO 67S + GRALAB 300 + POLAROID DAYLAB ]
The darkroom was not my favorite place to be. I have always been the type who only enjoys getting my hands wet if I wash dishes. Also, I wouldn’t say I like strong chemical smells and the possibility of working with anything that could damage my clothes. That equates to not wanting to ‘play’ in the darkroom.
I received my initial darkroom training through a rent-by-the-hour community darkroom. They held classes with pros teaching amateurs, and even though I was always busy behind the camera, I wanted to learn more about the darkroom process. The only darkroom education my formal commercial photography schooling taught was “We shoot 4×5 transparency films and drop them off at the local E-6 lab.” I quickly learned I would never have the time to be in the darkroom, and the more I learned about it, the more I did not want to work at it. But I wanted to learn everything I could, so when I dropped the film off at the pro-labs, I could understand what they could and could not do for my clients and me.
The first film processor I owned was a Polaroid AutoProcessor 35mm, and the first enlarger I owned was a Polaroid Daylab. Darkroom professionals may laugh at me calling these tools an “enlarger” and a “processor,” and they’d be right (no dodging or burning). Still, they were affordable tools for making Polaroid transfers. This was another avenue to be creative and make money selling prints.
I played with the Daylab for a couple of years, using a Polaroid 8×10 film holder and processor, and printed on watercolor paper by switching the Polaroid paper with a sheet of watercolor paper the same size before they both went through the processor and chemical pod. Then I wanted a better-quality enlarger for color correction and a better-quality enlarging lens for up to medium-format film as I wanted to keep making Polaroid transfer prints. So, the Daylab ended up on the used market. It sold fast, and I made a new friend in the process. The Polaroid AutoProcessor 35mm became a doorstop. I loved the PolaPan film, but Polaroid discontinued it shortly before the Daylab was sold.
Then, I hired a contractor to build a small darkroom on the side of my studio for use with a Beseler Dichro 67S I purchased used from a former photography student who listed it for sale at a local lab. The GraLab 300 showed up new after looking at used ones that were either too close to new prices or looked like they had seen better days. Then, I acquired the JOBO ATL-1000 processor for E-6 processing after moving to a rural area too far from the closest E-6 lab. The processor sat outside the darkroom on a cart and was wheeled to a bathroom for operation. It was a good thing having the ability to process E-6 in-house when I needed it, but that all changed when I switched my color work to digital after digital became good enough.
I never made prints on photographic paper in my darkroom, just on 8×10 Polaroid film and watercolor paper. During my darkroom rental days, I made enough RC prints and Cibachromes (beautiful stuff) to show me that I did not want to put much time and money into it, but it was fun, and I learned everything I wanted to. My commercial photography education was right; I would never have the time to devote to the darkroom if I were running a commercial photography business.
Nowadays, I enjoy shooting 4×5 and 120 black & white film and processing it at the kitchen sink. The ATL 1000 could not help with my black & white processing, as I prefer developing my B&W film using a semi-stand method. I might have used the ATL-1000 somehow, but I felt it right to sell it cheaply to another photographer in need. Developing E-6 is not for the faint of heart unless the nasty chemicals I had to use have changed.
Even in the digital age of desktop printing, I prefer having a pro-lab print my work. I have had a few Epson printers, including my current model, the 3880, but it needs updating, and I will not invest any more money into ImagePrint software or purchase another printer as I am heading toward retirement, and I plan not to sell prints then. I am not a printer, and I appreciate those who do a good job. Prints are lovely, but I am only interested in hanging out in a darkroom if I load film tanks, reels, and sheet film holders and double-check how many sheets are left in the box.
***
FILM IMAGE GALLERY
