
REVISED JUNE 2026
This article has been substantially expanded and updated. Additional illustrations will be added as they are produced.
INTRO
In Digitizing Film Part 1, we were introduced to the core tools I use when digitizing film: a digital camera, a macro lens, a copy stand with a leveling base, a light source, and film carriers or holders. We also explored the differences between medium format, full frame, and APS-C digital sensor sizes and how resolution relates to film capture.
Now we move into the actual photographic process itself. This includes camera setup, sensor-to-film parallelism, leveling, focusing, Live View usage, autofocus versus manual focus, reproduction ratio setup, film flatness, masking stray light, dust control, exposure, bracketing, stitching panoramic negatives, avoiding vibration, and RAW capture methodology.
PREPARING THE WORKSPACE
WHY ENVIRONMENT MATTERS
We must have a stable, clean workspace for the successful digitizing of film. The camera and lens must be stabilized to avoid vibration. Just as we place a camera on a tripod when photographing long exposures or macro subjects, we also need a rigid and stable platform when copying film into a digital file.
We are working at a macro level where even the slightest vibration can introduce blur. Dust and small particles that might never be noticed under normal viewing conditions can suddenly become highly visible in a high resolution scan. Before we begin digitizing, we need to carefully evaluate how our camera and copy stand system, our “digitizing station,” is set up.
Comfort also matters more than many people initially realize. If you are hunched over for long periods, your back will remind you quickly. I personally use a saddle stool when working at my digitizing station. I did not originally purchase this type of stool for digitizing. It was bought years earlier while photographing products in the studio, sometimes for entire days. I needed something comfortable with wheels that allowed me to move easily between the shooting area and the camera. Because I am fairly short, I found a saddle-style stool worked best for me.
Whatever seating arrangement you choose, try to make comfort part of your workflow. Depending on the height of your digitizing station and your working position, you may benefit from a rolling stool with height adjustment, especially during long digitizing sessions.
CLEANLINESS AND DUST AWARENESS
It is best to organize your digitizing station before you begin working so the tools you need are already laid out and within reach.
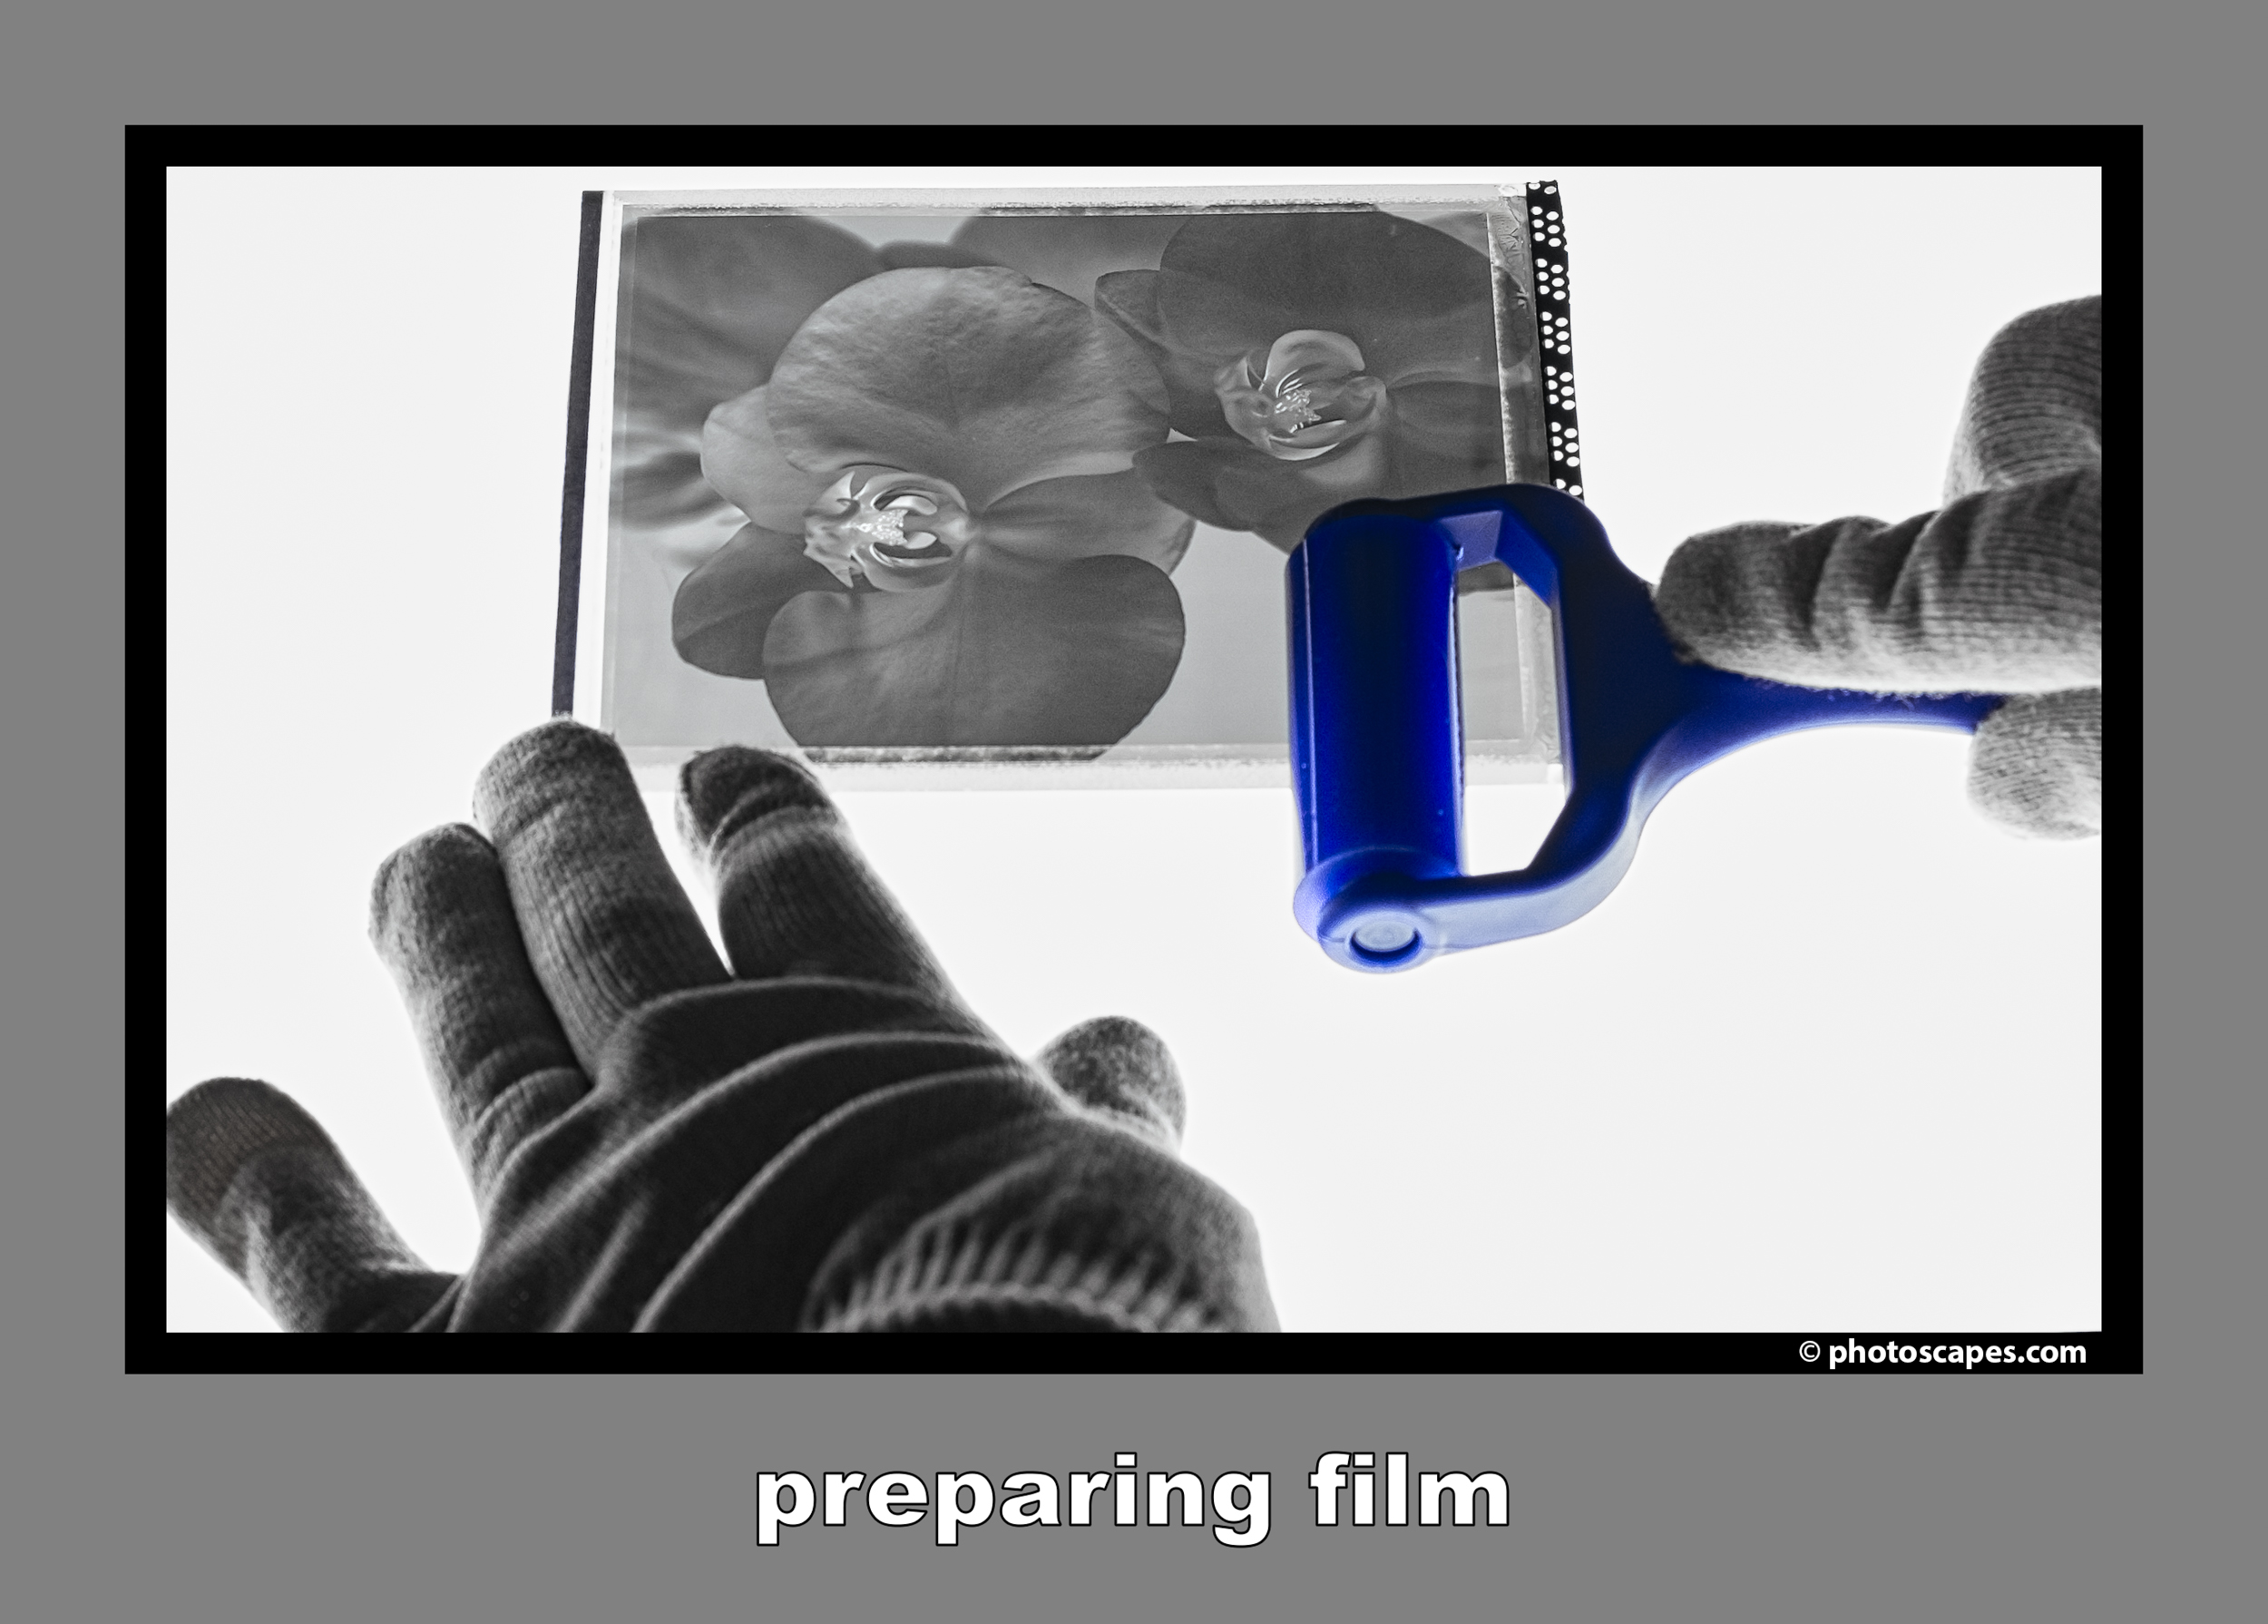
One note about how I prepare film prior to digitizing: as soon as my film has dried and is hanging, I gently run a static brush across both sides of the film. If the film is 120 roll film, I immediately roll it up while wearing gloves and place each roll into a clean plastic zip-top bag. I have found that Ziploc Brand Slider Freezer Bags in the 1 Quart size work particularly well for the way I splice together rolls and feed them through the Negative Supply Pro Film Carrier 120 MK2, though your own workflow may differ.
What all workflows share, however, is the need to keep film as clean and dust free as possible.
About an hour before a digitizing session, I vacuum the room and allow time for any microscopic airborne dust to settle. Because dust and static can build up in many ways, it is important to keep anti-static brushes nearby so the film can receive a final cleaning just before being placed into the film carrier or holder.
SETTING UP THE CAMERA SYSTEM
MOUNTING THE CAMERA
Set up your copy stand on a level table or desk. I have mine mounted on a table purchased from IKEA. Because my copy stand is the Beseler CS-21, it is both large and heavy, more comparable in size and weight to a Beseler 4×5 enlarger than a lightweight desktop copy stand. Since the platform itself occupies a considerable amount of space, I wanted a table that closely matched the footprint of the copy stand without extending far beyond it, while also not sitting excessively high from the floor.
Underneath the table, I placed two antique metal cabinets originally designed to hold large index cards, one stacked on top of the other, for storing digitizing tools and accessories. The setup keeps everything organized and within easy reach without consuming additional floor space.
Most copy stands include a mounting platform for the camera. Onto that platform, I installed a leveling base to simplify camera alignment and leveling adjustments. Initially, I used a ball head, but eventually switched to the leveling base full time. While a ball head certainly works, it provides far more movement than is necessary for copy stand work. A leveling base allows for small, controlled adjustments and makes the setup process faster and more precise.
CHOOSING CAMERA ORIENTATION
I position my cameras horizontally on the leveling base, which also matches the orientation of my light source. It feels natural, much like setting up a camera for a landscape photograph. Mounting the camera vertically has not provided any real advantage in my workflow and, depending on the design of the copy stand, may actually reduce the available working space between the vertical support column and the light source.
In my earlier digitizing days, I would move the light source and film holder assembly along guide rails created with magnetic strips attached to the copy stand’s magnetized surface. This allowed me to create overlapping captures for extremely high resolution stitched files.
Today, I no longer work that way. When digitizing 6×12 or 6×17 panoramic negatives, the Negative Supply Pro Film Carrier 120 MK2 includes a transport knob that advances the film smoothly through the carrier. This makes it much easier to capture overlapping sections for later stitching in post-processing while keeping the camera and light source stationary.
SENSOR-TO-FILM PARALLELISM
At macro reproduction distances, these issues become much more noticeable because depth of field becomes extremely shallow.
ACHIEVING ALIGNMENT
1. Use a Mirror: Place a thin front-surface mirror, approximately 1-2 mm thick, completely flat on the film holder or scanning surface. I use this type of mirror for alignment.
2. Center the Camera: Turn on the camera’s Live View and enable the crosshair or grid overlay.
3. Adjust the System: Adjust the copy stand or leveling base until the reflection of the camera lens appears perfectly centered within the crosshairs. Once centered, the optical axis is perpendicular to the mirror surface, meaning the sensor and film planes are parallel.
REAL-WORLD TOLERANCES
Perfect alignment does not truly exist because physical materials flex, sag, and shift slightly. Acceptable alignment always depends upon the precision of your setup and the resolution demands of your workflow.
The Math: At macro distances, depth of field is often less than a single millimeter.
The Margin: Any sensor tilt must remain within that tiny depth of field range from corner to corner.
The Reality: High resolution sensors above 45 megapixels combined with modern sharp macro lenses demand tighter tolerances than lower resolution systems.
FINE-TUNING AND SMALL CORRECTIONS
If your mirror test appears accurate but your actual scans still reveal a soft corner, small corrections can usually resolve the problem.
The Paper Shim: Place tiny scraps of paper or Post-it notes beneath one corner of the film holder to compensate for sagging or uneven support.
Grip or Gaffer Tape: A thin layer of gaffer tape placed strategically beneath part of the copy stand base can help correct a slight but persistent lean.
Geared Heads: If extremely fine adjustments are needed, a geared tripod head provides more precise control than a standard ball head or leveling base.
AVOIDING OBSESSIVE PERFECTIONISM
Do not spend hours chasing a mathematical zero that changes the moment you touch the focus ring or advance the film.
There are several practical ways to reduce stress while still achieving excellent results.
Stop Down the Lens: Avoid digitizing wide open. Most macro lenses perform best around f/5.6 to f/8, where sharpness is excellent and depth of field increases enough to mask very minor alignment errors.
Flatten the Film: Curved film is responsible for a large percentage of corner softness problems. In many situations, film flatness matters more than microscopic camera alignment adjustments. Anti-Newton Ring (ANR) glass can help hold film perfectly flat when necessary.
The Print Test: Finally, stop examining your scans at 400% magnification. If the softness cannot be seen during normal viewing or in a reasonably sized print, your alignment is likely already more than adequate.
REPRODUCTION RATIO AND FRAMING
UNDERSTANDING REPRODUCTION RATIO
What 1:1 Means
A 1:1 reproduction ratio, also called life-size magnification, means the size of the subject projected onto the sensor is identical to its physical size in real life. For example, a one-inch coin photographed at 1:1 will project as a one-inch image onto the camera sensor.
When digitizing film, understanding reproduction ratio helps determine how much of the negative fills the sensor area and how efficiently you are using the camera’s available resolution.
FULL FRAME VS. APS-C
APS-C sensors are smaller than full frame sensors, which results in a tighter crop of the projected image. This creates the appearance of greater magnification without changing the lens itself because a smaller portion of the image circle is being recorded.
APS-C systems typically require the lowest camera rail position on a copy stand because the smaller sensor area fills more quickly at closer distances. Macro lenses designed for APS-C cameras often achieve 1:1 reproduction with focal lengths in the 40 mm to 60 mm range, allowing the camera to sit relatively close to the baseboard.
Full frame cameras generally require a medium rail position. Macro lenses designed for full frame systems are commonly found in the 90 mm to 105 mm focal length range.
MEDIUM FORMAT
Medium format systems use significantly larger sensors (53.4x40mm or 44x33mm) or film areas (6×4.5 cm, 6×6 cm, or 6×7 cm formats). Because of this larger imaging area, less magnification is required to create large, highly detailed reproductions. The result is often smoother tonal transitions and a greater sense of depth and subtlety in the final image.
Medium format setups usually require the highest rail position on the copy stand. To achieve a 1:1 reproduction ratio, medium format macro lenses typically use longer focal lengths, often in the 90 mm to 120 mm range.
FRAMING THE NEGATIVE
Leaving Border Space
It is generally good practice to leave a slight border around the negative during capture. This provides protection against clipped edges, allows room for minor alignment imperfections, and helps avoid edge-related optical issues.
Personally, when digitizing Hasselblad 6×6 negatives, I often prefer showing the natural film border and therefore use a “full border” film carrier when I want that presentation included in the final image.
CROPPING PHILOSOPHY
Cropping should be viewed as a compositional tool rather than a correction for careless framing. Although modern digital cameras offer extremely high megapixel counts, heavy cropping still reduces overall resolution and can make noise and grain more visible.
This is one reason higher resolution camera systems can be especially beneficial when digitizing film. Additional resolution provides greater flexibility for cropping while still maintaining excellent image quality in the final file.
MAXIMIZING RESOLUTION
To get the sharpest possible results, fill the frame with your subject as much as ethically and compositionally possible. This forces your camera to utilize every single pixel on the sensor, retaining maximum detail, dynamic range, and texture for your final print or digital display.
A PRACTICAL WORKFLOW REASONS FOR HIGHER MEGAPIXELS
There can also be practical workflow reasons for preferring higher megapixel systems. For example, when using a digital back with a camera such as the Hasselblad FlexBody, a compact medium format view camera with rear shift and tilt movements, there is an important limitation: the digital back cannot be rotated independently without rotating the entire camera. Because of this, it is often preferable to work in a square format preview and crop later during post-processing when/if a different aspect ratio is desired.
In situations like this, the ability to capture a very high resolution square file becomes especially valuable, allowing multiple aspect ratios to be extracted later while still preserving excellent image quality.
FILM FLATNESS
WHY FLATNESS IS CRITICAL
Achieving proper film flatness is one of the most critical factors in producing sharp, high resolution digital captures of film. Curled or uneven film can introduce focus inconsistencies across the image area because macro digitizing systems operate with extremely shallow depth of field. Managing film flatness often involves choosing between tension-based holders, glass carriers, Anti-Newton Ring (ANR) glass, and balancing workflow speed against maximum image quality.
Curled Film
Film naturally curls over time due to storage conditions, humidity changes, and slight differences between the emulsion and film base as they age. During digitizing, this curl can lift portions of the negative outside the shallow depth of field produced by a macro lens.
Focus Inconsistencies
Even extremely small deviations in film flatness can create localized softness. At high magnifications and with modern high resolution sensors, tiny shifts in film position become surprisingly visible.
Panoramic Film
Long panoramic formats such as 6×12 and 6×17 are especially prone to sagging or bowing in the center. These formats benefit greatly from rigid support systems capable of maintaining an even focal plane across the entire length of the negative.
HOLDER DESIGN CONSIDERATIONS
Tension-Based Holders
Tension-based holders use methods such as magnetic pressure plates, curved tracks, or roller transport systems to help keep the film flat without placing additional glass between the film and lens. One advantage of this design is preserving maximum optical clarity by avoiding extra reflective surfaces in the optical path.
Glass Carriers
Glass carriers sandwich the film between optical glass plates positioned above the light source. While this method can hold severely curled film exceptionally flat, it also introduces additional air-to-glass surfaces that may increase reflections, attract dust, and slightly reduce contrast if not carefully managed.
Anti-Newton Ring (ANR) Glass
ANR glass uses a microscopically etched surface that prevents the film from adhering tightly to the glass. This helps eliminate Newton rings, the colorful interference patterns that can occur when smooth film surfaces come into direct contact with standard glass.
TRADEOFFS: SPEED VS. PERFECTION
Fluid Mounting
Fluid mounting is often considered the highest quality method for achieving maximum sharpness and minimizing the appearance of scratches. However, it is generally impractical for most camera digitizing workflows because it requires mounting fluids, additional cleanup, and a much slower working process.
Standard Glass Holders
Standard glass carriers can be quick and convenient to use, especially with difficult or heavily curled film, but they are more vulnerable to internal reflections, dust contamination, and Newton ring artifacts if not properly maintained.
Tension and Borderless Holders
Tension-based and borderless holders may require slightly more care when loading and advancing film, but they often provide a more efficient long-term workflow by reducing glass-related artifacts, minimizing dust spotting, and preserving maximum sharpness from the digital capture system.
FOCUSING TECHNIQUES
MAGNIFIED LIVE VIEW
Most modern cameras allow Live View magnification of 10× or greater. This feature is invaluable when digitizing film because it allows you to evaluate focus at a pixel level rather than relying on the camera’s rear screen at normal magnification.
Enable Live View and zoom into the image as much as practical. Once magnified, slowly adjust focus while observing the grain structure of the film.
Evaluating Grain
As focus approaches its optimum point, the film grain will appear to “snap” into clarity. The grain should look crisp and well defined rather than soft or mushy. This point represents the highest level of detail your digitizing setup can resolve.
Alternative Focusing Targets
Not all film stocks make grain easy to see. Fine-grained films such as Kodak Panatomic-X, Kodak TMAX 100, or Fujifilm Acros II may provide little visible grain structure, especially in thin negatives.
In these situations, focus on other sharply defined elements such as frame numbers, edge markings, film stock identification text, or the edge of a film perforation. These features often provide an easier and more reliable focus target than the image itself.
AUTOFOCUS VS. MANUAL FOCUS
Advantages of Autofocus
Modern mirrorless cameras have transformed the digitizing process. With small-area or pinpoint autofocus modes, many systems can lock onto film grain quickly and consistently. In some situations, autofocus may actually provide more repeatable results than manual focusing, particularly during long digitizing sessions where eye fatigue becomes a factor.
My own workflow has evolved considerably in this regard. Early digitizing sessions with medium format digital backs required manual focusing. Today, autofocus-equipped cameras have simplified the process and significantly reduced setup time.
When Manual Focus Is Preferable
Manual focus remains valuable when working with older lenses that lack electronic communication, low-contrast negatives that cause autofocus systems to hunt, or whenever complete control over the focusing process is desired.
Focus Confirmation
If manually focusing, consider disabling focus peaking while making final adjustments. Although focus peaking can be useful for rough setup, it often highlights broad areas of apparent sharpness and can create a false impression of critical focus. For final evaluation, magnified Live View is usually the more reliable method.
EDGE-TO-EDGE INSPECTION
Sensor and Film Alignment
To achieve uniform sharpness across the entire frame, the camera sensor and film plane must remain parallel. Even a slight misalignment can leave one side of the negative noticeably softer than the other.
Checking the Corners
After focusing in the center of the frame, inspect the extreme corners using magnified Live View. If the center appears sharp but one or more corners appear soft, the problem is often related to alignment or film flatness rather than focus itself.
False Sharpness
Wide apertures can create a misleading impression of sharpness in the center of the frame while allowing the edges to drift outside the depth of field. For this reason, evaluating both the center and corners is an important part of the focusing process.
REPEATABILITY AND REAL-WORLD EXPECTATIONS
Consistency
Once your copy stand, film holder, and camera are properly aligned, focus generally needs to be established only once for an entire roll of film. Assuming the holder maintains a consistent film plane, subsequent frames should require little or no adjustment.
Vibration Control
Macro photography is highly sensitive to even the smallest movement. Use a remote release, electronic shutter, or self-timer whenever possible to prevent vibrations from degrading image sharpness during capture.
Aperture Selection
For most digitizing applications, the best balance between sharpness and depth of field is typically found around f/5.6 to f/8, depending on the lens. Stopping down slightly provides enough depth of field to compensate for minor variations in film flatness while avoiding the diffraction losses that become increasingly visible at smaller apertures.
As always, test your own lens and workflow. The optimal aperture is the one that delivers the greatest overall sharpness across the entire frame.
MASKING STRAY LIGHT
WHY STRAY LIGHT MATTERS
Controlling stray light is an often overlooked aspect of digitizing film, yet it can have a significant impact on image quality. Any light that reaches the camera sensor without passing through the intended image area of the film has the potential to reduce contrast, lower black levels, and introduce unwanted flare.
Loss Of Contrast
Stray light entering the lens from areas outside the film image can reduce overall contrast and color saturation. The effect is similar to photographing into bright sunlight without a lens hood. Blacks become less deep, highlights lose separation, and the image can appear flat or lacking in crispness.
Reduced Black Levels
Unwanted ambient light striking the film holder, light source, or surrounding work area can illuminate the film base and reduce the density of shadow areas. Instead of recording as rich blacks, these areas may reproduce as muddy grays, resulting in a loss of tonal depth and perceived sharpness.
Reflections and Flare
Reflections can occur whenever light bounces between the film surface, glass carriers, light source, and lens elements. These internal reflections may create flare, ghosting, haze, or localized bright spots within the image. The problem is often subtle and may go unnoticed until post-processing, where it becomes apparent that the scan lacks the contrast and clarity present in the original negative.
MASKING TECHNIQUES
Once the camera and film holder are properly aligned, the next step is to minimize stray light. The goal is simple: the only light reaching the camera sensor should be the light passing through the film itself.
Masks Around Film Carriers
One of the most effective methods of controlling stray light is to cover any exposed areas of the light source surrounding the negative. Light escaping around the film carrier can reflect into the lens and reduce image contrast.
Black mat board, black cardstock, or opaque masking materials can be used to cover unused portions of the light source. Some photographers create custom masks for different film formats, while others simply use movable masking panels.
Whatever method you choose, the objective is the same: ensure that the only illuminated area visible to the lens is the film frame being digitized.
Bellows and Light Shields
Another effective technique is to create a physical barrier between the camera lens and the film carrier. This can be accomplished with a macro bellows system, a commercial lens hood, or a simple homemade tunnel constructed from black cardboard and lined with a non-reflective material.
The purpose of the shield is to prevent ambient room light from striking the front element of the lens or reflecting from surfaces surrounding the digitizing setup. Even small amounts of stray light can reduce contrast when working at high reproduction ratios.
Darkening the Work Area
The digitizing area itself should be treated much like a darkroom enlarging station. Bright room lights, sunlight from windows, and illuminated computer screens can all contribute unwanted reflections and flare.
Whenever possible, close blinds or curtains and turn off unnecessary room lighting. If a computer monitor is positioned near the digitizing station, consider dimming it or positioning it so its light cannot reflect from the film surface.
One final consideration is clothing. Light-colored shirts can reflect surprisingly large amounts of light onto glossy film surfaces. When working with highly reflective film or glass carriers, darker clothing can help minimize unwanted reflections and maintain maximum image contrast.
EXPOSURE METHODOLOGY
Proper exposure is every bit as important when digitizing film as it is when making the original photograph. The goal is to capture the maximum amount of information contained within the negative or transparency while preserving highlight and shadow detail for later processing.
ESTABLISHING EXPOSURE
Histogram Usage
The histogram is one of the most useful tools available when digitizing film. Rather than relying solely on the image displayed on the rear screen, monitor the histogram to evaluate how the captured data is distributed across the sensor’s tonal range.
I recommend activating the RGB histogram whenever possible. This allows you to monitor each color channel individually and identify potential clipping before it occurs.
When digitizing color film, remember that the image will later be inverted during post-processing. As a result, it is important to pay attention to the individual color channels rather than judging exposure solely by the appearance of the preview image.
In most cases, the objective is to produce a well-distributed histogram that approaches, but does not clip, either end of the tonal scale.
Protecting Highlights
As with digital photography in general, it is often beneficial to expose as far to the right of the histogram as possible without clipping important information. This approach maximizes the amount of data captured by the sensor while maintaining highlight detail.
With slide film, highlight protection is particularly important because transparency films often contain a limited exposure range. Once highlight detail is clipped, it cannot be recovered.
Negative film is generally more forgiving. When digitizing color or black-and-white negatives, the clear film base should be recorded cleanly while avoiding excessive overexposure that pushes the histogram beyond the sensor’s recording capability.
Dense Negatives vs. Thin Negatives
Not all negatives require the same exposure settings.
Dense negatives, often the result of generous exposure or high contrast scenes, require more light or longer shutter speeds for the camera to adequately record detail through the denser portions of the film.
Thin negatives, on the other hand, transmit more light and generally require less exposure. However, they also contain less image information and demand careful exposure to prevent shadow areas from becoming noisy or lacking detail.
ISO SELECTION
Base ISO Considerations
For digitizing film, I recommend using your camera’s native base ISO whenever possible. For most cameras this will be ISO 100, ISO 64, or ISO 200, depending on the sensor design.
Using base ISO maximizes image quality and provides the greatest amount of tonal information available from the sensor.
Dynamic Range
Native ISO settings generally provide the widest dynamic range a sensor can capture. This becomes particularly important when digitizing dense negatives or transparency films that contain significant tonal variation.
The greater the available dynamic range, the easier it becomes to preserve highlight and shadow detail during post-processing.
Noise Performance
Base ISO also minimizes digital noise. Keeping digital noise as low as possible is important because excessive sensor noise can interfere with the natural grain structure of the film.
The goal is for the viewer to see the characteristics of the film itself, not artifacts introduced by the digital capture process.
WHITE BALANCE
RAW Flexibility
I strongly recommend capturing all digitized images in RAW format. RAW files preserve the maximum amount of image information and provide complete flexibility for white balance adjustments later in the workflow.
Although white balance can be adjusted after capture, it is still helpful to establish a consistent baseline during the digitizing session. A fixed setting such as Daylight or a custom white balance based on your light source works well.
Consistency During Sessions
Consistency is often more important than absolute accuracy during capture. When digitizing color negatives, many photographers establish a custom white balance using an unexposed portion of the film base to help compensate for the film’s orange mask.
Whether you choose a custom white balance or a fixed preset, keeping that setting consistent throughout an entire roll simplifies post-processing and helps ensure uniform color from frame to frame.
BRACKETING
WHY BRACKETING CAN HELP
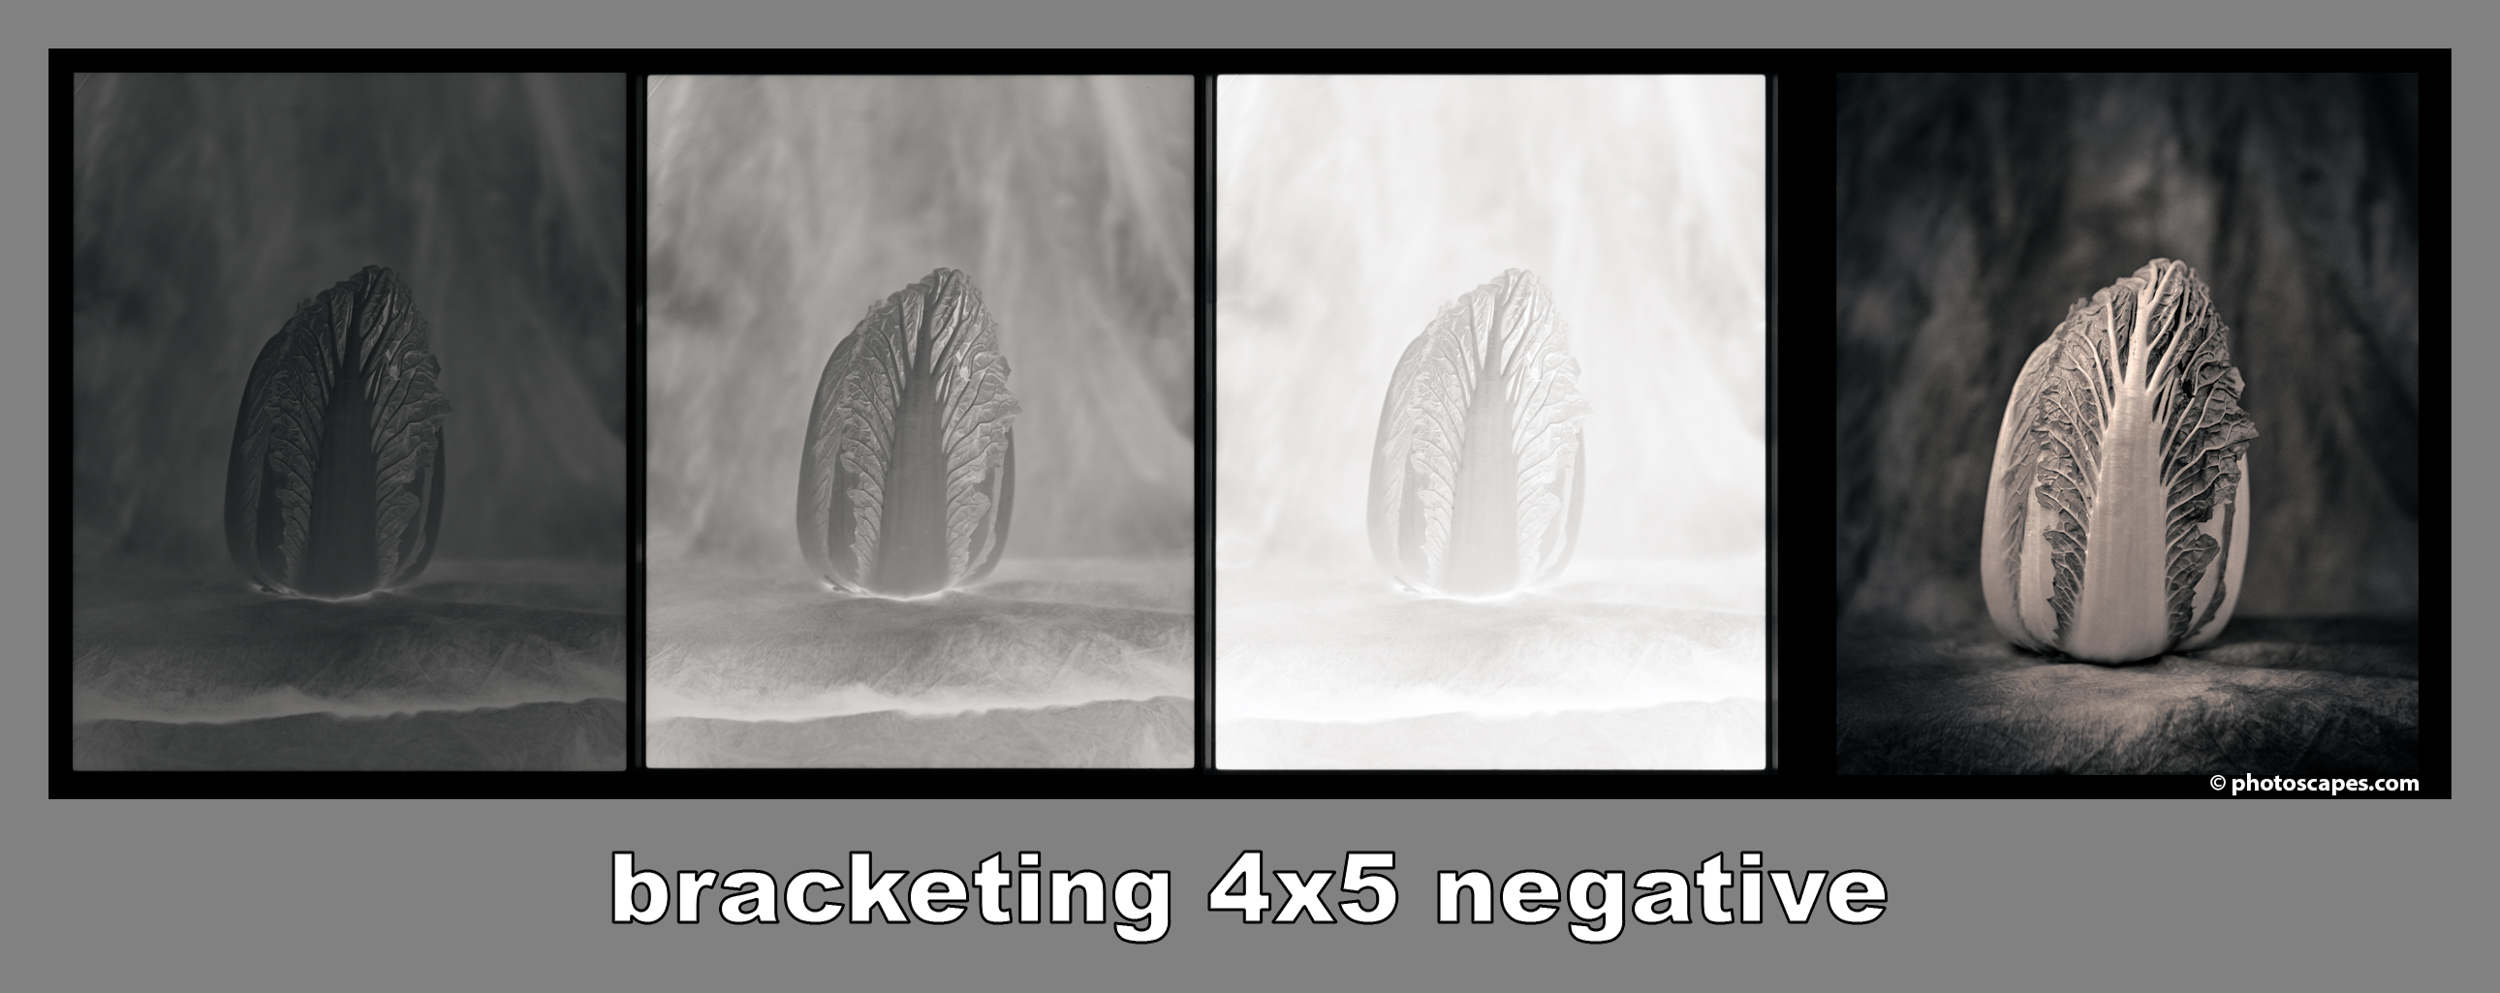
A single digital capture may not always record every bit of information contained within a piece of film. Bracketing provides additional exposures that can help preserve highlight and shadow detail, improve difficult captures, and reduce the risk of losing information.
It can also serve as a useful safety net when working with unusual film stocks, aging emulsions, or negatives whose density varies significantly from frame to frame.
DIFFICULT NEGATIVES
Underexposed Film
Thin negatives often contain very little density and can be challenging to digitize successfully. Bracketing allows you to explore different exposure levels to maximize shadow detail while minimizing noise.
Overexposed Film
Dense negatives contain substantial amounts of image information, but that information may be difficult for the camera sensor to record in a single exposure. Additional bracketed captures can help preserve detail in the densest areas of the negative.
Damaged or Aged Film
Older films may exhibit shifts in density, color, or contrast. In these situations, standard exposure settings may not provide the best results, making bracketing a useful insurance policy.
DENSE TRANSPARENCIES
Slide films deserve special attention because they generally have less exposure latitude than negative films.
Limited Exposure Latitude
Unlike color negatives, transparency films are less forgiving of exposure errors. Small changes in exposure can significantly affect highlight and shadow detail.
Dense Highlight Areas
Some transparencies contain extremely dense highlight regions that require additional exposure to fully reveal the recorded image information.
Clipping Risks
Digital sensors can easily clip highlights when digitizing slide film. Capturing additional darker exposures can help preserve highlight detail that might otherwise be lost.
HIGH CONTRAST FILM
Certain films and subjects produce tonal ranges that challenge even modern digital sensors.
High Contrast Films
Specialized films, such as technical or document films, often exhibit extremely high contrast with very little tonal transition between highlights and shadows.
High Contrast Subjects
Negatives made in harsh midday sunlight or other extreme lighting conditions may contain a wider tonal range than a single capture can comfortably accommodate.
Pushed Film
Film developed beyond its normal rating typically exhibits increased contrast and deeper shadows. Bracketing can help preserve information across the full tonal range.
SIMPLE BRACKETING METHODS
Auto Exposure Bracketing (AEB)
Many modern cameras include an Auto Exposure Bracketing feature that automatically captures a sequence of exposures at predetermined intervals. This is often the quickest and easiest approach.
Shutter Speed Adjustments
For copy work, manually varying shutter speed while maintaining a fixed aperture and ISO is often the preferred method. This ensures depth of field and image quality remain consistent throughout the sequence.
Tethered Capture
If working tethered to a computer, many capture applications allow bracketed exposures to be triggered automatically from the software interface.
ORGANIZING BRACKETED CAPTURES
Bracketing can quickly generate large numbers of files, making organization important.
One simple technique is to photograph a blank frame or place a hand in front of the lens before beginning a bracketed sequence. This creates a visual marker that makes it easy to identify the start of the series later.
Some software applications can automatically group bracketed exposures based on capture time, simplifying file management and HDR workflows.
Consistency also helps. If you choose to bracket, use the same number of exposures throughout a session whenever practical. A predictable pattern makes later editing and file management much easier.
WHEN BRACKETING BECOMES UNNECESSARY
Although bracketing can be useful, it is often unnecessary for routine digitizing work.
Well-exposed color negatives generally fit comfortably within the dynamic range of modern digital cameras and rarely require multiple captures. Likewise, low contrast scenes with evenly distributed tones can usually be recorded successfully with a single exposure.
For large archival projects involving hundreds or thousands of images, bracketing may simply slow the workflow and consume additional storage space without providing meaningful benefits.
In my own workflow, bracketing is used selectively. Most well-exposed negatives require only a single capture. I reserve bracketing for unusually dense negatives, difficult transparencies, and situations where preserving every possible bit of image information outweighs the additional time required.
CONTACT SHEETS
CONTACT SHEET CREATION
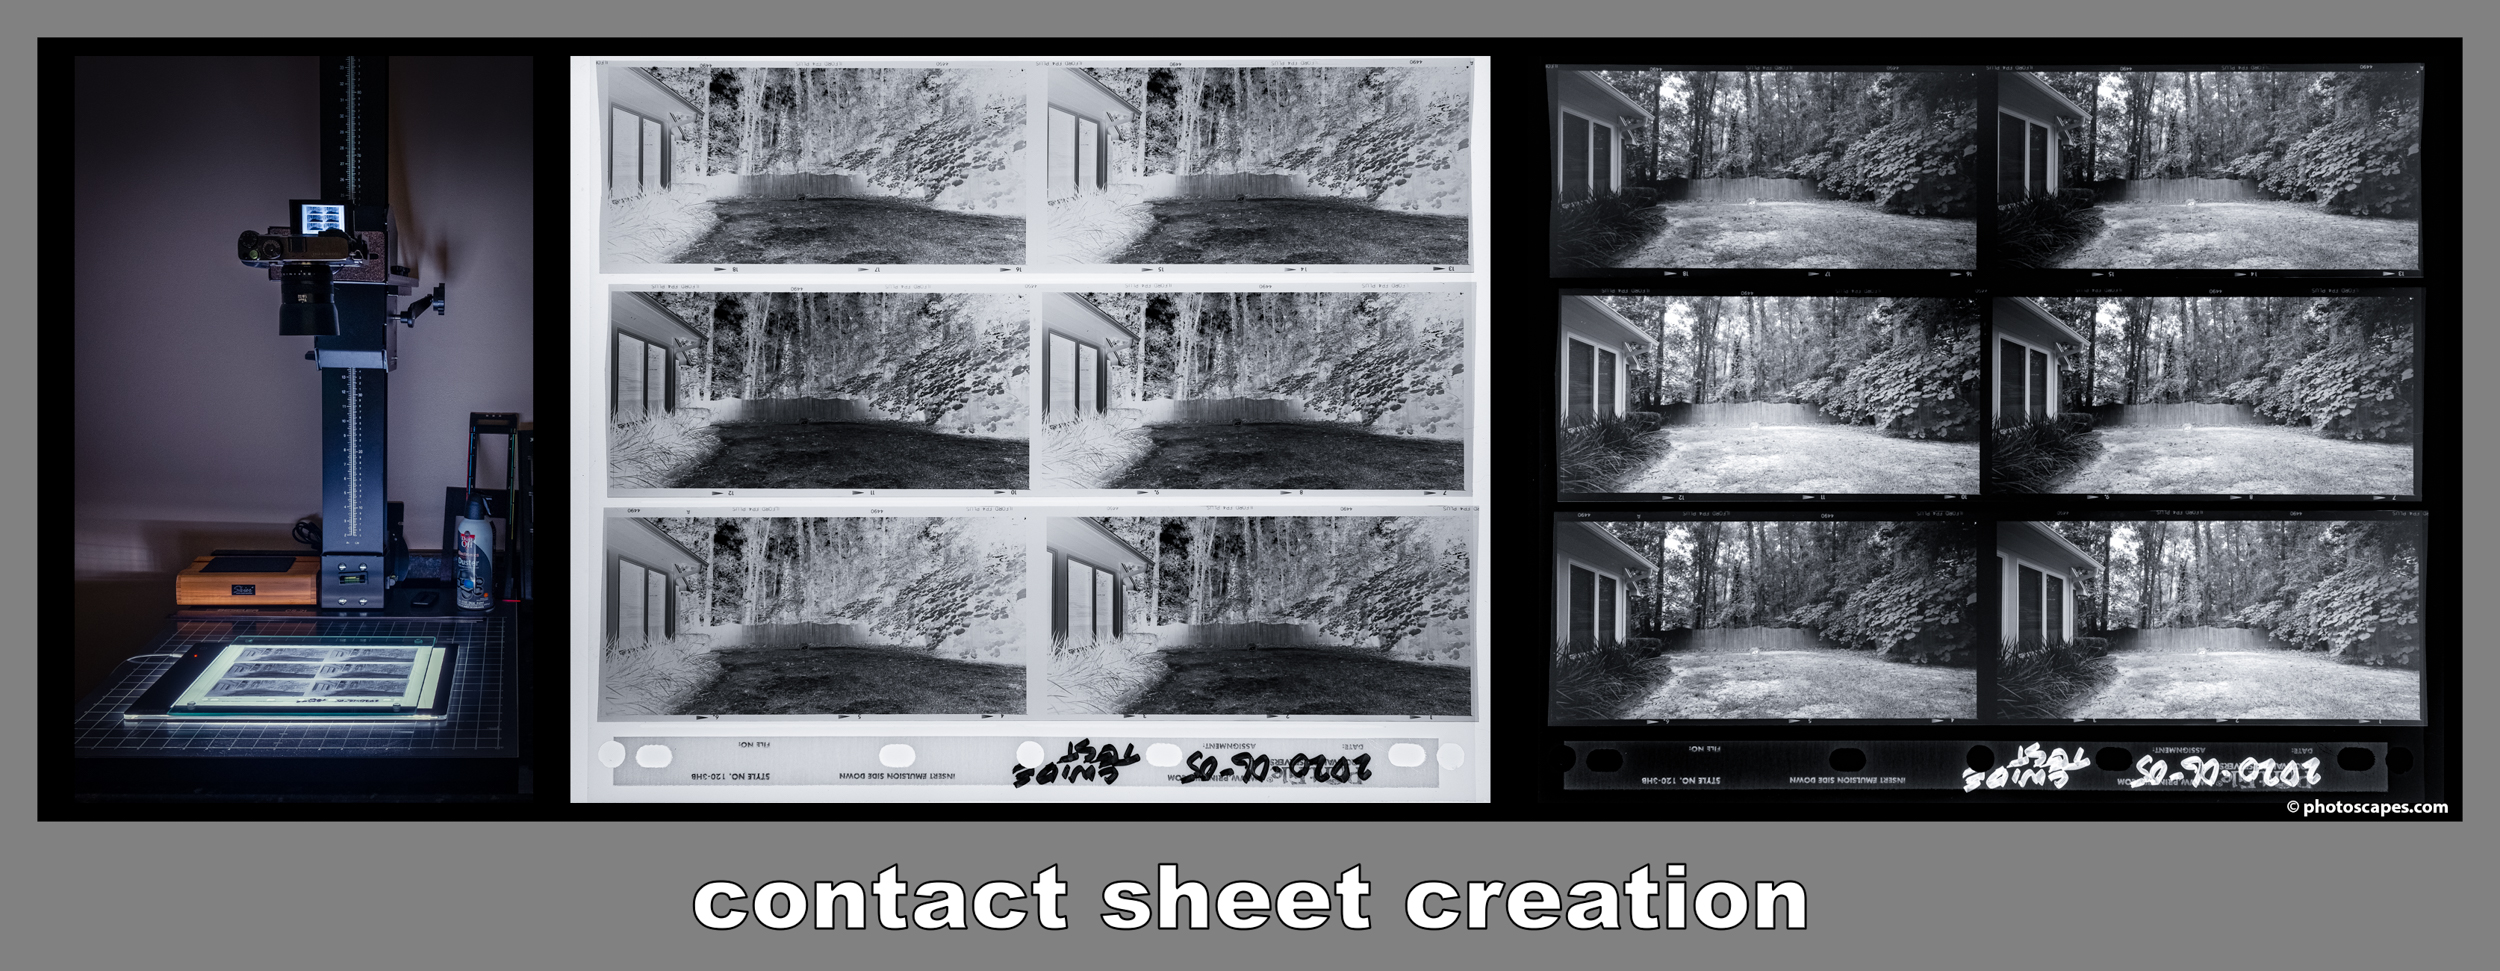
Occasionally, I need a quick contact sheet rather than individual digitized frames. When I do, I simply place the Print File page containing the negatives on top of my Kaiser lightbox and cover it with a sheet of glass to help keep the page flat. I then make a series of bracketed exposures and use the Negative Lab Pro plugin in Lightroom to convert the negative image into a positive contact sheet.
Above is an example of this process. In this case, I was testing my Cambo Wide 650 in my backyard using a 6×12 panoramic film magazine. A sign was placed approximately 15 feet from the camera, and the purpose of the test was to evaluate the lens’s hyperfocal accuracy as well as verify the integrity of the Graflok back and film magazine combination.
After converting the contact sheet to a positive image, I added notes from my shooting log in Photoshop. This creates a visual reference that combines the film frames with the technical information recorded during the test. Because these files are stored within my Cambo Wide 650 folder structure in Lightroom, I can quickly locate and review them whenever needed.
This highlights one of the reasons I continue to use Lightroom. Beyond image processing, its cataloging and organizational capabilities allow me to maintain a searchable archive of negatives, contact sheets, test results, and finished images. Over time, that organizational structure becomes just as valuable as the images themselves.
In Digitizing Film Part #3, we will move beyond the capture process and into the software side of the workflow, including file organization, cataloging, contact sheets, RAW conversion, inversion, color correction, archiving, and long-term image management.
STITCHING NEGATIVES
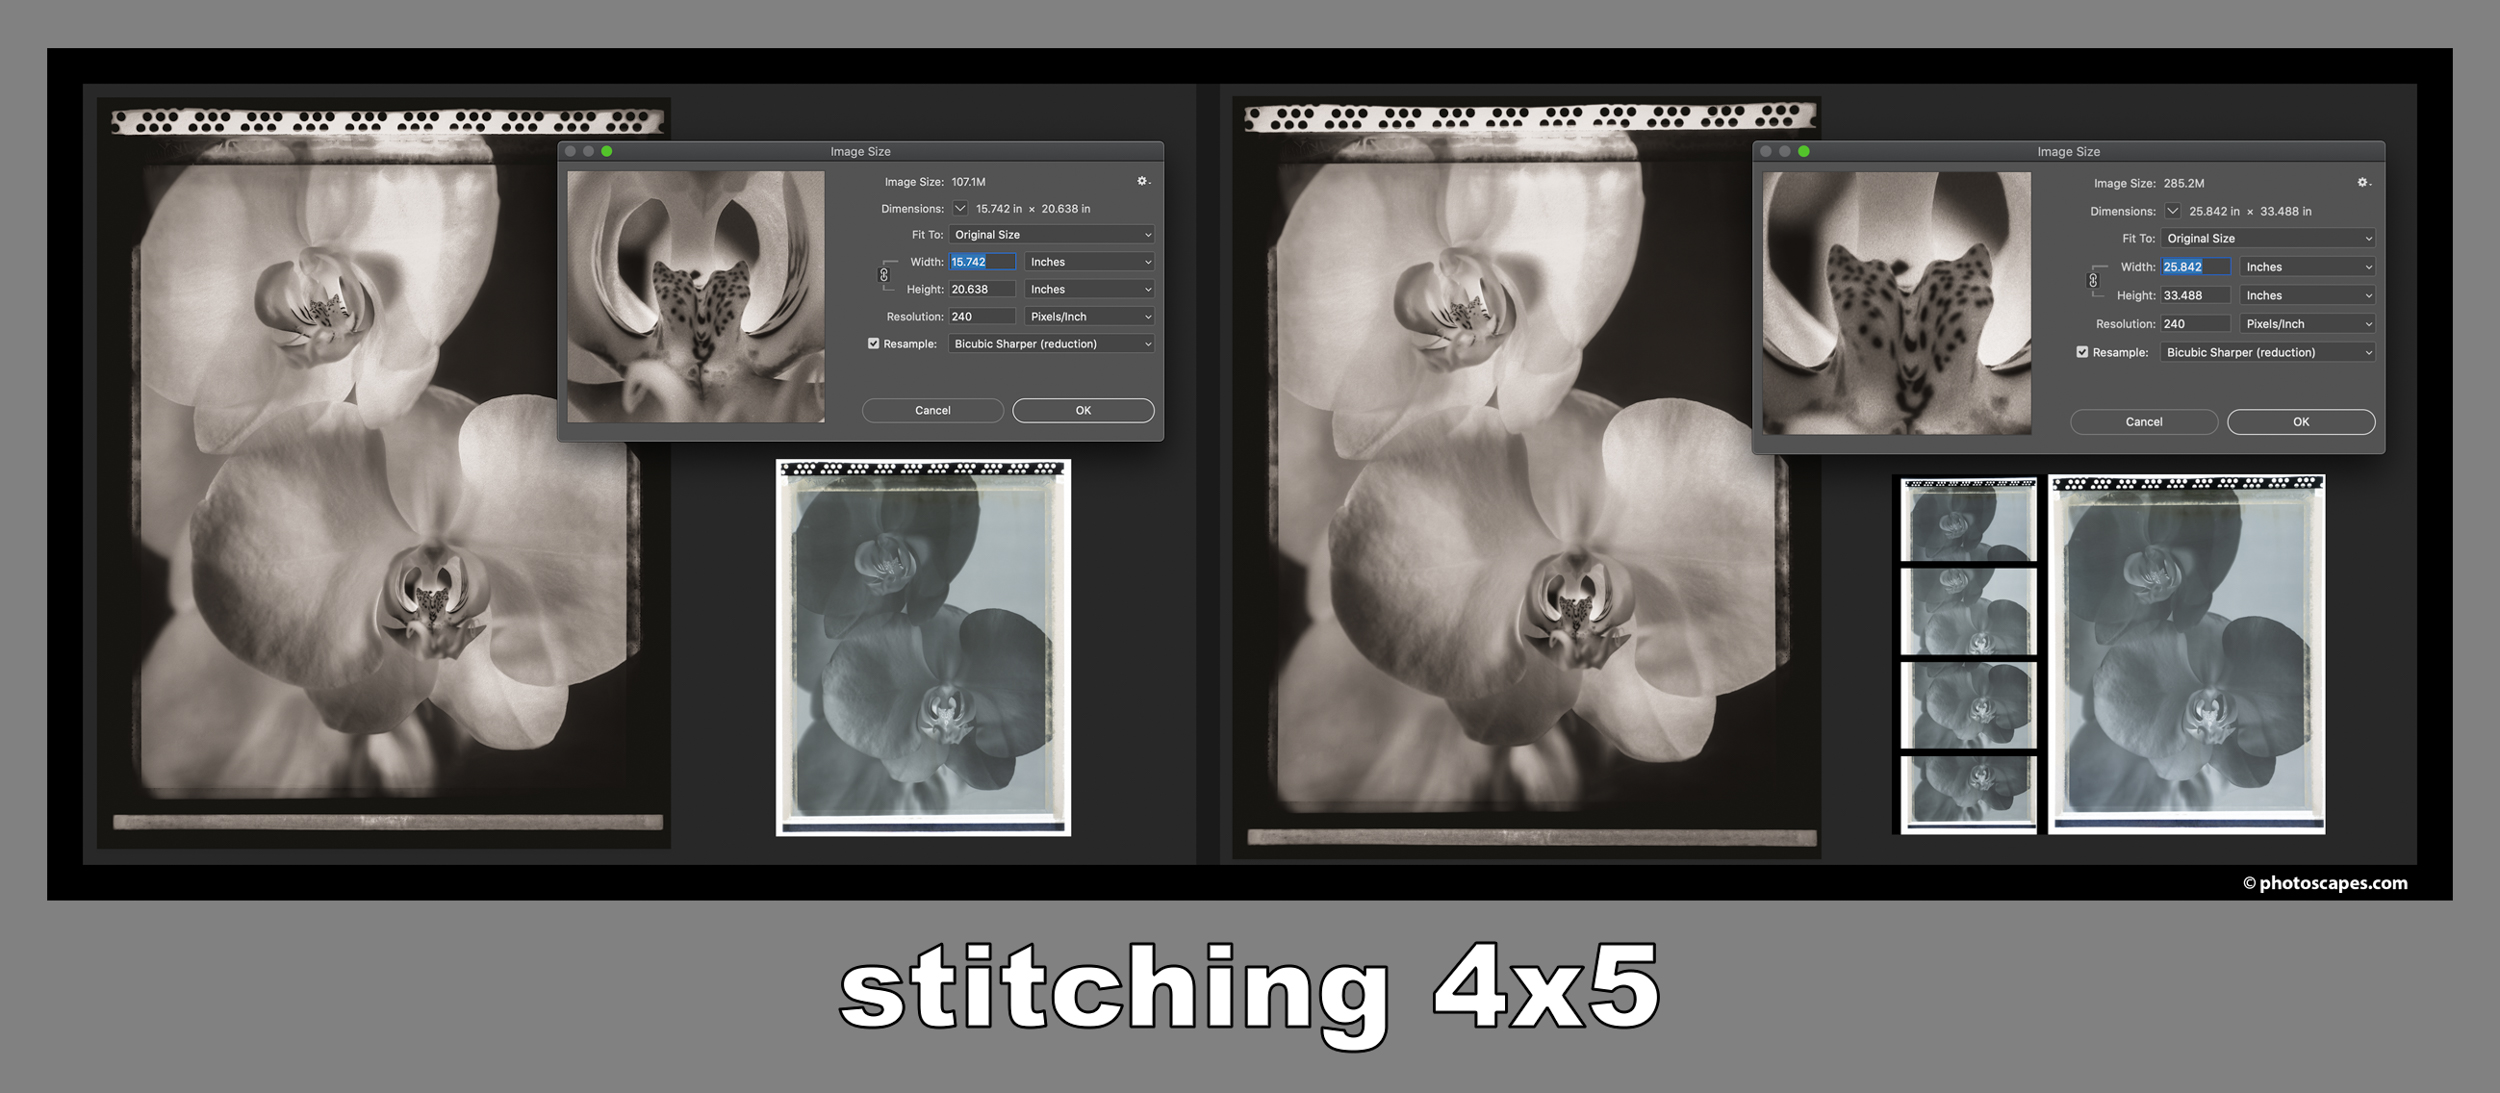
Stitching multiple overlapping captures allows the negative to be digitized at a higher effective resolution. Each section of the film is photographed separately and later merged in software to create a single file containing significantly more detail than a one-shot capture. This approach is particularly beneficial when the final image will be printed large or when maximum detail extraction from the negative is desired.
Although stitching requires additional capture and processing time, the increase in resolution often makes it worthwhile, especially for photographers working with APS-C cameras and large-format negatives.
WHY STITCHING IS SOMETIMES NECESSARY
Modern digital cameras offer remarkable resolution, but there are situations where a single capture cannot fully utilize the detail contained within a negative. In these cases, stitching multiple captures together can produce significantly larger files while preserving the maximum amount of information recorded on the film.
Overcoming Sensor Resolution Limits
Stitching allows you to move beyond the native resolution of your digital camera. By combining multiple overlapping captures, the resulting file can contain substantially more detail than any single exposure from the sensor.
Capturing Larger Film Formats
Medium format and large format negatives often contain more information than a single digital capture can effectively record. Formats such as 6×7, 6×9, 4×5, and larger can benefit greatly from multi-image stitching, particularly when large prints or archival-quality reproductions are desired.
Preserving Panoramic Formats
Panoramic formats such as 6×12 and 6×17 present a unique challenge because of their extreme aspect ratios. While a single capture may record most or all of the negative, stitching multiple captures together allows the full panoramic frame to be digitized at significantly higher resolution.
In some cases, film carriers do not permit a complete capture of the entire 6×12 or 6×17 frame in a single exposure. Stitching becomes a practical solution, allowing the photographer to capture the full image area while also increasing the final file’s resolution. This approach is particularly useful when digitizing panoramic negatives intended for large prints, where preserving every detail across the width of the image is important.
CAPTURE TECHNIQUE
Successful stitching begins with a consistent capture process.
Maintaining Overlap
Each capture should overlap the adjacent frame sufficiently to provide the stitching software with common reference points. An overlap of approximately 30% to 50% generally works well and provides reliable alignment during assembly.
Moving the Film, Not the Camera
For digitizing work, it is often preferable to keep the camera fixed and move the film through the carrier. This approach maintains consistent geometry, focus, and alignment throughout the sequence.
For example, when digitizing 6×12 or 6×17 negatives, I use the transport mechanism built into the Negative Supply Pro Film Carrier 120 MK2 to advance the film while keeping the camera completely stationary.
Locking Camera Settings
Before beginning a stitched sequence, switch the camera to full manual operation. Focus, aperture, shutter speed, ISO, and white balance should remain unchanged throughout the capture process.
Any variation between frames can create visible transitions or inconsistencies that complicate the stitching process later.
PRACTICAL WORKFLOW NOTES
Organizing Files
Good file organization becomes increasingly important as stitched projects grow larger. Sequential file numbering helps keep the individual captures together and simplifies identification later in the workflow.
Grouping Images
Many software applications allow related captures to be grouped into stacks or collections before stitching. Taking advantage of these organizational tools can make the post-processing workflow considerably easier.
Maintaining Even Illumination
The quality of the final stitched image depends heavily on the consistency of the light source. Uneven illumination across the film can result in visible transitions between panels and make stitching more difficult.
Before beginning a stitched capture sequence, verify that your light source produces uniform illumination across the entire area being digitized. Consistent lighting helps ensure seamless transitions and a cleaner final result.
A PRACTICAL PERSPECTIVE
For most 35 mm and standard medium format negatives, a single capture from a modern digital camera is often more than sufficient. Stitching becomes most valuable when working with panoramic formats, very large negatives, or situations where the highest possible resolution is desired.
In my own workflow, stitching is used primarily for 6×12 and 6×17 negatives. The additional capture time is relatively small, but the increase in file size and retained detail can be substantial.
AVOIDING VIBRATION
When digitizing film, we are working at high magnifications where even the slightest movement can reduce image sharpness. Vibrations that would be completely invisible in everyday photography can become apparent when photographing a negative at or near macro reproduction ratios.
Fortunately, most vibration sources are easy to identify and eliminate once they are understood.
SOURCES OF VIBRATION
Floor Movement
Vibration can originate from surprisingly distant sources. Walking near the copy stand, shifting your weight while seated, or even heavy traffic outside the building can transmit subtle movement through floors and into the digitizing setup.
This is one reason I prefer a sturdy copy stand mounted on a solid table. The more rigid the support system, the less likely it is to transmit unwanted vibrations to the camera.
Shutter Shock
Mechanical shutters create physical movement during exposure. On some cameras, this movement is insignificant. On others, especially when working at high magnifications, shutter shock can introduce a small loss of sharpness.
DSLR cameras may also introduce vibration from mirror movement. Although mirror lock-up can reduce this effect, modern mirrorless cameras offer significant advantages for digitizing film because they eliminate mirror movement altogether.
Handling the Setup
The most common source of vibration is often the photographer. Touching the camera to release the shutter, adjusting controls immediately before exposure, or bumping the copy stand can all introduce movement.
At macro magnifications, even a small vibration can affect image sharpness.
MINIMIZING MOTION
Electronic Shutter
Whenever possible, use an electronic shutter or silent shutter mode. This eliminates mechanical shutter movement and removes one of the most common sources of vibration.
Most of my current digitizing work is performed using electronic shutter mode for this reason.
Delayed Shutter Release
A short self-timer delay allows vibrations to dissipate before the exposure begins. A two-second delay is often sufficient, although some photographers prefer a five-second delay for maximum stability.
This simple technique can produce noticeably sharper results, particularly when working with lightweight copy stands or less rigid support systems.
Remote Triggering
Using a remote release allows the camera to be triggered without physical contact. This can be accomplished with a cable release, wireless remote, smartphone application, or tethered capture software.
Any method that eliminates direct contact with the camera during exposure will help maximize sharpness.
A PRACTICAL PERSPECTIVE
While it is important to control vibration, it is also important not to become overly concerned with chasing perfection. A stable copy stand, electronic shutter, remote triggering, and a solid work surface will eliminate the vast majority of vibration-related issues.
In my experience, film flatness and accurate focus are far more likely to limit image sharpness than vibration once these basic precautions have been taken. The goal is simply to remove vibration as a variable so the film itself can be recorded as accurately as possible.
RAW CAPTURE PHILOSOPHY
Throughout this series, I have repeatedly emphasized capturing film as RAW files rather than JPEGs. While JPEG files may be adequate for casual use, RAW files preserve the maximum amount of information recorded by the camera sensor and provide the greatest flexibility during post-processing.
When digitizing film, the goal is not simply to create a viewable image. The goal is to create a high-quality digital master that can serve as the foundation for all future editing, printing, and archiving.
WHY RAW MATTERS
Maximizing Dynamic Range
RAW files preserve the greatest amount of tonal information available from the sensor. This allows subtle details to be retained in both shadows and highlights, which is particularly important when digitizing dense negatives, transparencies, or difficult exposures.
The more information preserved during capture, the more flexibility you will have later when converting and editing the image.
Color Flexibility
RAW files record the sensor data before major processing decisions are applied. This provides far greater freedom when adjusting white balance, color balance, contrast, and tonal relationships during conversion.
This flexibility is especially valuable when digitizing color negatives, where the inversion process often requires substantial color correction to achieve accurate results.
A Non-Destructive Workflow
One of the greatest advantages of RAW capture is that the original image data remains untouched. Adjustments made in software are stored as instructions rather than permanently altering the underlying file.
This means an image can be revisited and reinterpreted years later without any loss of quality.
CAPTURE CONSISTENCY
Consistent Exposure and Camera Settings
RAW capture works best when combined with a disciplined and repeatable workflow. Maintaining consistent exposure, ISO, white balance, and lighting conditions throughout a digitizing session helps produce uniform results and simplifies later processing.
Although RAW files provide tremendous flexibility, consistency during capture remains important.
Repeatable Processing
A standardized capture workflow makes it much easier to apply the same inversion and correction settings across multiple frames. This becomes particularly valuable when digitizing entire rolls of film where exposure and lighting conditions remain relatively consistent.
The more consistent the capture process, the more efficient the post-processing workflow becomes.
Reducing Variables
Whenever possible, avoid changing camera settings, light source intensity, film holder position, or other variables unnecessarily during a session. Consistency helps eliminate surprises and makes troubleshooting easier when problems arise.
LONG-TERM ARCHIVAL CONSIDERATIONS
Future-Proofing Your Files
One of the most compelling reasons to capture RAW files is that software continues to improve. New inversion tools, noise reduction algorithms, color science, and artificial intelligence technologies are introduced regularly.
A RAW file captured today can be reprocessed years from now using tools that may not yet exist.
The Digital Negative
I often think of the RAW file as the digital equivalent of the original negative. It represents the closest record of what the camera sensor actually captured and serves as the permanent master file from which all future versions can be derived.
For this reason, I never discard my RAW captures after creating finished images.
Metadata and Organization
A long-term archive is only useful if files can be located and identified later. Consistent file naming, folder organization, keywords, and metadata become increasingly important as a collection grows.
Whenever practical, include information such as film type, film format, capture date, camera used, and any other details that may be useful in the future. These small organizational efforts pay enormous dividends when searching large archives years later.
FINAL THOUGHTS
The purpose of digitizing film is not merely to create a digital copy. It is to create the best possible digital representation of the original negative or transparency. RAW capture provides the foundation for that goal by preserving the maximum amount of image data while maintaining complete flexibility for future interpretation.
Just as photographers once protected their original negatives, I believe the RAW file deserves the same level of care. It is the master record from which everything else flows.