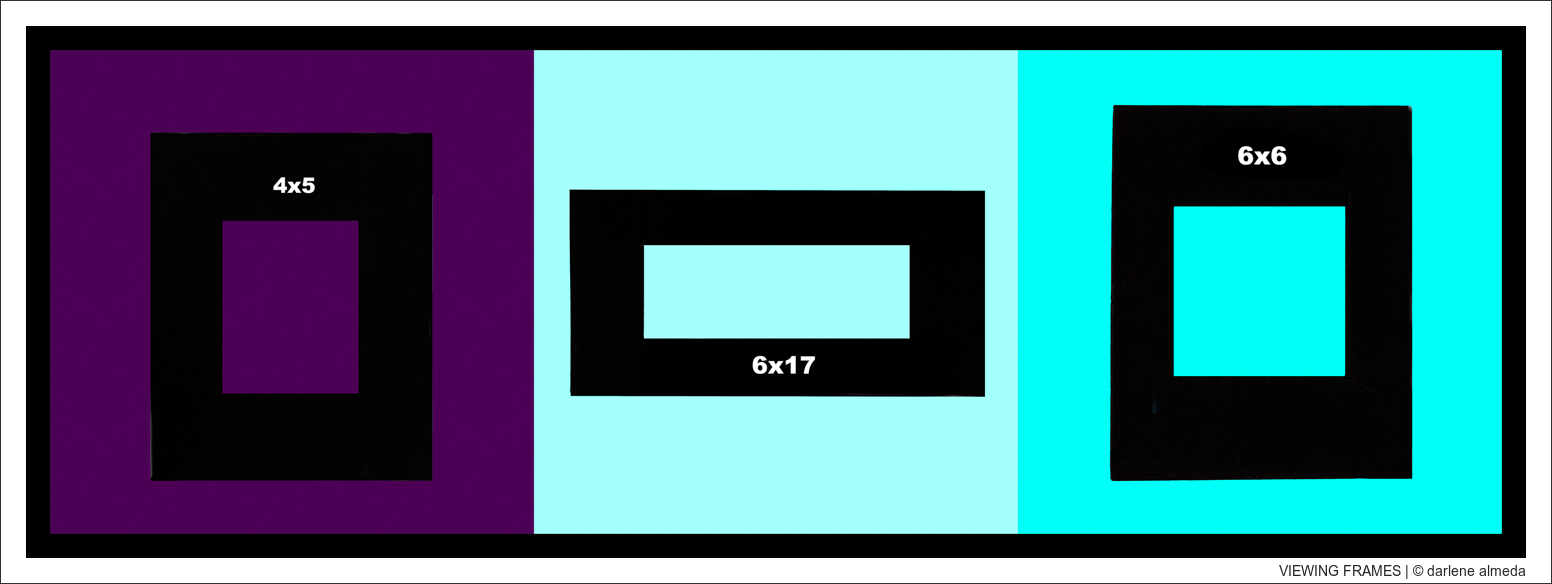
IMAGE: POPULAR VIEWING FRAMES
Intro
Framing your shot is essential to capturing the perfect image, and a viewing frame is a simple yet powerful tool to help pre-visualize your compositions. Ideally, the window should match your film or sensor size to give you the most accurate preview. In this post, we’ll explore various options for viewing frames—from ready-made tools like the ViewCatcher, to repurposing materials you might already have, and even crafting your own custom viewing frame. Let’s dive in!
The ViewCatcher
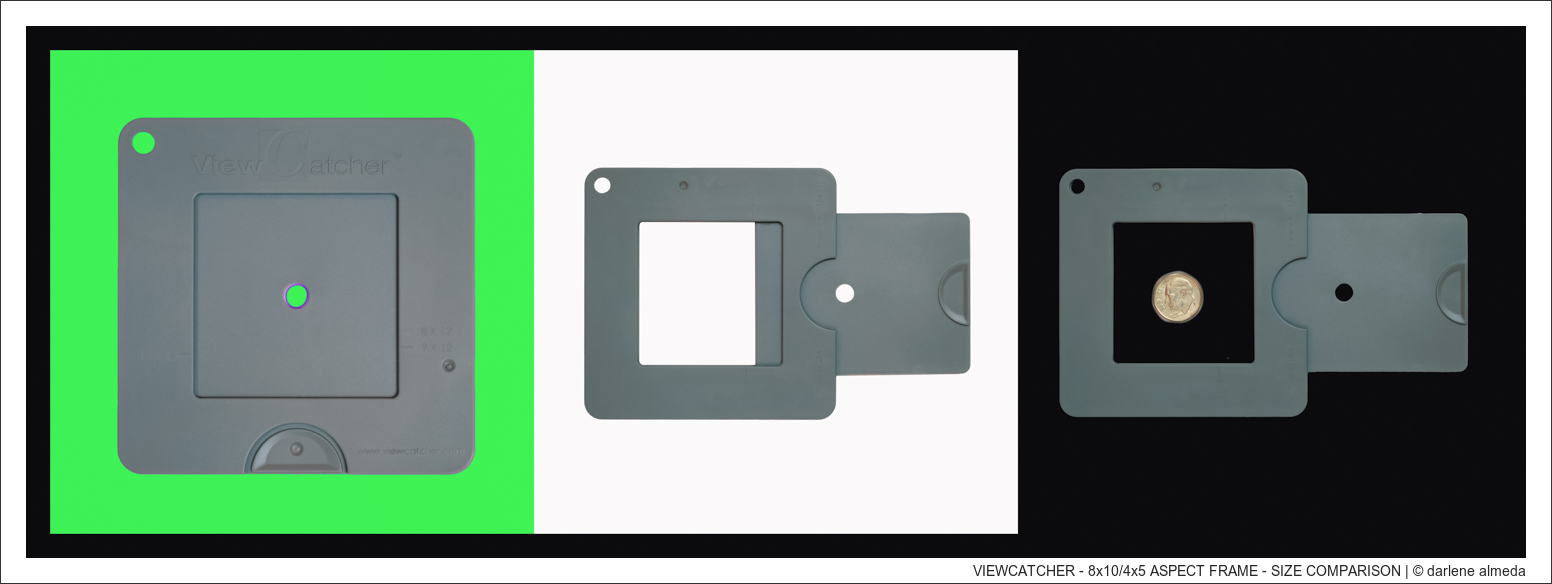
A popular artist’s viewing frame, the ViewCatcher, made by The Color Wheel Company of Philomath, Oregon, is available for purchase online. The ViewCatcher measures 9×9″ and has crop indicators for 8×10 (4×5), 2×2 (5x5cm) square, 8×12, 9×12, 11×14, and 12×16. Because it is specifically designed with fine art painters in mind, the crop indicators are of popular canvas and paper sizes, but you can use the 8×10 for the 4×5 aspect ratio and the 2×2 for square formatting.
VIEWCATCHER – 8×10/4×5 ASPECT FRAME – SIZE COMPARISON
The ViewCatchers features include:
(1) Adjustable Viewing Window: The ViewCatcher has a sliding mechanism that allows you to adjust the size and aspect ratio of the viewing window. This flexibility helps in experimenting with different compositions and framing options.
(2) Neutral Gray Color: Made from a neutral 18% gray plastic, it aids in evaluating the true values and colors of a scene without the influence of surrounding hues.
(3) Lightweight and Portable: Its compact design makes it easy to carry around in a pocket or camera bag, making it ideal for on-the-go and use in the studio.
Customizing The ViewCatcher: Lens Knots
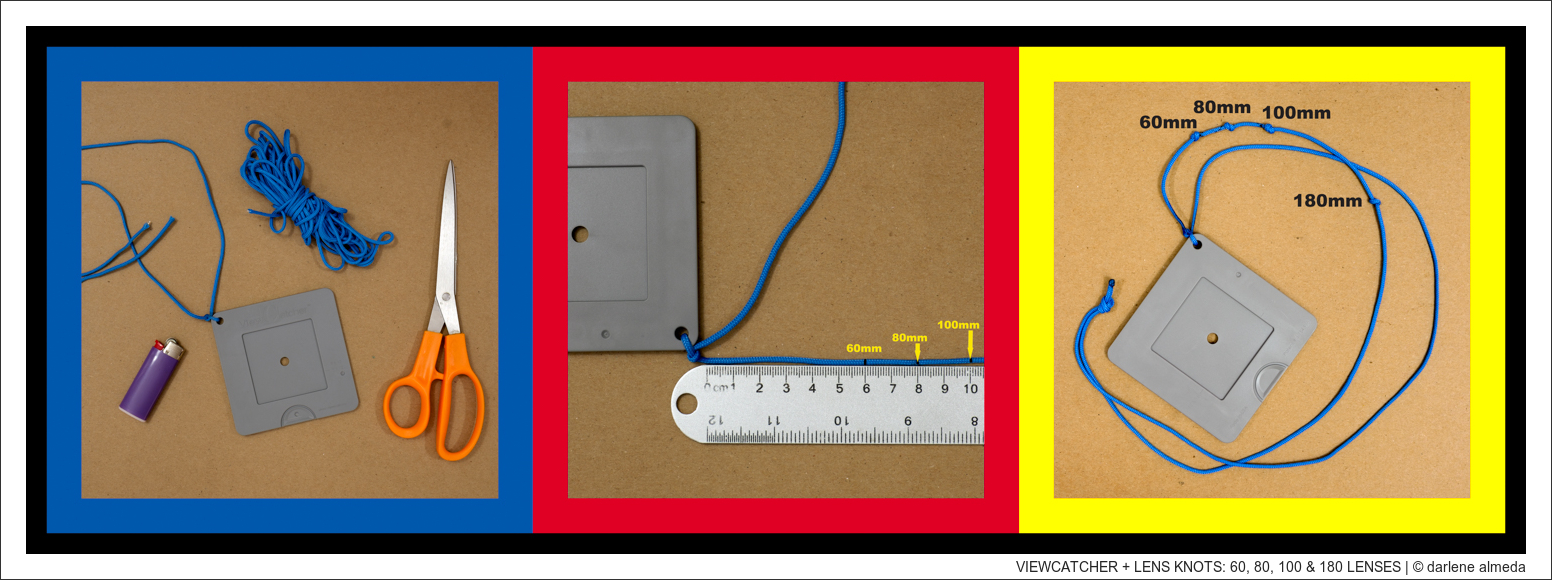
Now I will show you how I customized a ViewCatcher for use with my Hasselblad 501CM film camera kit. When I travel with my Hasselblad, I take three lenses. It will either be the 60, 80, and 180 kit, or depending upon what I plan on shooting, it might be the 60, 100, and 180 kit. My other lenses, the 120 and 135 macro lenses stay in the studio. Wouldn’t it be nice to have a way to tell what lens to use before setting up the camera? There is and in my example, we will use knots placed on the string at distances corresponding to the focal lengths.
VIEWCATCHER + LENS KNOTS: 60, 80, 100 & 180 LENSES
In Image #1, you’ll see the materials I used to create this customized ViewCatcher. I chose a 95lb Paracord for the string, cutting it long enough to comfortably wear the ViewCatcher around my neck. The extra length allows for a loop-tie through the hole in the ViewCatcher, ensuring it stays securely in place when I raise it to eye level for composing.
In Image #2, after threading the paracord through the ViewCatcher to serve as a lanyard, I then added knots along the cord to represent the different focal lengths of my lenses. For example, the knot for a 60mm lens is tied 60mm from the start of the cord, and the knot for an 80mm lens is placed at 80mm. A ruler with centimeter markings is used to ensure accurate measurements.
In Image #3, it has been completely set up for my specific lenses: 60, 80, 100, and 180mm.
Now when I hold the ViewCatcher at a comfortable distance from my eyes, I can frame my subject. Once I have the subject in frame, I will hold the knotted cord to my right cheek and parallel to my eye. Using the knots, I will be able to see what lens best fits the scene. When using lens knots made for wide-angle, it’s a pretty up-close-and-personal experience—like in this case, where the 60mm/6cm distance barely makes it to my cheek. It’s not exactly the wide-angle adventure I was hoping for, but hey, at least my nose gets a front-row seat. 🙂
Next, we will look at two options we have for making a DIY viewing frame, and if we want, we can also add a knotted cord to them.
Slide Mounts As Viewing Frames
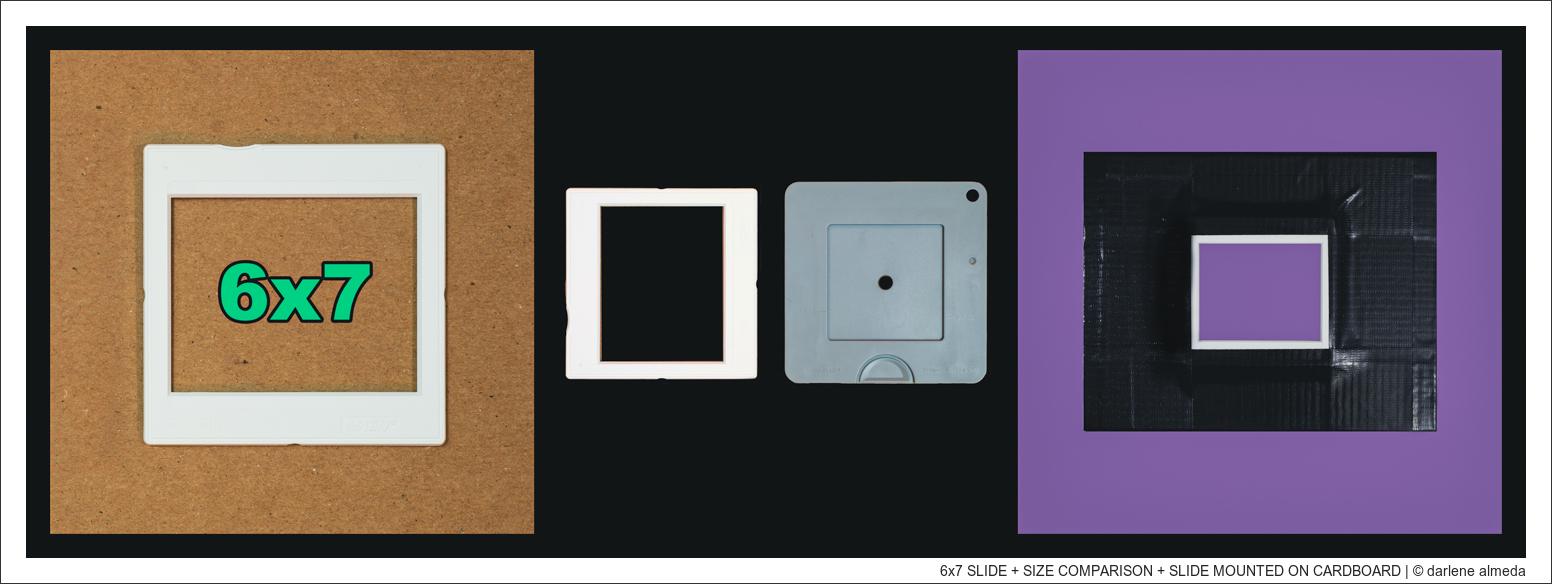
Slide mounts come in various sizes to match different film formats. If you’re shooting with a full-frame (FF) digital sensor, a 35mm slide mount should work well as a framing tool. For larger sensors or film formats, you can find plastic slide mounts in 6×4.5, 6×6, and 6×7 sizes. Personally, I have 6×6 and 6×7 mounts from my days shooting transparency film with Hasselblad and Mamiya 7II cameras. Although I haven’t come across 6×9 slide mounts, they may exist.
If you’re shooting with a 44×33 digital sensor, like I do, the 6×4.5 mount is a close match in aspect ratio—not exact, but it works well for framing.
For film users, it’s best to get a slide mount that matches your film size to use as a visual framing tool. Years ago, when many commercial photographers commonly used 4×5 transparency (slide) film, 8×10″ black mat boards with a 4×5 opening were easy to find. However, that’s not the case today. In the next section, we’ll cover how to make your own, after discussing the advantages of using slide mounts as a viewing frame.
6×7 SLIDE + SIZE COMPARISON + SLIDE MOUNTED ON CARDBOARD
Image #1 features a Matin 6×7 plastic slide mount. In Image #2, you’ll see the 6×7 slide mount next to the ViewCatcher for a handy size comparison. Image #3 shows the same slide mount attached to a piece of cardboard with black Duck tape (it’s a brand name) for easier handling. You can also use the cardboard border to attach a knot cord customized for your lenses if you’d like to add that functionality.
Using slide mounts as viewing frames offers photographers several advantages, such as portability, precise framing, and an accurate preview of aspect ratios. They’re also budget-friendly, especially if you already have a few lying around. Slide mounts help you focus purely on composition, require no batteries or technology, and work across both film and digital formats. In short, they provide a simple yet effective way to assess and improve your compositions without the need for any high-tech gear.
DIY Viewing Frames
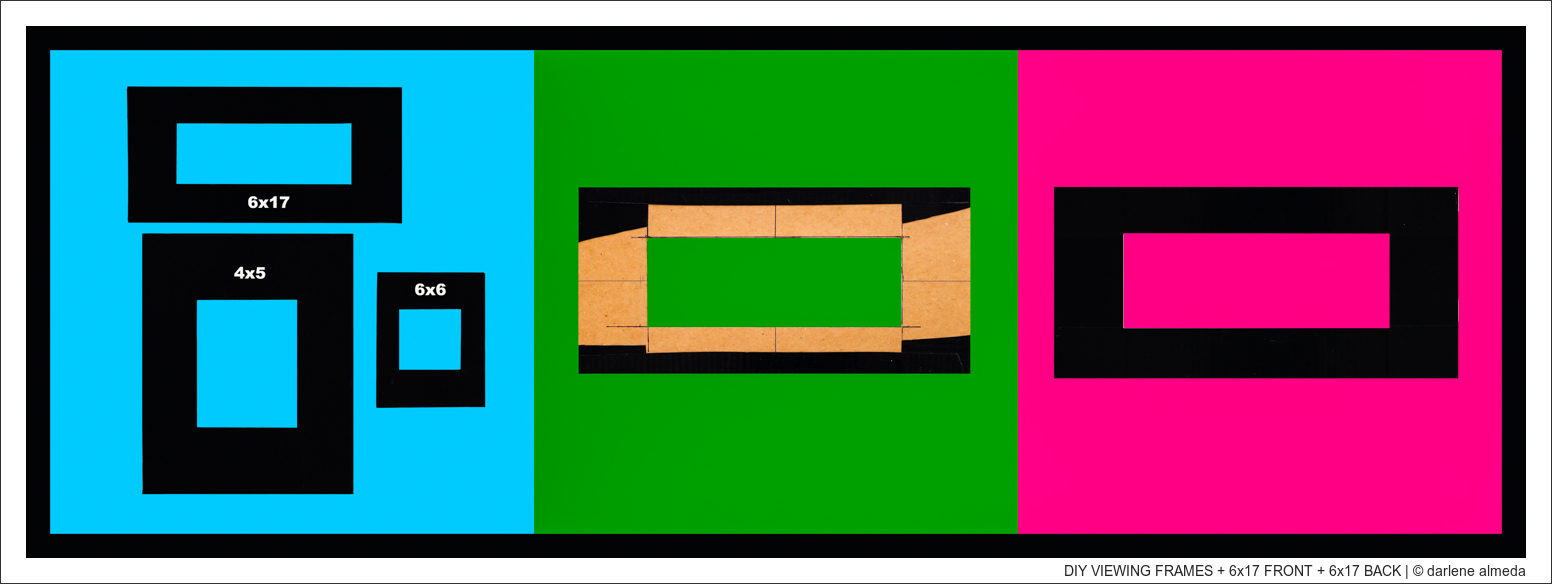
The easiest and most cost-effective way to create customized viewing frames is to make them yourself using cardboard. I’ve experimented with both black foam board and thin cardboard (aka chipboard), but I prefer thin cardboard because it’s easier to cut with a utility knife. Any type of clean cardboard will work if you have the correct size available.
To get started, I use a T-square to mark the dimensions on either foamboard or cardboard. When making the 6x17cm viewing frame, I began by drawing horizontal and vertical lines to mark the center of the board. Then, using the ruler on the T-square, I aligned the 8.5cm mark with the center line and made marks at the ‘0’ and ’17’ cm points on either side. After that, I rotated the board 90 degrees, placed the 3cm mark on the center line, and marked the ‘0’ and ‘6’ cm points. Using the T-square, I drew straight lines connecting the marks, from ‘0’ to ‘6’ cm on one axis, and ‘0’ to ’17’ cm on the other, repeating this process for each side. With the frame lines drawn, I double-checked the measurements to ensure accuracy.
DIY VIEWING FRAMES + 6×17 BACK + 6×17 FRONT (viewing Side)
Once the lines are laid out, I place the board on a cutting mat. Using a metal ruler flipped to the flat side for stability, I carefully cut out the frame with a utility knife. Having a sharp blade is crucial for a clean and precise cut.
If you’re using foam board, once the frame is cut, it’s ready to use. For thin cardboard, like in the 6×17 example, I covered it with black Duck tape to give it a polished finish and a bit more durability. Both types of frames are perfect for adding a knotted cord for lens focal lengths if you’d like to include that option.
Summary
A viewing frame is a simple yet powerful tool for photographers of all skill levels. By crafting your own frame from a cardboard cutout tailored to your format, and adding a knotted cord to match your lenses, you can sharpen your ability to pre-visualize shots, resulting in more intentional and compelling photographs.
If making one isn’t an option, consider purchasing a ViewCatcher, using a slide mount, or visiting a picture framing shop to have a custom window cut for your specific camera format. They often have scrap materials, and the cost should be minimal. You can also find string or twine in the office and shipping supply sections of many retailers. Happy shooting!

