Introduction to Optimal Pinhole Size
Creating sharp and captivating images with a pinhole camera begins with understanding the importance of pinhole size. A pinhole camera, a marvel of simplicity, uses a tiny hole instead of a lens to project images onto film or a sensor. The diameter of this hole, known as the pinhole, is crucial for image clarity. If it is too large, the image blurs; if it is too small, the image dims and loses detail. In this article, we delve into the concept of optimal pinhole size, explore standard calculation methods, and provide practical charts for various focal lengths to help you achieve the best results in your pinhole photography endeavors.
Understanding Optimal Pinhole Size
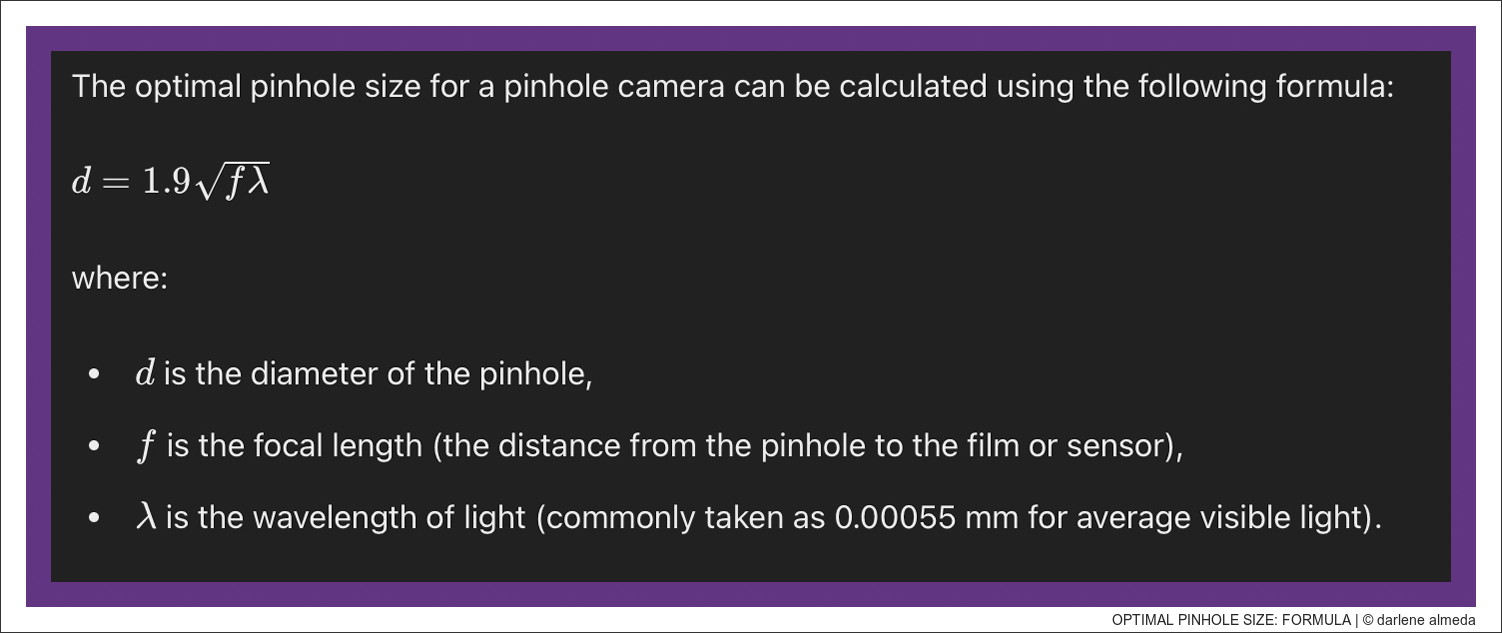
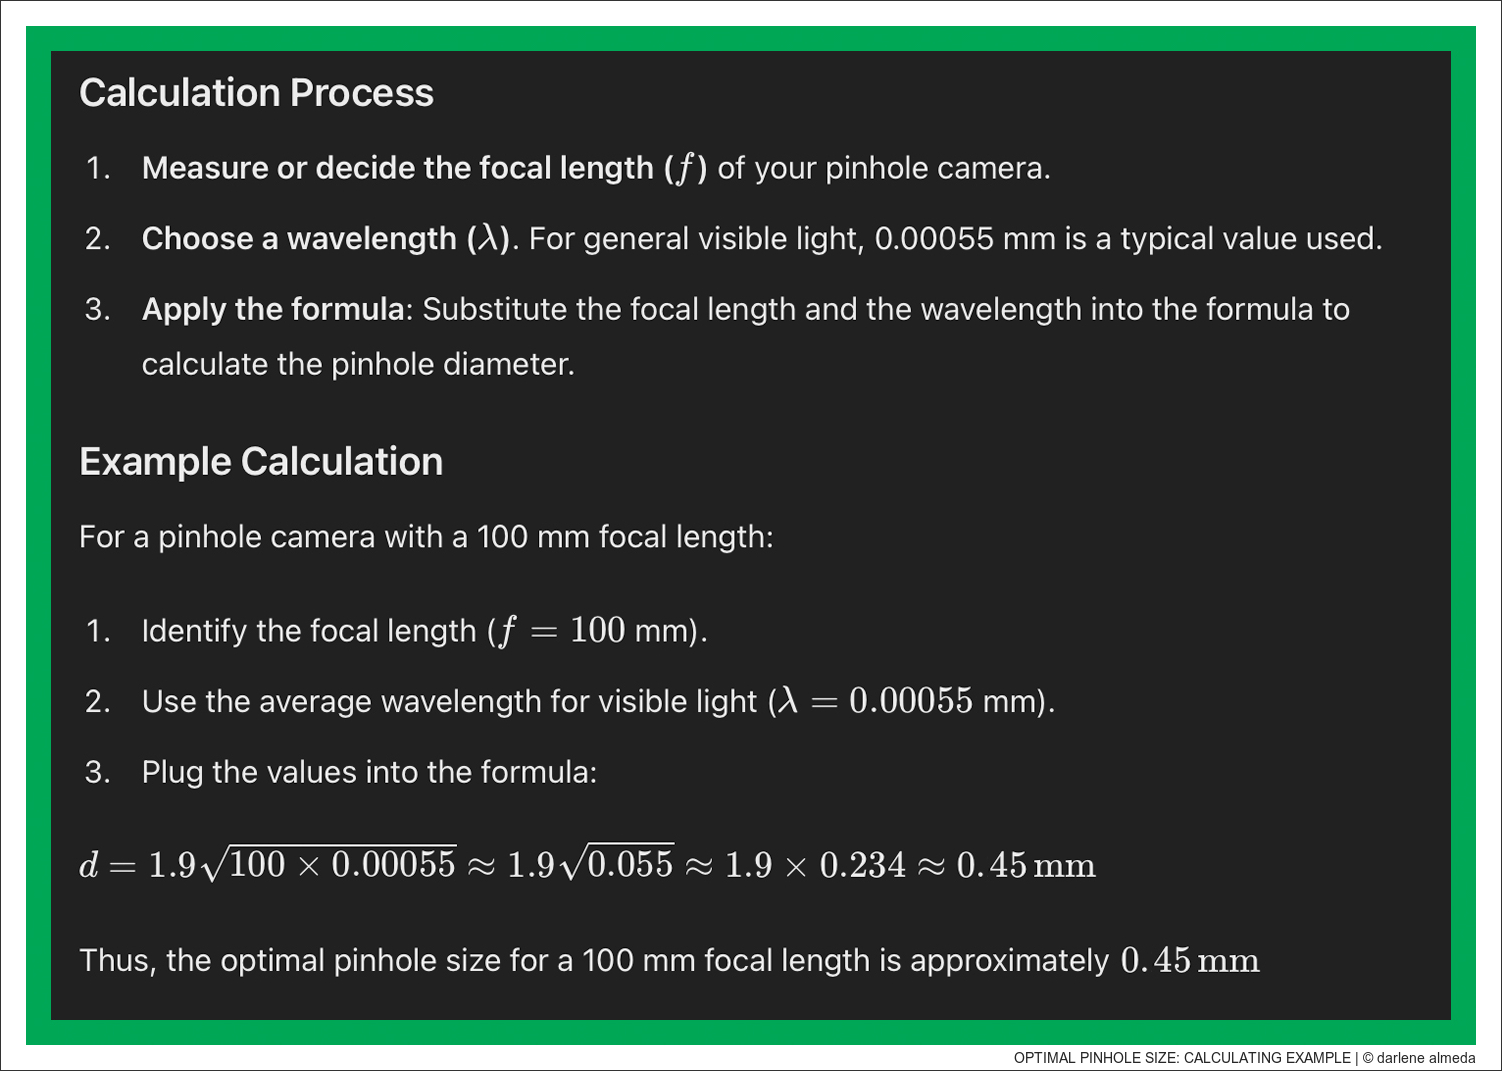
The optimal pinhole size is the diameter that allows for the sharpest possible image. It balances the diffraction of light (which spreads light rays out and blurs the image) with geometric sharpness. This optimal size can be calculated using a straightforward formula derived from physics principles. Below a popular formula, standard sizes calculated, and the calculating process.
Lord Rayleigh’s Optimal Pinhole Size Formula
Below is a well-known formula for Lord Rayleigh’s pinhole diameter calculation. It’s sometimes written in slightly different forms:
Nₒpt = 505kd, where k = (1 + f/s) and s = distance of subject from camera.
This version yields nearly the same (though not exact) optimal pinhole size. Remember, with pinholes, we’re dealing with very small dimensions—fractions of a millimeter—so practical sizes are usually rounded to whole or half values like “f/4” or “f/4.5.”
If your pinhole is 0.5 mm (0.02 inches) in diameter and you are photographing distant subjects such as mountains, the ideal focal length is about 126 mm (5 inches) (N = f/d). With this setup, everything will appear sharp from roughly 2.5 m (8.2 feet) (about 20× the focal length) to infinity. The same camera is not suited to macro photography, since its optical characteristics are intended for distance rather than close-up work.
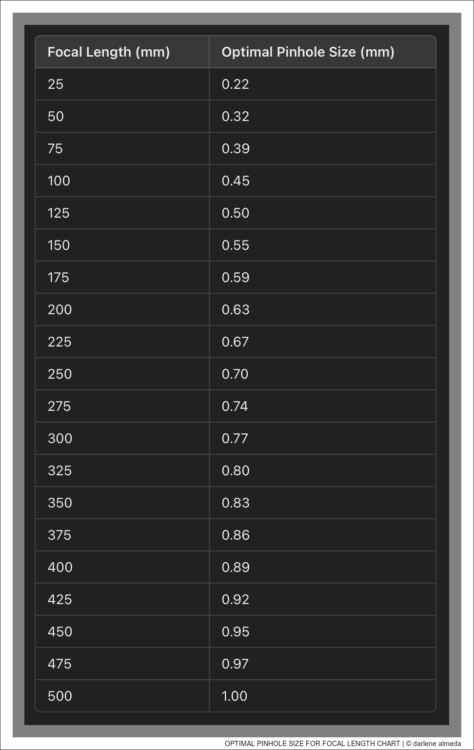
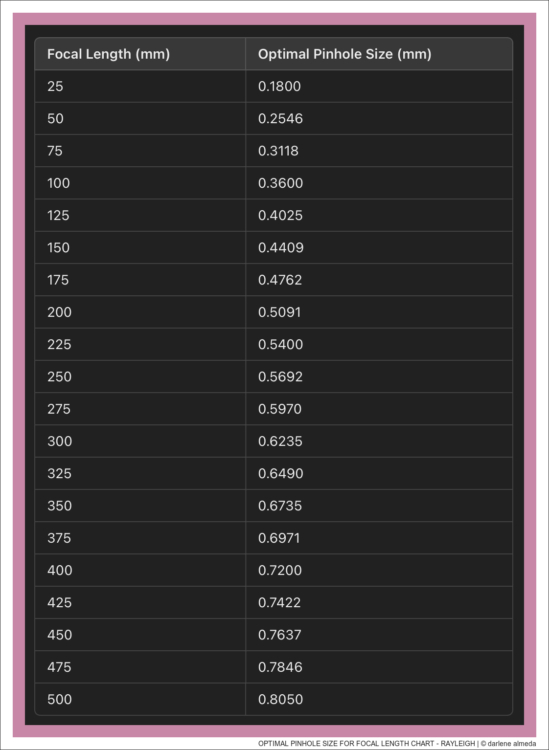
Optimal Pinhole Size For Focal Length Chart #2
Below is a chart for focal lengths based on Lord Rayleigh’s formula, with a 25mm differential for focal lengths from 25mm to 500mm.
Who Was Lord Rayleigh?
Lord Rayleigh, born John William Strutt on November 12, 1842, and passing on June 30, 1919, was an influential English physicist known for his extensive contributions to the field of physics. He was particularly recognized for his work on the scattering of light, which explains why the sky is blue, now known as Rayleigh scattering. This discovery has had significant implications in the fields of optics and atmospheric science.
Rayleigh also made substantial contributions to acoustics, fluid dynamics, and the theory of sound. He was awarded the Nobel Prize in Physics in 1904 for his investigations of the densities of the most important gases and for his discovery of argon, an inert gas in the Earth’s atmosphere.
Additionally, Rayleigh’s work on wave theory, elasticity, and electromagnetism has been foundational in the development of modern physics. His published work, “The Theory of Sound,” remains a seminal reference in the field. As a highly regarded figure in science, his contributions have had a lasting impact on various scientific disciplines.
Closing Comments
In conclusion, it’s essential to recognize that slight variations in pinhole size calculations can occur when different formulas are used, and that’s perfectly okay. These discrepancies are generally minor and fall within an acceptable range, ensuring that the pinhole camera still produces sharp images. Considering how incredibly small these pinholes are—often measured in fractions of a millimeter—such minute differences in size are negligible in the grand scheme of photography.
When reading the charts, you’ll need to round off to the nearest whole number or 0.5 mm for practical purposes. This simplification makes the construction process easier without significantly impacting image quality.
Whether using Rayleigh’s formula or another method, the results are close enough to each other not to make a substantial difference, allowing for beautiful and unique pinhole photographs.
If you’re passionate about pinhole photography, you’ll likely experiment with various pinholes from different manufacturers. In my experience, even pinholes advertised as the same size can perform differently depending on the maker. Once you find a pinhole that perfectly suits your needs, treat it with care and consider it “special.” My favorite pinhole cameras are in the 4×5 format.

