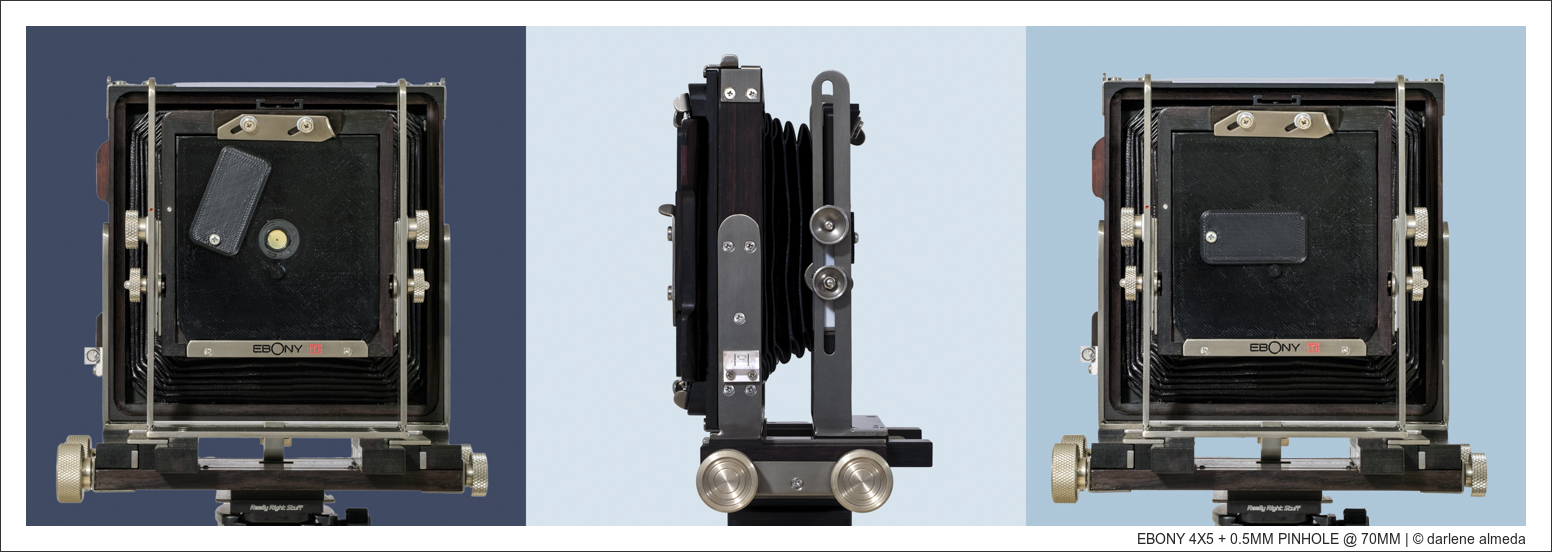
EBONY 4×5 + 0.5MM PINHOLE + 70MM BELLOWS DRAW
In this article, I share my approach to crafting images with a 4×5 field camera with interchangeable pinholes attached to a dedicated lens board. I’ll explain my rationale for choosing this method over a basic 4×5 box pinhole camera, outlining its pros and cons. Additionally, we’ll explore the offerings from two pinhole makers who provide different design approaches to interchangeable pinholes. I’ll also detail my process for metering the correct exposure, complete with a downloadable 4×5 Pinhole F/Stop & Exposure Factor Chart. Finally, I’ll discuss my preferred film choice and the reasons behind it. Let’s get started.
Reasons For Choosing A 4×5 Camera For Pinhole Photography
I’m drawn to the visual effects of pinhole long-exposure photography, and I plan to incorporate some of these unique visual effects into my compositions.
With a background in commercial art as a comp artist, I’ve honed my skills by designing compositions for various ad agencies and businesses over the years. If you’re passionate about design and appreciate the unique visual effects of what pinhole light can offer, consider pinhole photography as a design tool, but it is not for every image.
Now, let’s look deeper into my process of choosing a pinhole to create an image.
Imagine I sketched out an idea for a pinhole image on paper. While the composition is well-defined, the next step is to create the design, and I do this by building the set for the image.
Next, I will need to translate it onto the 4×5 ground glass to record it on film. But we cannot see anything on the ground glass as the pinhole does not project the view of what is in front of the camera; it is a teenie, tiny pinhole, for goodness sake! So, how do we get there from here?
The solution uses a 4×5 camera that takes interchangeable lenses, not just pinholes. We will need to determine the appropriate lens for photographing the composition, and then, once we have the camera setup, switch the lens out for the pinhole. It is that easy!
Up next are two approaches for designing interchangeable pinholes for 4×5 cameras.
Pinholes Made For 4×5 Cameras
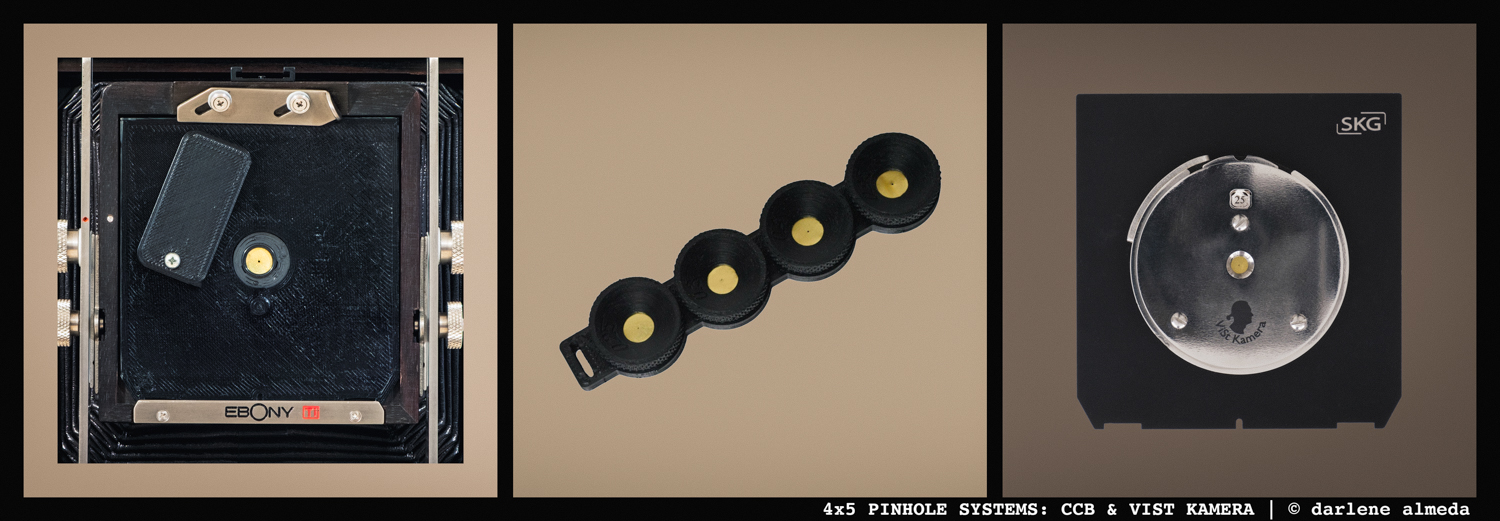
CCB LINHOF BOARD + CCB PINHOLES + VIST KAMERA NINE PINHOLES & SHUTTER
Image #1 above shows the 3D-printed pinhole adapter board from the Custom Camera Building (CCB) company. It fits cameras requiring the universal Linhof size and is designed to hold the interchangeable pinhole inserts shown in image #2 above for large-format cameras. My set includes pinholes of 0.4mm, 0.5mm, 0.6mm, 0.7mm, and 0.8mm.
The newest addition to my pinhole toolbox is a custom-made pinhole shutter with nine pinholes, shown in image #3 above. Vist Kamera made this in Vilnius, Lithuania. My set includes pinholes of 0.25mm, 0.3mm, 0.35mm, 0.4mm, 0.45mm, 0.5mm, 0.55mm, 0.6mm, and 0.7mm. I purchased it on eBay, and it arrived in perfect condition from the seller, virgisst.
The Vist Kamera unit is unique. It has a built-in shutter that opens and closes smoothly with the included locking shutter release cord. It features a rotatable disc that lets you select your desired pinhole size and rotates smoothly between pinholes. I sent the unit to SK Grimes for mounting onto one of their custom-made Linhof-type boards.
Next, we will look at the image titled “Timeless Treasures,” which I created for the 2024 Worldwide Pinhole Day. It was captured on HP5+ film and a CCB 0.7mm pinhole.
Timeless Treasures: How It Was Made
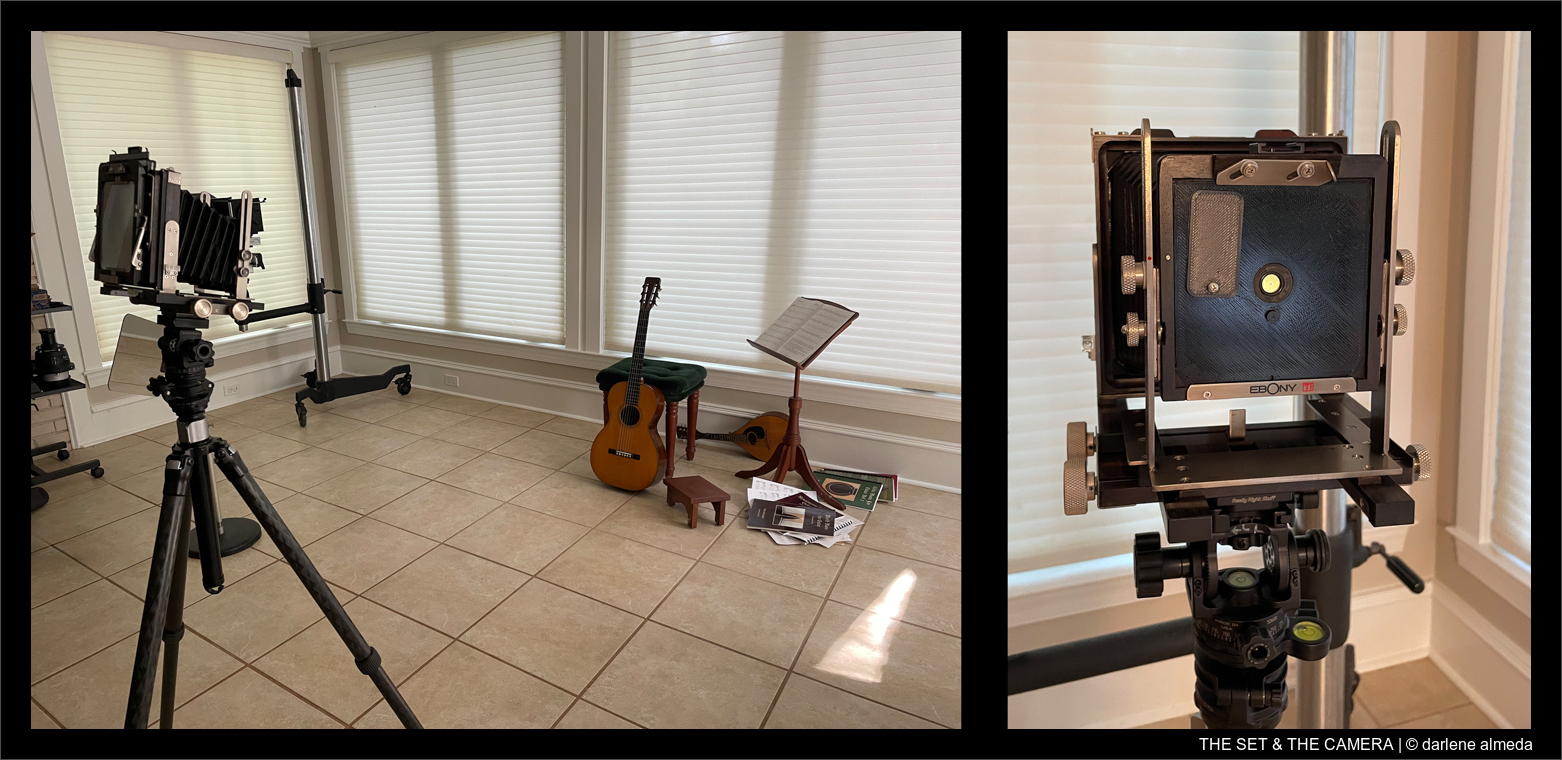
THE SET & THE CAMERA
On Set:
- Location: Studio with diffused window light & direct light from open door.
- Props: personal furniture, sheet music, and instruments.
- Composition guided through vision in head and paper sketch.
- After the scene was created, a lighting assessment was made.
- A mirror on a stand was added to direct light toward the guitar’s face.
Camera & Equipment:
- An Ebony 4×5 field camera on an RRS tripod, Acratech #1117 base & #1160 head.
- Nikon Nikkor 150/5.6 W lens for composing only.
- CCB 0.5mm and 0.7mm pinholes were selected along with their lens board.
- Sekonic 558R light meter for light calculations.
- Timer in iPhone was used for exposure timing.
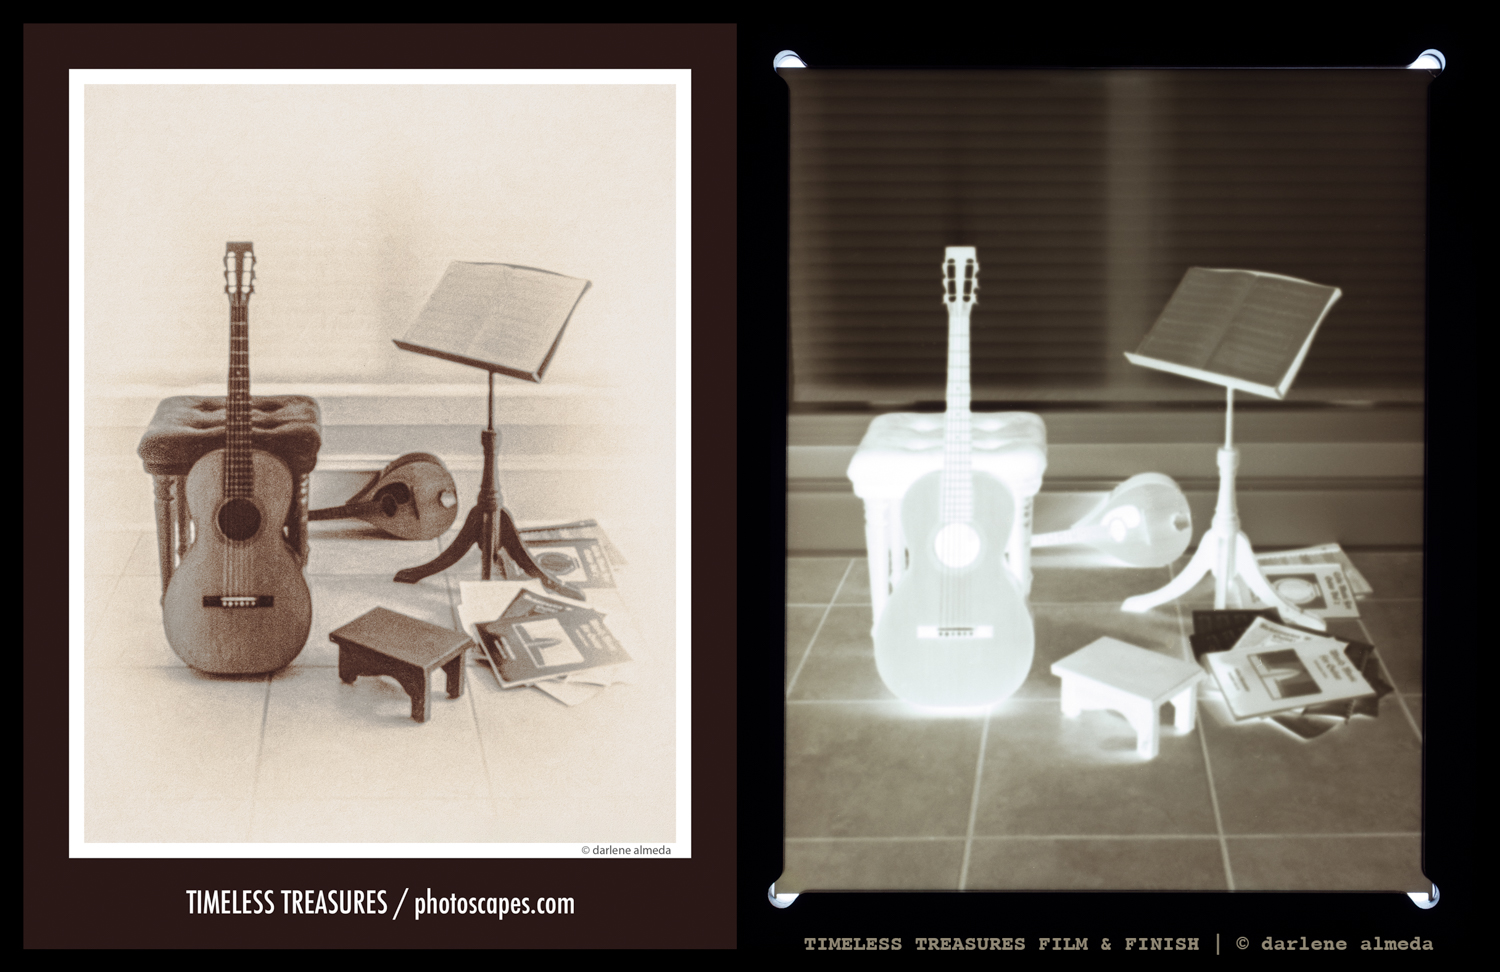
TIMELESS TREASURES: FINISHED IMAGE + 4X5 NEGATIVE
The Shoot:
- Ilford HP5+ 4×5 film (exp 4/2020, freezer stored) rated at ISO 160.
- Four HP5+ sheets loaded into Toyo film holders.
- Camera in place with lens, light metering around the set before each exposure.
- #1 Pinhole 0.5mm replaces lens, first exposure @ 12 minutes
- #2 Pinhole 0.5mm, second exposure @ 24 minutes
- #3 Pinhole 0.7mm replaces 0.5mm, third exposure @ 24 minutes.
- #4 Pinhole 0.7mm, fourth exposure @ 6 minutes (sun popped out from clouds).
After Shoot:
- The film developed semi-stand with 510 Pyro, thus the staining color.
- #3 digitized with a Fujifilm X-Pro3 and Zeiss 50 macro lens on a copy stand.
- Image file uploaded into Lightroom, converted to positive via Negative Lab Pro.
- File processed for best exposure, contrast, and perspective tweaking.
- A custom LUT was applied, and the image’s overall look was fine-tuned to completion.
The Ins & Outs Of The Exposure
Achieving the perfect exposure in pinhole photography is more complex than with a traditional lens setup. Factors such as lighting conditions and film reciprocity are crucial in determining exposure times.
Before shooting with a pinhole setup, it’s essential to grasp key numbers that will influence your film selection and exposure settings. These numbers include the diameter of your pinhole(s) and the focal length of your camera or, as discussed in this article, the bellows extension. Understanding these figures allows you to calculate the Focal Ratio, the first factor in determining correct exposure times.
This short article explains how to calculate the Focal Ratio: Mastering Pinhole Photography: A Simple Guide to Achieving Perfect Exposure Without Gadgets.
The next steps involve applying an exposure factor for each focal ratio and, if needed, adjusting for film reciprocity.
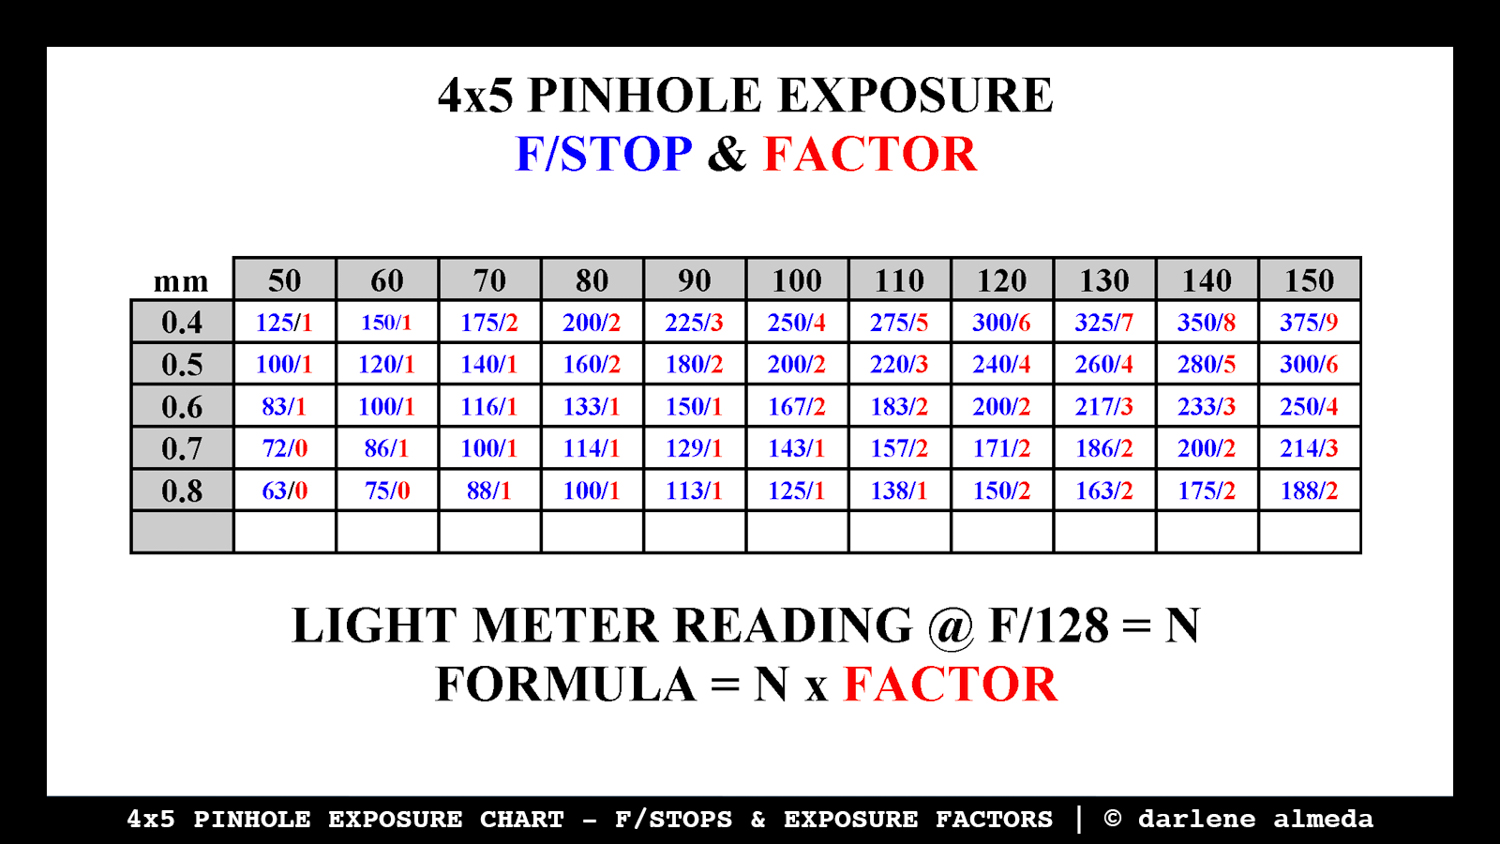
Now, let’s examine an exposure chart I devised specifically for my 4×5 cameras and pinholes. This comprehensive chart incorporates a range of pinhole sizes and bellows extension lengths, catering to the requirements of most 4×5 camera enthusiasts eager to try the world of pinhole photography with their equipment.
4×5 Pinhole Exposure: F/stop & Factor Chart
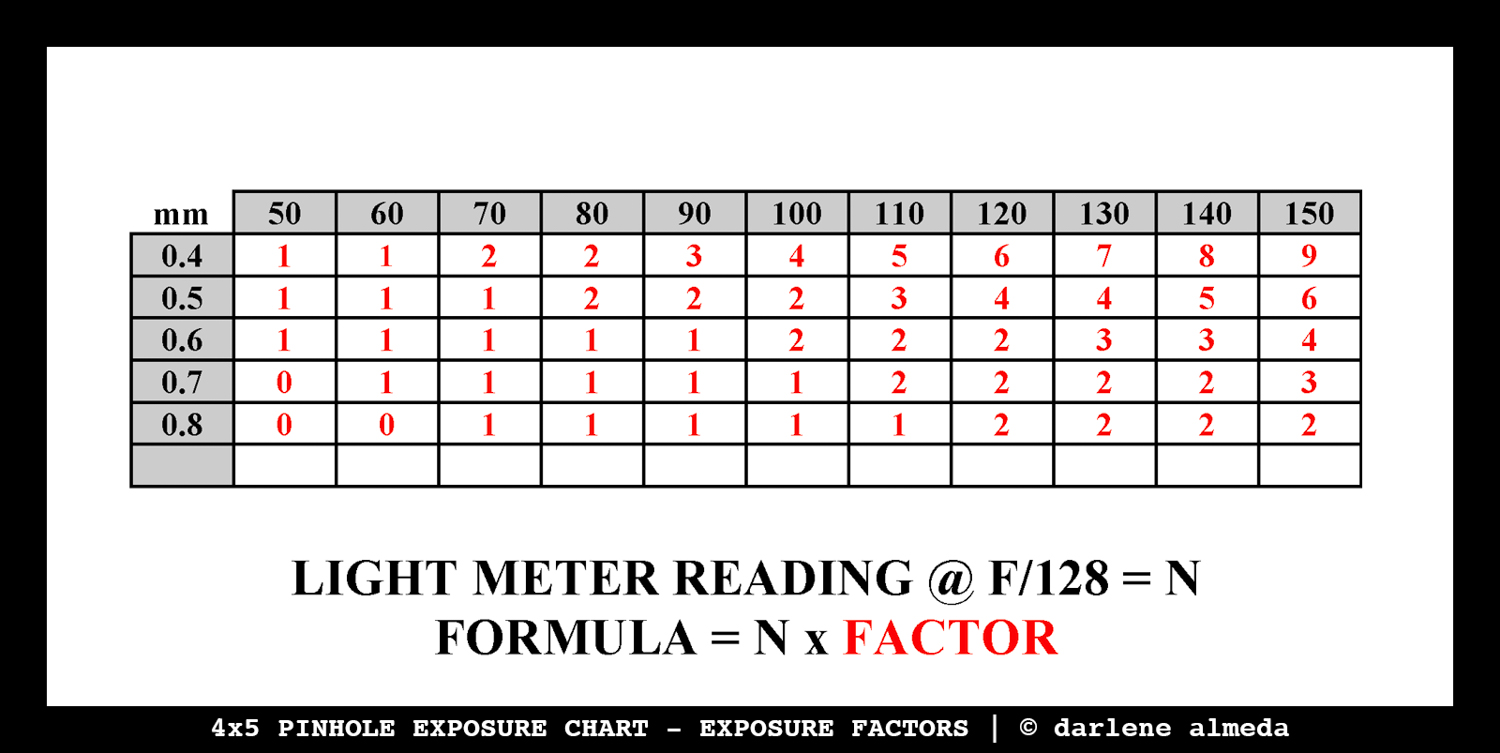
As we look at the chart, I emphasize that you don’t need to perform any calculations since they’ve already been completed. All you need to do is identify your pinhole size (e.g., 0.4, 0.5, etc.) and understand your bellows extension (BE), which is straightforward if you compose your image using a lens, as the lens measurement in millimeters corresponds to the BE on the chart. You can find the exposure factor from there for the correct exposure. If the film you’re using requires a reciprocity factor, this must be factored in, and I will show you how I factored it in with the example below.
For fun, quickly look at the charts and see if you notice any patterns. Then, we will walk through the steps I took to get the proper exposure for “Timeless Treasures”. All four films I shot during that session received correct exposure.
How Exposure was Calculated for “Timeless Treasures”
FILM: HP5+ rated at ISO 160 (RF = 1.3 stops)
PINHOLE: 0.7mm
BELLOWS EXTENSION: 150mm
Step #1: Reciprocity Factor
I set the light meter ISO to 160 because HP5+ has a reciprocity factor (RF) of 1.31.
I would rather set my meter to compensate for the RF than have to remember it during a shoot.
NOTE: All light meter readings for these charts are for F/128 and will not work for other F/stops.
Step #2: Meter Reading & Use The Chart
a) Light meter reading was determined to be: ( 8 minutes @ F/128 ) = N
b) Look at the Chart, find 0.7 and follow across to 150 to get the exposure factor = 3
Step #3: Proper Exposure: 8 minutes x 3 = 24 minutes
Pros & Cons
Here are my thoughts on the Pros and Cons of using a 4×5 field/view camera over an all-in-one pinhole camera:
Pros:
We can choose or design the composition when we can see it.
It is the least expensive pinhole camera if you already have a 4×5 kit.
Various filmbacks & films can be used (Instax, Polaroid, 120, etc.).
Offers a broader range of creative possibilities compared to fixed pinhole cameras.
May eliminate special filter sizes or attachments depending upon your filter system.
Set it up for a 4×5 shoot, then swap the lens with a pinhole – easy peasy.
Cons:
It may not be as portable as a basic pinhole camera.
It is not as lightweight as a basic pinhole camera.
It may be less convenient to use as a basic pinhole camera.
Closing Comments
I find 4×5 pinhole photography pleasurable and straightforward, especially after refining my exposure technique. This has resulted in a mix of happy surprises and assured outcomes.
I keep a printed copy of the chart, folded in half, with my 4×5 pinhole kit. Typically, I refer to the chart’s backside, which displays the exposure factors only.
For my 4×5 pinhole photography, I rely on Ilford HP5+ film, which performs admirably. I only need to make a minor adjustment, reducing its ISO from 400 to 160 due to its consistent reciprocity factor of 1.31 for prolonged exposures, as stated by Ilford.
My workflow is:
(1) compose,
(2) set the light meter to ISO 160,
(3) take readings at f/128,
(4) multiply meter reading by the exposure factor,
(5) open the pinhole and let the light drawing begin!

